Overview
The objective of the User Guide is to provide a step-by-step
description of the new system flow with various screen prints.
Please refer to the Georgia IRP User Guide, Volume 1, Home
Level, Section 1.1
Please refer to the GAIRP User Guide, Volume 1, Home
Level, Section 1.1.1.1
IRP processing includes the following Supplements:
|
Supplement
Abbreviation
|
Supplement
Description
|
Vehicle
Service Abbreviation
|
Vehicle
Description Abbreviation
|
|
AAC
|
New IRP Account
New Restricted Account
|
AAC
|
New Customer Account
|
|
AFF
|
IRP Fleet to Fleet Transfer
|
AFF
|
Fleet to Fleet – From
|
|
XFF
|
IRP Fleet to Fleet Transfer
|
AFT
|
Fleet to Fleet – To
|
|
AFL
|
New IRP Fleet
New Restricted Fleet
|
AFL
|
Add Fleet
|
|
AJU
|
IRP Add Jurisdiction
|
AJU
|
Add Jurisdiction
|
|
AVE
|
Add Vehicle
|
AVE
|
Add Vehicle
|
|
AXV
|
Transfer Plate
|
AXF
|
Add with Transfer – From Vehicle
|
|
AXV
|
Transfer Plate
|
AXT
|
Add with Transfer – To Vehicle
|
|
CFF
|
IRP Change Carrier Type
|
CFF
|
Change Carrier Type
|
|
CFN
|
Change Name
|
CFN
|
Change Fleet Name
|
|
CMB
|
Combined
|
AVE
|
Combined – Add Vehicle
|
|
CMB
|
Combined
|
CVF
|
Combined – Change/
Amend Vehicle Fee
|
|
CVF
|
Amend Vehicle with Fee
|
CVF
|
Change/ Amend Vehicle with Fee
|
|
CVN
|
Amend Vehicle No Fee
|
CVN
|
Change/ Amend Vehicle No fee
|
|
CWT
|
IRP Change Weight Group Weight
|
CWT
|
Change Weight
|
|
DEV
|
Delete Vehicle
|
DEV
|
Delete Vehicle
|
|
EOD
|
IRP Error Correction – DO Vehicle/Distance
|
AVE
|
Error Correction – Add Vehicle / Do Distance
|
|
EOU
|
IRP Error Correction – UNDO Vehicle
|
|
|
|
|
|
|
|
|
RCC
|
Replace Cab Card
|
RCC
|
Replace Cab Card
|
|
REI
|
IRP Reinstatement
|
|
Reinstatement
|
|
RTG
|
Replace Plate
|
RTG
|
Replace Plate
|
|
RWC
|
Renewal
|
CVF
|
Renewal – Amend Vehicle
|
|
RWC
|
Renewal
|
DEV
|
Renewal – Delete Vehicle
|
|
VCV
|
VIN Correction
|
VCV
|
VIN Correction
|
|
AUD
|
IRP Audit
|
|
|
The New Account process starts with creating a Common Customer
(at the Home Level before creating a new IRP/Restricted account (Section
1.2.1.1 Create Customer). The Customer Number and IRP Account Number are one
and the same. Account and Customer is common for any IRP or Restricted fleet
creation.
A New Account is required when creating a new IRP or Restricted
fleet for the first time.
At the Home Level Main Menu, click on the APPLICATIONS tab
and select IRP from the list of applications displayed by the drop down menu.
The IRP Main Menu Screen displays next.
·
Click the PROCESS Menu item and select ACCOUNT and then select NEW
IRP ACCOUNT. The Customer Search screen will be displayed next
·
Enter the account (common customer) number in the Account No. field
·
Click the PROCEED button on the command line
o If the Common Customer
record does not exist based on the information entered, the system will display
a message that no customer exists for this Account No. The user must go to the Customer
tab on the Home Level Main Menu to create the Common Customer.
o If the carrier
already has an existing IRP account, the user must create a new fleet or
perform the desired transactions (supplements) in an existing fleet. A message
will display to notify the user that an account already exists.
o If a carrier
already exists as a Common Customer but does not have an IRP account, the
Account Detail screen is displayed
The next step is creating the IRP account profile.
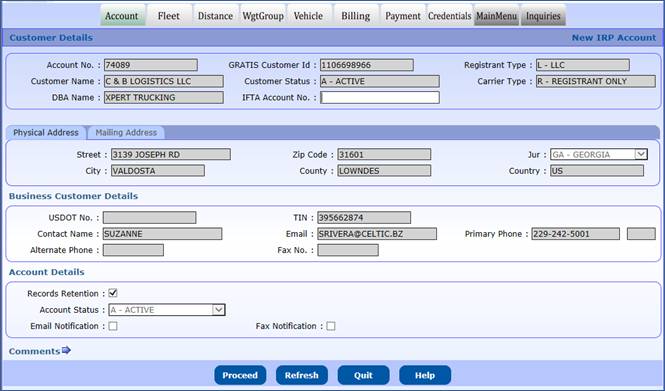
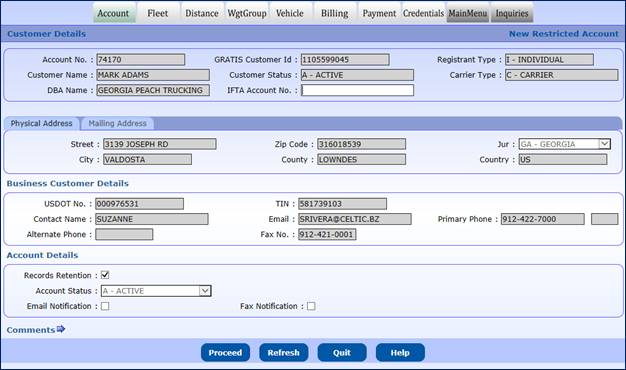
There are several sections on the New Account Screen.
The Customer Details and Business Customer Details fields
populate from the information in the Common Customer and the user cannot change
this information.
·
Customer Details
o Account No.
o GRATIS Customer
Id
o Registrant Type
o Customer Name
o Customer Status
o Carrier Type
o DBA Name
·
Business Customer Details
o USDOT No.
o TIN
o Contact Name
o Email
o Primary Phone
o Alternate Phone
o Fax No.
o Physical
Address
o Mailing Address
·
IRP Account Details
o Record Retention
– is defaulted to checked, field is used to indicate record retention
information has been provided
o Account Status
– is defaulted to ACTIVE and the user cannot change it
o Email Indicator
and Fax Indicator – The user can check one or both of these boxes and the Carrier
will receive IRP renewal notices through email and/or fax instead of regular
mail. NOTE: If the email/fax information is missing, the user has to add the
information in these fields by returning to the Home Level and updating the customer
information
o Comments – The
user can add free-form comments in this area. After adding content to the
Comments box, the user must click on the ADD/UPDATE button to save the comment
in the Account record
NOTE:
The user must select the “Delete Allowed” check box before adding comments in
order to delete comments in future.
Click the PROCEED button to execute the application’s edits
and display the validation screen.
The verification screen displays next, showing the user a
consolidated view of the Account information. If the user determines some of
the information is incorrect, the user can click the BACK button on the command
line and the system will display the Account screen again. The user can make
the required changes and select PROCEED.
Click the PROCEED button on the command line and the IRP
account information will be saved to the database. The IRP Fleet Detail screen
will then display.
If a new account transaction has been started for a
Restricted Account, the user will navigate to the Restricted Fleet screen.
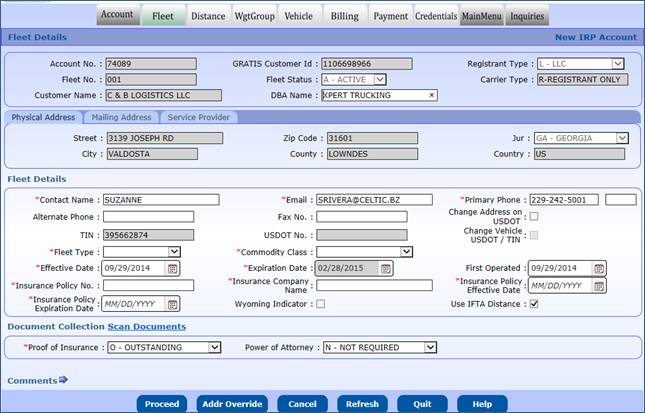
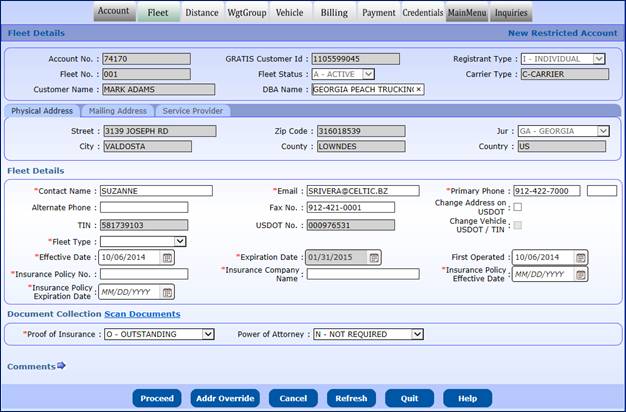
After creating the IRP account profile the Fleet creation
process occurs. Several of the Fleet information fields will default to the
values from the Customer Account information.
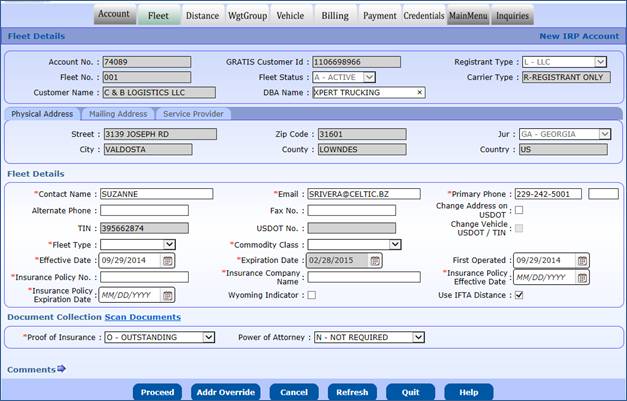
Some of the fields which default from the Customer
Account are protected including:
·
Account No.
·
GRATIS Customer Id
·
Customer Name
·
TIN/USDOT/Carrier Type
·
Physical Address
The following fields have a default value or the user will
key the information:
·
Mailing Address – If different from the Physical address
·
Service Provider – If the carrier has a Service Provider for the
fleet the information for that provider must be entered. The designated Service
Provider will be able to perform certain supplements for the carrier via
external web transactions
o Service
Provider - Select the Service Provider from the drop down list
o Power of
Attorney – Click this box if the user has provided a Power of Attorney
agreement. If the User selects a Service Provider, this is mandatory.
o Phone, Address,
Email, Fax – These fields will be defaulted from the Service Provider Customer Record
·
Contact Name – This field defaults from the IRP
Account contact information
·
Email – The email will default from the IRP Account and can be
changed but is required to navigate to the next screen
·
Primary Phone No. and extension – Will default from the IRP
Account information and can be changed
·
Alternate Phone – Optional field, enter if known
·
Fax No. – Will default from the IRP Account information and can
be changed
·
Change Address on USDOT – Stores the value of a changed address
on USDOT – only valid for the supplement where it is added
·
Fleet Type – There are two types of fleets available, Private and
For Hire; both will be allowed for the same account
·
Commodity Class - After selecting a Fleet Type, the user will
select a Commodity class from the drop down list provided
o The following
is the list of acceptable Commodity Classes for each Fleet Type:
|
Fleet Type
|
Commodity Class
|
|
PVT
|
Private
|
ALL
|
|
FOR
|
For Hire
|
ALL , Household Goods, Bus
|
|
RES
|
Restricted
|
No commodity class
|
·
Fleet Effective Date and Expiration Date
o The Effective
Date defaults to the current date
o Georgia has
annual registration for IRP and the Expiration date is based on the first
initial of the business name or the first initial of the last name of an
individual. The expiration date will be automatically generated and protected,
regardless of the Fleet Effective Date
·
First Operated Date – Will be defaulted to current date for all
new fleets - Date when fleet was first added in Georgia used for informational
purposes only
·
Wyoming Indicator – Click on this field if the Intrastate Authority
for Wyoming applies for a carrier. For Georgia carriers, since it does not
apply, the indicator is defaulted to unchecked.
·
Use IFTA Distance – Will default to checked which indicates the
IFTA distance will be used as the basis for the distance on the Distance screen
·
Insurance Verification – The insurance information fields must be
entered and valid to continue with the transaction
o
Insurance Policy No – This field allows
alpha and numeric characters but does not allow special characters (e.g. - /
&)
o
Insurance Company Name – Enter the name of the insurance company
o
Insurance Policy Effective Date – The date format is MM/DD/YYYY
and must be a valid date
o
Insurance Policy Expiration Date – This date format is MM/DD/YYYY
and must be a valid date greater than the Insurance Policy Effective date
·
Document Collection – Certain documents are required for a New
Fleet creation. If the system can check for the document automatically via a
system interface, it will mark the document as being “System Collected” (S). Options
for the documents include: C- Collected, N- Not Required, O- Outstanding, and
S- System Collected.
o Proof of Insurance
– Select the appropriate status from the dropdown list as listed above
o Power of
Attorney – Select the appropriate status from the dropdown list as listed above
·
Comments – Use the arrow to open or collapse the comment box. Enter
any appropriate comment(s) and select the Add/Update button to apply the
comment(s) to the account. These comments are displayed on the Fleet Inquiry
Screen to internal users only.
o Access Level – Select the appropriate access level for the comment
from the dropdown list:
§
Internal
§
Public
§
Restricted
o Delete Allowed
– Click this box if you want to be able to delete this comment
·
Addr Override – used if the address checking returns an error;
however, the address is correct
After the user enters the Fleet information, select PROCEED
to execute the edits and display the validation screen. The user should verify
the fleet information and select the PROCEED button from the command line at
the bottom of the screen to save the Fleet information. The “Distance Details”
screen will be displayed after the PROCEED button is selected on the Fleet
validation screen.
The navigation tabs at the top of the screen will indicate
that the user is now at the “Distance” step in the New Fleet supplement.
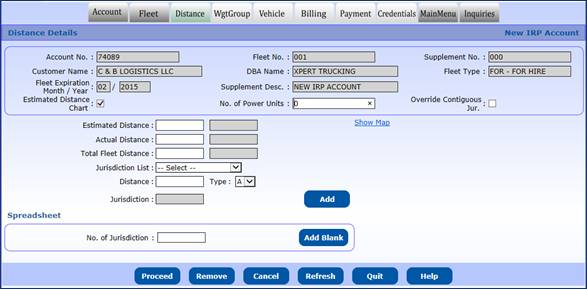
The user will be able to add jurisdictions using multiple
methods:
1.
Selecting the jurisdiction of travel by selecting the jurisdiction on
the map (use Show Map link), entering the distance and the type (Actual,
Estimated, No Travel Intended) and clicking the ADD button, or
2.
Selecting the jurisdiction of travel by selecting the jurisdiction from
the dropdown, entering the distance and type of distance, and clicking the ADD
button.
3.
In addition to individual jurisdictions in the drop down, you can select
Surrounding Jurisdictions or All Jurisdictions, select the type of distance from
the dropdown and then click the ADD button. This will populate the spreadsheet
with the appropriate jurisdictions based on the selection.
After the user enters the jurisdictions, the distance type
and distance are required. The month and year will be defaulted to the
supplement effective month and year. The user can make adjustments if
necessary. Adjustments would only be necessary if the carrier was operating in
another jurisdiction and estimated jurisdictions should be calculated using E2
logic.
After reviewing the applicant’s Distance Schedule, the
user may data enter the distance for each jurisdiction, or elect to use the
estimated distance table.
To use the estimated distance option the user must:
·
Check the estimated distance chart check box
·
Enter the No. of Vehicles (The default is 0)
·
Set the jurisdiction distance type to “E” for estimated for every
jurisdiction with estimated miles
·
When PROCEED is selected the distance for the estimated
jurisdictions will populate from the estimated distance table
The system will calculate the total distances and compare
them to the “user entered” totals for each of these:
·
Actual
·
Estimated
·
Total Distance
If the totals do not match the distances entered by the
user, the system will display an error message.
In some cases, the registrant will provide actual distance
for a new account/fleet. The user will enter the distance and select type “A” for
actual distance.
The system will ensure a carrier has included all the
jurisdictions necessary to create a path to the base jurisdiction. If the
system cannot find a contiguous path for all jurisdictions specified, an error
message displays. The override contiguous jurisdiction indicator will be
defaulted to ‘N’ (unchecked) indicating a contiguous check. If the override
indicator is checked, the user must provide a comment to indicate a reason for
the non-contiguous jurisdictions.
There may be documents required for creating the
jurisdictions of travel and the appropriate distances.
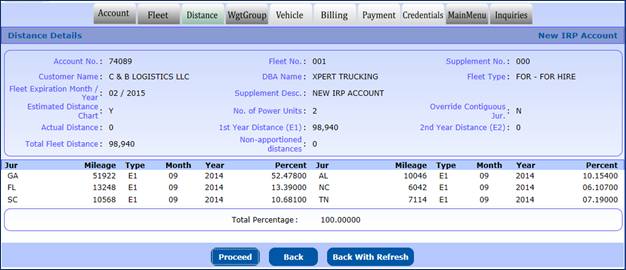
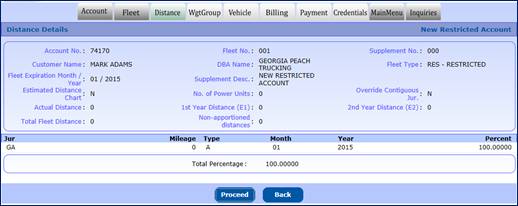
After all of the distance information is entered, click
the PROCEED button on the command line at the bottom of the screen. The system will
check for any missing information and calculate the percentage of distance travelled
for each jurisdiction. This information will display on the verification screen
along with the rest of the jurisdiction information. If there are any changes
required, the user can click the BACK button on the command line to make the
necessary changes and continue processing. If the user wants to remove the
distance from jurisdictions and start over , they can click the BACK WITH
REFRESH button.
After the distance information has been entered and
verified, click the PROCEED button from the command line and the Fleet Weight
Group Detail screen will be displayed.
The navigation tabs at the top of the screen will indicate
that the user is now at the “WgtGroup” step in the supplement.
NOTE: The Add Jurisdiction
function will no longer apply when Full Reciprocity is implemented and the
fleet effective date is January 1, 2015 or greater.
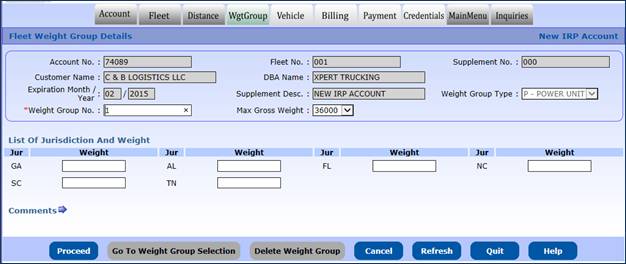
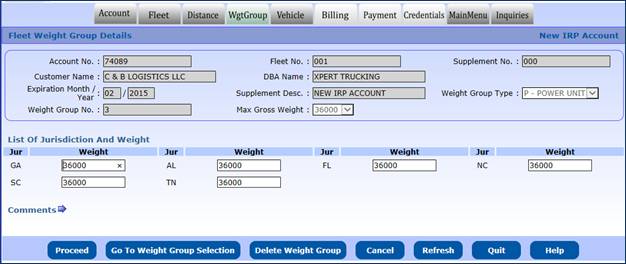
To enter a weight group for the fleet, do the following:
·
Weight Group No. – The field will auto-populate with a number
based on existing data. It will display 1 if no weight groups exist or will
display the next number in succession for any existing weight group numbers.
The number can be changed, if desired, but cannot be equal to an existing
weight group number.
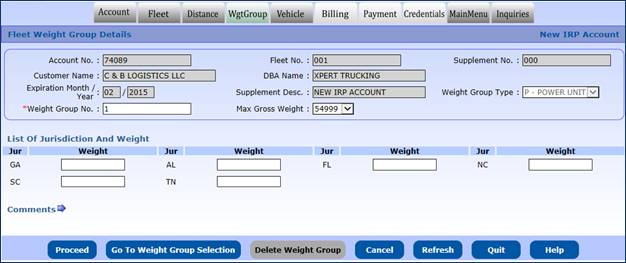
·
Select the maximum gross weight for the weight group from the
drop down. If you select “Other”, a new field will appear and you must enter
the maximum gross weight allowed for that weight group.
·
If any of the jurisdictions have a different weight (weight
override), enter the weight for that jurisdiction.
·
Click the PROCEED button on the command line to populate the
weight for the remaining jurisdictions and the verification screen will display.
If a weight is outside the 10% variance, a warning message will display in the
message area at the top of the screen and then the user must enter an explanation
of the 10% weight variance using comments.
·
The system will check to ensure the weight for each jurisdiction does
not exceed the maximum weight allowed in the specific jurisdiction.
·
If any of the weights need to be changed, click the BACK button
on the command line and the system will display the Jurisdiction weights for
changes.
Click the PROCEED button on the command line and the
Weight Group Selection screen will display the new weight group in a selection
list along with any other weight groups created.
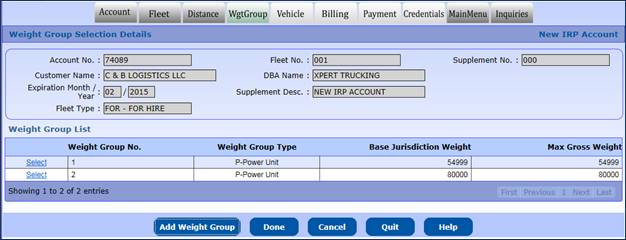
To create another weight group, click the ADD WGT GRP
button on the command line and repeat the above steps.
To update a weight group, click the “SELECT” link to the
left of the weight group number you wish to change and that weight group information
will display. You will be able to change the information as required.
To delete a weight group, click the “SELECT” link to the
left of the weight group number you wish to delete and that weight group
information will display.
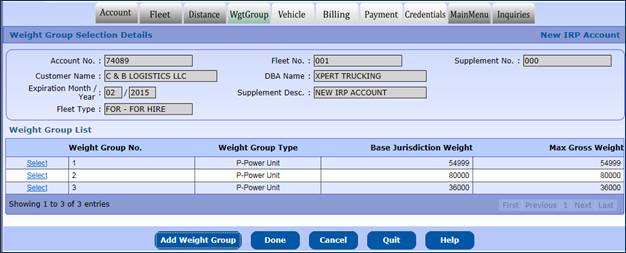
Select DELETE WEIGHT GROUP from the command line. If the
weight group is not attached to any vehicle currently in the system, the weight
group will be deleted. User will be prompted to confirm the delete action.
After all weight groups have been created and verified,
click the DONE button on the command line and the “Vehicle Detail” screen will
display. The navigation tabs at the top of the screen will indicate that the
user is now at the “Vehicle” step in the supplement.
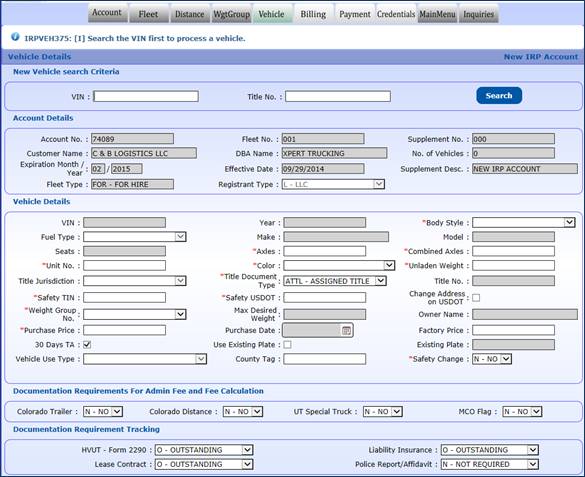
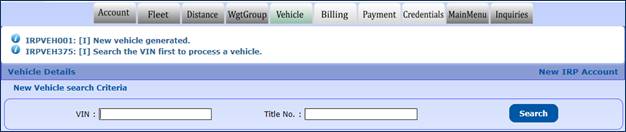
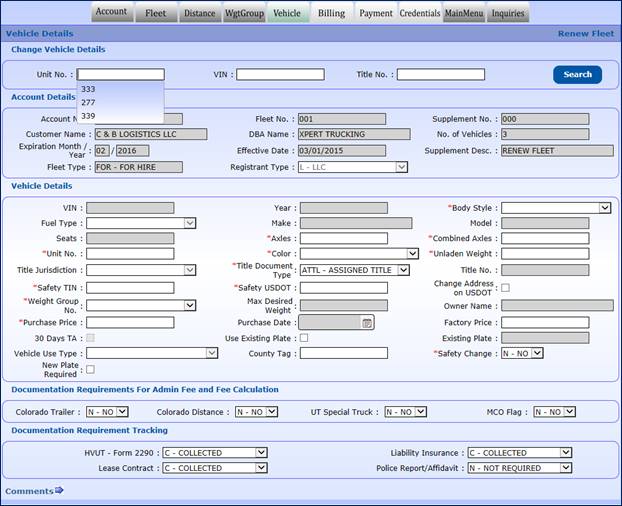
The Vehicle Detail screen will gather the information for
each vehicle added to the fleet. Mandatory fields are indicated by a red
asterisk “*”.
At the top of the Vehicle Detail screen there is a feature
allowing the user to find an existing vehicle in the GRATIS database.
·
Enter the VIN and click the SEARCH button. The system will
search for the information and, if found, will populate the vehicle information
fields on the Vehicle Detail screen.
If the vehicle match exists in GRATIS or the GAIRP system,
some information will be populated either from GRATIS lookup or from previous
information entered in GAIRP. The following fields are available for vehicle information:
·
VIN – Pulled from GRATIS and cannot be changed
·
Year – Pulled from GRATIS and cannot be changed
·
Body Style - Is pulled from GRATIS but can be changed if the
value is different than those listed in the drop down
·
Fuel Type – Pulled from GRATIS and cannot be changed
·
Make – Pulled from GRATIS and cannot be changed
·
Model - Pulled from GRATIS and cannot be changed
·
Seats – entered only for buses
·
Number of axles and combined axles
o Axles – If
available in GRATIS or GAIRP, it will be displayed or user can enter if not
present in GRATIS or GAIRP
o Combined Axles –
User must data enter value which must be greater than or equal to the vehicle
axles
·
Unit No – Company identifier for the vehicle
·
Color – User can select from the dropdown list available
·
Unladen Weight - If present in either GRATIS or GAIRP it will be
populated, otherwise user can data enter a value
·
The following fields pertain to the vehicle title:
o Title
Jurisdiction – Pulled from GRATIS and cannot be changed; It will always display
as Georgia.
o Title Document
Type – User should select from the drop down
·
ATTL – Assigned Title
·
BOS – Bill of Sale
·
CO – Court Order
·
CTR – E-Title / County Title Receipt
·
OMM – Original MSO/MCO
·
OSTR – Out of State Title Receipt
·
RTTL – Repossessed Title
·
UTTL – Copy of Unassigned Title
o Title Number –
Title Number or number associated with the Title Document Type in GRATIS and
cannot be changed
·
Carrier Responsible For Safety Fields:
o Safety TIN –
TIN associated with the USDOT responsible for safety – prepopulates with the
values from fleet if available
o Safety USDOT -
USDOT responsible for safety – prepopulates with the values from fleet if available
o Safety Change –
user to select if the vehicle responsible for safety is to change within the
registration period – user must select either N or Y
o Change address
on USDOT: allows the user to change the address for the USDOT for this
transaction for the credential printing
·
Weight group number – The drop down lists the valid weight group
number and its associated max gross weight for the fleet. If the user needs to
add a weight group, select the WGT GROUP tab at the top of the screen
(Navigation tabs) and the Weight Group Selection screen will display. When the
weight groups have been updated, the system will return to the Vehicle Detail
screen.
·
Max Desired Weight – Weight of vehicle traveling in Georgia
·
Owner Name – Pulled from GRATIS and cannot be changed
·
Purchase Price – Will display if data present in GRATIS,
otherwise user can data enter
·
Purchase Date – Pulled from GRATIS and cannot be changed
·
Factory Price - The factory price of the vehicle is required
information for the IRP fee computation. If a registrant does not provide the
factory price, the system will try to retrieve the factory price from the
factory price table. If GAIRP cannot retrieve the factory price, the user must
enter it.
·
30 Days TA checkbox – This checkbox will always default to
checked (Y) for all supplements except renewals. TA will be issued for only 30
days with a one-time option to extend for an additional 30 days using the
reprint TA module.
·
Use Existing Plate – in some rare occasions an existing IRP plate
may be used when adding a vehicle – user should “check” the indicator and then
enter the plate in the Existing Plate field
Documentation Requirements
The Documentation Requirements for Admin Fees and Fee
Calculations consists of several indicators that must be set in order to
calculate fees correctly. They are as follows:
·
Colorado Trailer indicator – For vehicles traveling to
Colorado - If it is a straight truck pulling a trailer and the empty weight of
the truck is less than 16,000 pounds, the carrier must indicate a “Y”. The
system will be defaulted to ‘N’
·
Colorado Distance indicator – defaulted to ‘Y’ and can be
changed
o The fee
structure for CO is a two-tier schedule calculated according to the total
national distance traveled by each power unit
·
If the vehicle travels 10,000 miles or less nationally, the user
will enter an ‘N’ in the space provided
·
If the vehicle travels over 10,000 miles, the default “Y” will
use the over-10, 000 miles schedule
·
Utah Special Truck indicator - For vehicles
traveling to Utah - If the truck type is a cement pump, well boring unit or
crane, the user will check the Utah special truck flag. The system will default
this field to ‘N’
·
MCO Flag indicator - If the vehicle is a new vehicle, a
copy of the manufacturer’s certificate of origin is required in order to have
the fee calculation use the new vehicle fees table. The system will be
defaulted to ‘N’
The Documentation Requirement Tracking consists of a drop
down list of documents that may be required for registration purposes. The
user can select the appropriate document from the dropdown list to indicate the
status:
·
O – Outstanding
·
C – Collected
·
S – System Collected (System controlled)
·
N – Not Required
Comments – Use the arrow to expand or close the comment section.
Select the ADD/UPDATE COMMENT button to apply comments to the record, select
the Access Level and indicate whether the comment can be deleted by checking
the Delete Allowed checkbox. Enter comments as necessary.
After you have entered the information, click the PROCEED button
on the command line and the system will perform edits to ensure that you have
entered all the mandatory fields and that they are correct to the extent
possible. The validation screen will display.
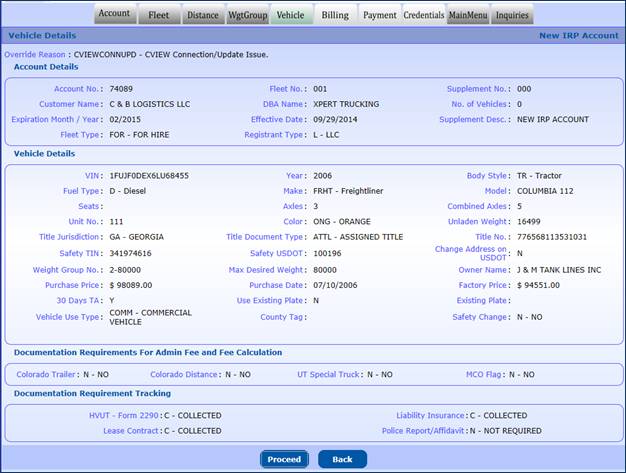
Click the PROCEED button on
the command line to save the vehicle information. The Vehicle Detail screen
will display with empty fields for creation of another vehicle if required.
If
some of the information needs to be updated after the vehicle has been stored
in the system:
·
Click the VEHICLE LIST Button on the command line and a selection
list of vehicles will display
·
Click any “Select” link to the left of the unit number in the
selection list and the vehicle details will display
·
Update the vehicle information as required and click the PROCEED
button on the command line
·
Delete the vehicle from the supplement by clicking the CANCEL
VEHICLE button on the command line
When vehicle updates are complete, click PROCEED and the
verification screen will display.
Confirm the information and then click the PROCEED button
and the “VEHICLE DETAILS” screen will display.
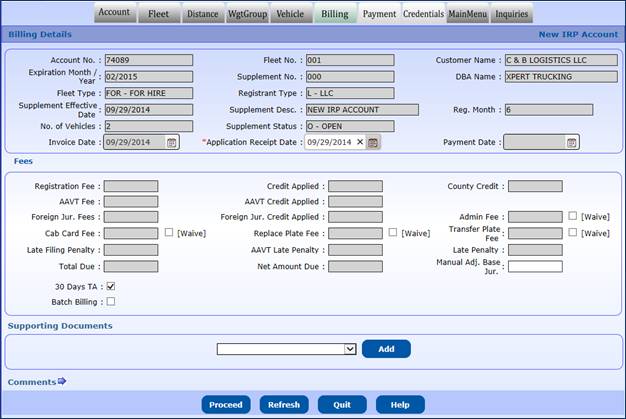
When you have entered all of the vehicles correctly into
the system, click the DONE button and this will display the “Billing Detail”
screen. The navigation tabs at the top of the screen will indicate that the
user is now at the “Billing” step in the supplement process.
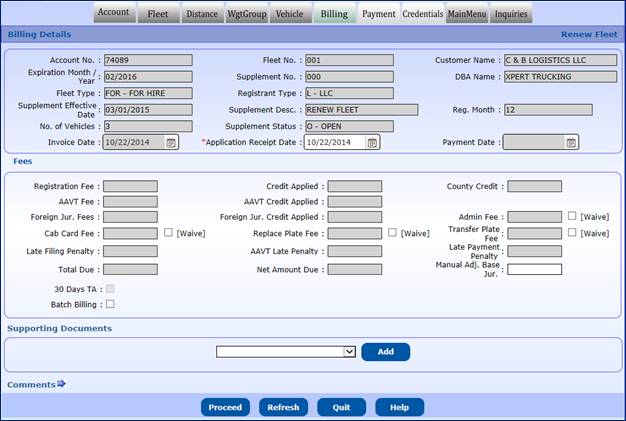
The first view of the billing screen does not have fee
calculations on it. This screen allows the user to override certain fees if
required. When applicable, the user can override fees for vehicles in the fleet
by checking the “Waive” indicator next to the fee.
Batch Billing is available for larger fleets with more
than 200 vehicles. By checking the Batch Billing checkbox, the supplement will
be submitted to a “Batch Queue” at which point the batch billing queue
administrator is able to run the process in off peak hours to calculate the
bill and produce the TAs in batch.
Click PROCEED and the system will
calculate the fees. The supplement status will go from “Open” to “Invoiced”.
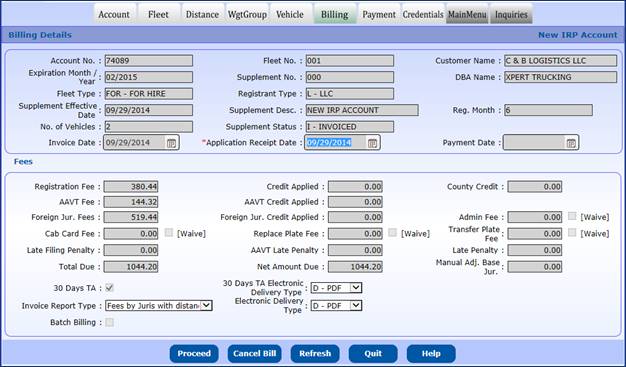
After the supplement is “Invoiced”, the user cannot update
the fleet, vehicle, distance, or vehicle information. If changes are required,
the user must click the CANCEL BILL button on the command line and then select the
appropriate (fleet, vehicle, distance) tab at the top of the screen. The
system will display the appropriate screen for updates.
After the supplement is in invoiced status and correct
information entered, there are several options which are listed below:
·
Invoice Report Type
o Summary Invoice
o Fees by unit
o Fees by
Jurisdiction with distance percentage (defaults to this option)
o Supporting
Document for Vehicle
o Fees by Unit by
Jurisdiction
·
Electronic Delivery Type for the Invoice:
o EMAIL
§ The email address will
default to the fleet level email address. The user will be able to update this
field. Updating this field will not update the Fleet Level email address.
o FAX
§ The fax number will
default to the Fleet Level fax number. The user will be able to update this
field. Updating this field will not update the Fleet Level fax number
o PDF – View
format (default for external user)
§ The user will have
the ability to save and/or print either a portion or the entire document from
the PDF file
After fee type and electronic delivery type have been
selected click the PROCEED button on the command line to produce the invoice. A
message will be generated indicating that the Billing was done successfully,
the TA was successfully generated and the Invoice Report was generated successfully
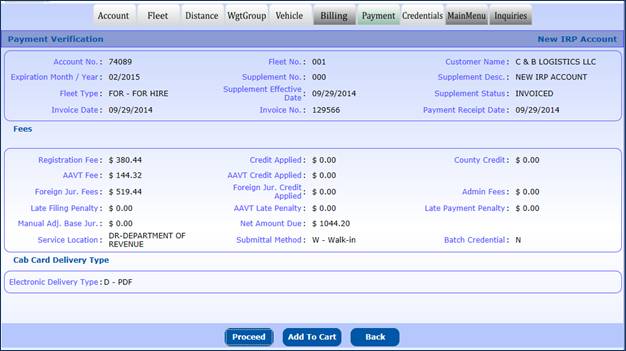
1.3.1.7 Payment Details
After billing, the user will navigate to this screen to
continue to the payment process. For large carriers where more than 200
credentials will be produced, the user should select the “Batch Credential” check
box to push the supplement to the batch credential process after payment
collection is completed.
Payment
Verification
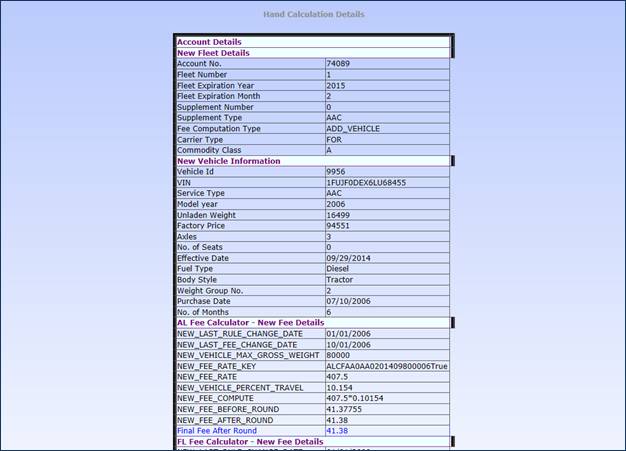
The user may also choose to see the hand log detailed
calculation for each unit for each jurisdiction by clicking the ”SHOW HAND LOG”
on the command line. The Show Hand Log option will not be available in the production
environment. Hand log shows the supplement and vehicle information.
Additionally, for each jurisdiction, the last rule change and fee change are
shown as is the fee calculation for the vehicle.
The user may also choose to see the detailed invoice by
clicking the View Invoice Report button on the command line.
Click the PROCEED button on the command line and it will
display the verification screen.

The user may choose to add this amount to the cart for
payment at a later time by clicking the ADD TO CART button and the user will be
able to proceed with additional supplement processing. Refer to Section 1.2.3.1
Cart Payment, in the Home Level User Guide regarding making a payment for an
entire cart
OR
Click the PROCEED button to go directly to the cart
payment processing screen. The system will check to ensure a cash drawer is
open before you can make a payment. Refer to Section 1.2.3.1.1 Payment
Collection, in the Home Level User Guide to make the payment.
The New Account process starts with creating a Common
Customer (at the Home Level before creating a new IRP/Restricted account (Section
1.2.1.1 New Customer). The Customer Number and Restricted Account Number are
one and the same.
A New Account is required when creating a new Restricted
or IRP fleet for the first time.
At the Home Level Main Menu, click the APPLICATION tab and
select IRP from the list of applications displayed by the drop down sub menu.
The IRP Main Menu Screen displays next.
·
Click the PROCESS tab and select ACCOUNT, then select NEW RESTRICTED
ACCOUNT. The Customer Search screen will be displayed next.
·
Enter the account (common customer) number in the Account No.
field
·
Click the PROCEED button on the command line at the bottom of the
screen
o If the Common
Customer record does not exist based on the information entered, the system
will display a message that no customer exists for this Account No. The user
must go to Customer tab on the Home Level Main Menu to create the Common
Customer
o If the carrier
already has an existing IRP/Restricted account, the user must create a new
fleet or perform the desired transactions (supplements) in an existing fleet.
A message will display to notify the user that an account already exists
o If a carrier
already exists as a Common Customer but does not have an IRP/Restricted
account, the Account Detail screen is displayed

The next step is creating the Restricted account profile.
There are several sections on the New Account Screen.
The Customer Details and Business Customer Details fields
populate from the information in the Common Customer and the user cannot change
this information.
·
Customer Details
o Account No.
o GRATIS Customer
Id.
o Registrant Type
o Customer Name
o Customer Status
o Carrier Type
o DBA Name
o IFTA Account
No. (open field which user can data enter if applicable)
·
Business Customer Details
o USDOT No.
o TIN
o Contact Name
o Email
o Primary Phone
o Alternate Phone
o Fax Number
o Physical
Address
o Mailing Address
·
Account Details
o Record
Retention – is defaulted to checked, field indicates record retention
information has been provided
o Account Status
– is defaulted to ACTIVE and the user cannot change
o Email Indicator
and Fax Indicator – The user can check one or both of these boxes and the
Carrier will receive Restricted renewal notices through email and/or fax
instead of regular mail. NOTE: If the email/fax information is missing, the
user has to add the information in these fields by returning to the Home Level
and updating the customer information.
o Comments – By
clicking the arrow, the user can add free-form comments in this area. After
adding content to the Comments box, the user must click the ADD/UPDATE COMMENT button
to save the comment in the Account record.
NOTE:
The user must select the “Delete Allowed” check box before adding comments in
order to delete comments in the future.
Click the PROCEED button to execute the application’s
edits and display the validation screen.
The verification screen displays next, showing the user a
consolidated view of the Account information. If the user determines some of
the information is incorrect, the user can click the BACK button on the command
line and the system will display the Account screen again. The user can make
the required changes and select PROCEED.
Click the PROCEED button on the command line and the Restricted
account information will be saved to the database. The Fleet Detail screen
displays.
Several of the Fleet information fields will default to
the values from the Customer Account information. Some of these fields are
protected including:
·
Account No.
·
GRATIS Customer Id
·
Customer Name
·
TIN / USDOT / Carrier Type
·
Physical Address
The following fields have a default value or the user will
key the information:
·
Mailing Address – If different from the Physical address
·
Service Provider – If the carrier has a Service Provider for the
fleet, the information for that provider must be entered. The designated
Service Provider will be able to perform certain supplements for the carrier
via external web transactions.
o Service
Provider – Select the Service Provider from the drop down list
o Power of
Attorney – Click this box if the user has provided a Power of Attorney
agreement. If the User selects a Service Provider, this is mandatory.
o Phone, Address,
Email, Fax – These fields will default from the Service Provider Record
·
Contact Name – This field defaults from the Restricted Account
contact information
·
Email Address – This field defaults from the Restricted Account
contact information and is required
·
Primary Phone No. – This field will default from the IRP Account
information and can be changed but is mandatory
·
Alternate Phone – Enter this, if known
·
Fax No. – This field will default from the IRP Account
information and can be changed
·
Change Address on USDOT – Stores the value of a changed address
on USDOT – only valid for the supplement where it is added
·
Fleet Type – This field has a dropdown with Restricted as the only
available option
·
Fleet Effective Date and Expiration Date
o The Effective
Date defaults to the current date
o Georgia has
annual registration for Restricted registration and is based on the first
initial of the business name or the first initial of the last name of an
individual. The expiration date will be automatically generated and protected,
regardless of the Fleet Effective.
·
First Operated Date – This field will default to the current date
for all new fleets. It is the date the fleet was first added in Georgia and
used for informational purposes only
·
Document Collection – Certain documents are required for a New
Fleet creation. If the system can check for the document automatically via a
system interface, it will mark the document as being “System Collected” (S). Options
for the documents include: C- Collected, N- Not Required, O- Outstanding, and
S- System Collected.
o Proof of
Insurance – Select the appropriate status from the dropdown list as listed
above
o Power of
Attorney – Select the appropriate status from the dropdown list as listed above
·
Comments – Enter the appropriate comment(s), if applicable.
These comments are displayed on the Fleet Inquiry Screen to internal users only
·
Access Level – Select the appropriate access level for the
comment from the dropdown list:
o Internal
o Public
o
Delete Allowed – Click this box if you want to be able to delete
this comment
·
Addr Override – This function can be set if the address checking
returns an error, however the address is correct
After the user enters the Fleet information, select
PROCEED to execute the edits and display the validation screen. The user
should verify the fleet information and select the PROCEED button from the
command line at the bottom of the screen to save the Fleet information. The
“Distance Details” screen will be displayed next.
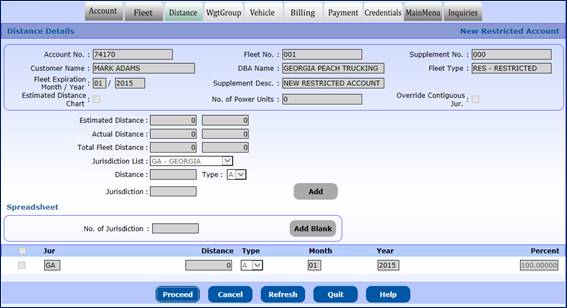
The navigation tabs at the top of the screen will indicate
that the user is now at the “Distance” step in the New Restricted Account/Fleet
supplement.
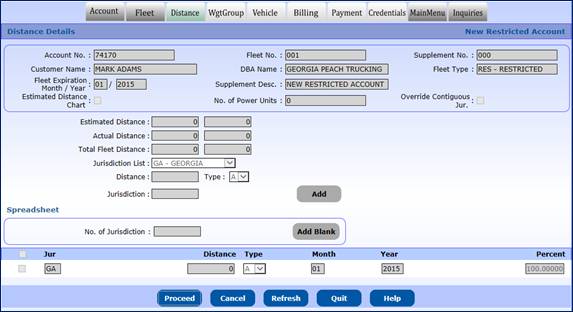
Restricted fleet will show only Georgia as the
jurisdiction with 100.00 as the percentage and all fields protected. Select
PROCEED to continue the supplement.
Weight groups for Restricted fleets are created and added
using the same steps as those used to create weight groups for IRP fleets. The
user selects the Max Gross Weight from a dropdown list, which will be available
on the vehicle screen for selection.
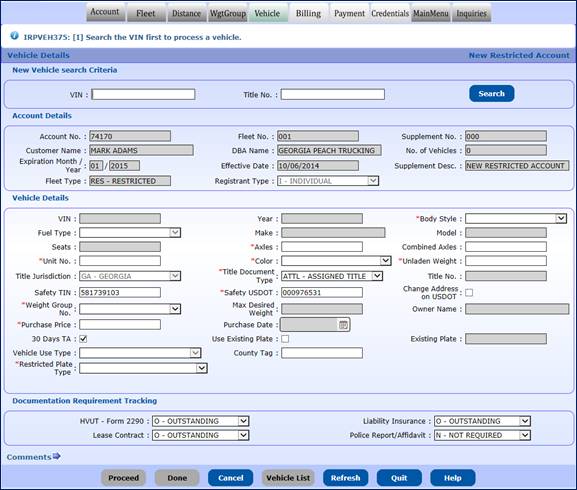
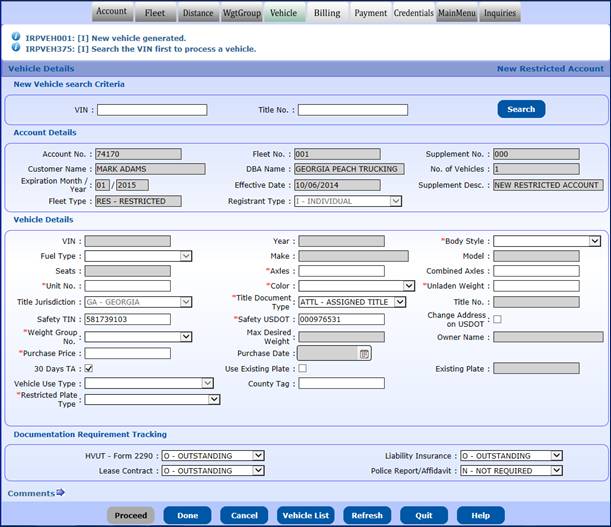
The Vehicle Detail screen will gather the information for
each vehicle added to the fleet. A red asterisk indicates mandatory fields “*”.
At the top of the Vehicle Detail screen there is a feature
allowing the user to find an existing vehicle in the GRATIS database.
·
Enter the VIN and click the SEARCH button. The system will
search for the information and, if found, will populate the vehicle information
fields on the Vehicle Detail screen.
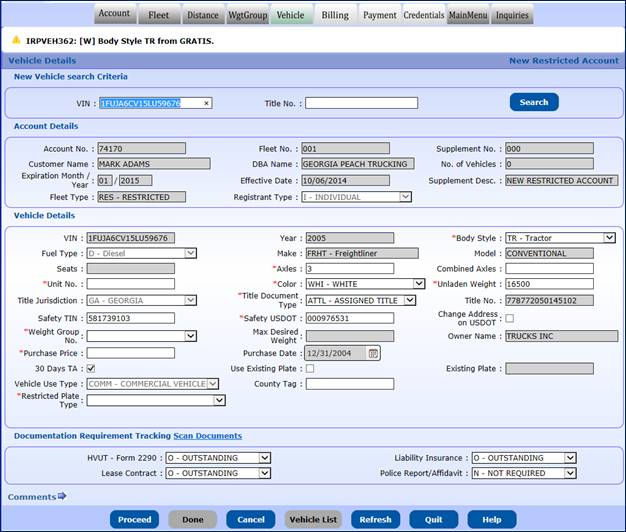
If a vehicle match exists in GRATIS or the GAIRP system, some
information will be populated either from GRATIS lookup or from previous
information entered in GAIRP. The following fields are available for vehicle information:
·
VIN – Pulled from GRATIS and cannot be changed
·
Year – Pulled from GRATIS and cannot be changed
·
Body Style – Is pulled from GRATIS but can be changed if the
value is different than those listed in the drop down
·
Fuel Type – Pulled from GRATIS and cannot be changed
·
Make – Pulled from GRATIS and cannot be changed
·
Model – Pulled from GRATIS and cannot be changed
·
Seats – Entered only for buses
·
Number of axles and combined axles
o Axles – If
available in GRATIS or GAIRP, it will be displayed or user can enter if not
present
o Combined Axles
– User must data enter value which must be greater than or equal to the vehicle
axles
o If the vehicle
type is Bus, then combined axles must equal vehicle axles
o If the vehicle
type is TR or TK, then combined axles must be greater than or equal to the
vehicle axles
·
Unit No – Company identifier for the vehicle
·
Color – User can select from the dropdown list available
·
Unladen Weight – If present in either GRATIS or GAIRP it will be
populated, otherwise the user can data enter a value
·
The following fields pertain to the vehicle title:
o Title
Jurisdiction – Pulled from GRATIS and cannot be changed; it will always display
as Georgia
o Title Document
Type – User should select from the drop down
·
ATTL – Assigned Title (field defaults to this value)
·
BOS – Bill of Sale
·
CO – Court Order
·
CTR – E-Title / County Title Receipt
·
OMM – Original MSO / MCO
·
OSTR – Out of State Title Receipt
·
RTTL – Repossessed Title
·
UTTL – Copy of Unassigned Title
o Title Number –
Title Number or number associated with the Title Document Type in GRATIS and
cannot be changed
·
Carrier Responsible For Safety Fields:
o Safety TIN –
TIN associated with the USDOT responsible for safety – prepopulates with the
values from fleet if available
o Safety USDOT – USDOT
responsible for safety – prepopulates with the values from fleet if available
o Safety Change –
user to select if the vehicle responsible for safety is to change within the
registration period – user must select either N or Y
o Change address
on USDOT – allows the user to change the address for the USDOT for this
transaction for the credential printing
·
Weight group number – The drop down lists the valid weight group
number and its associated max gross weight for the fleet. If the user needs to
add a weight group, select the WGT GROUP tab at the top of the screen
(Navigation tabs) and the Weight Group Selection screen will display. After
the weight groups are updated, the system will return to the Vehicle Detail
screen.
·
Max Desired Weight – Weight of vehicle traveling in Georgia
·
Owner Name – Pulled from GRATIS and cannot be changed
·
Purchase Price – Will display if data present in GRATIS,
otherwise user can data enter
·
Purchase Date – Pulled from GRATIS and cannot be changed
·
30 Days TA checkbox – This checkbox will always default to
checked (Y) for all supplements except renewals. The TA is issued for only 30
days with a one-time option to extend for an additional 30 days using the
reprint TA module.
·
Use Existing Plate – On some rare occasions an existing IRP plate
may be used when adding a vehicle – user should “check” the indicator and then
enter the plate in the Existing Plate field
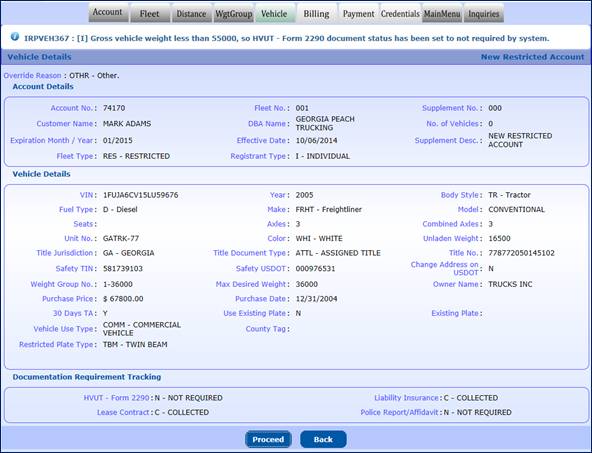
·
Vehicle Use Type – This field will auto-populate to display “COMM
– COMMERCIAL VEHICLE”, and cannot be changed
·
County Tag – This field is used to associate a County Tag, if
applicable
·
Restricted Plate Type – A dropdown list is available; the user
must select one of the options from the list below:
o
AGF – Agriculture/Fertilizer
o
CRP – Crop
o
FAR – Farm
o
MKF – Milk/Fertilizer
o
SPL – Single Pole
o
TBM – Twin Beam
The Documentation Requirement Tracking consists of a drop
down list of documents that may be required for registration purposes. The
user can select the appropriate document from the dropdown list to indicate the
status:
·
O – Outstanding
·
C – Collected
·
S - System Collected (System controlled)
·
N - Not Required
Comments – Use the arrow to expand and close the comment section.
Select the ADD/UPDATE COMMENT button to apply comments to the record, and
identify the Access Level and indicate whether the comment can be deleted by
checking the Delete Allowed checkbox. Enter comments as necessary.
After you have entered the information, click the PROCEED
button on the command line and the system will perform edits to ensure that you
have entered all the mandatory fields and that they are correct to the extent
possible. The validation screen will display.
Click the PROCEED button on the command
line to save the vehicle information. The Vehicle Detail screen will display
with empty fields for creation of another vehicle if required.
Perform the following steps if some of the information
needs to be updated after the vehicle has been stored in the system:
·
Click the VEHICLE LIST button on the command line and a selection
list of vehicles will display
·
Click any SELECT button to the left of the unit number in the
selection list and the vehicle details will display
·
Update the vehicle information as required and click the PROCEED
button on the command line
·
Delete the vehicle from the supplement by clicking the CANCEL
VEHICLE button on the command line
When vehicle updates are completed, click the PROCEED
button on the command line and the verification screen will display.
Confirm the information then click the PROCEED button and
the “VEHICLE DETAILS” screen will display.
When you have entered all of the vehicles correctly into
the system, click the DONE button on the command line and this will display the
“Billing Detail” screen. The navigation tabs at the top of the screen will
indicate that the user is now at the “Billing” step in the supplement process.
After this, the billing process starts. To get the details
of the billing process please refer to Section 1.3.1.6 or for online users
click here.
After this Payment details process starts. To get the
details of the payment process please refer to the Section 1.3.1.7 or for
online users click here.
1.3.3 In Progress
The IN PROGRESS process will provide a user with the
ability to:
·
Continue to work after quitting in the middle of a supplement
transaction without losing the information processed to that point
·
Access unfinished supplement transactions at the point where the
last logical piece of work was completed
·
To continue processing a supplement:
o Enter the account
number (additional search fields are available for use)
o Click the PROCEED
button to display a list of available supplements
§ If only one
supplement exists, the system will automatically continue in the supplement
details.
§ If multiple
supplements exist, a list of supplements will display and the user will select
the desired supplement to continue processing.
Documents that were not previously collected during a transaction
can be updated via the Document Update transaction.
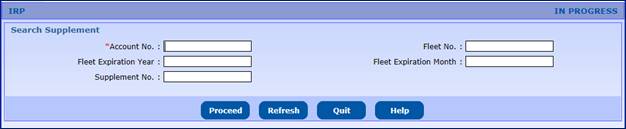
·
Select the Document/Update tab from the IRP menu and the Supplement
Search screen will display
o Enter the Account
No., Fleet No., and Expiration year at a minimum
o The Outstanding
checkbox can be used to narrow your search to only those records with
outstanding documents waiting to be collected
o Click the PROCEED
button and a list of records matching the search parameters will display
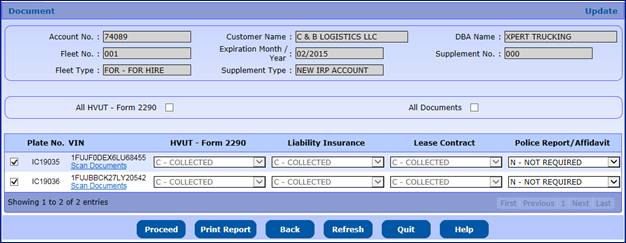
·
Update the documentation for the appropriate vehicles by
selecting the status from the drop down lists
·
Select PROCEED
·
Access the transaction through IN PROGRESS to proceed with the
transaction if required to complete the supplement
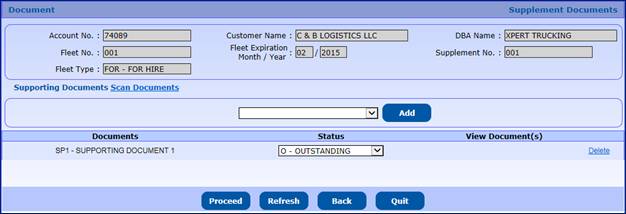
Any additional supplement related documents that are
collected can be added using the Supplement Document transaction.
·
Select the Document/Supplement Documents tab from the IRP menu
and the Supplement Search screen will display.
o Enter the
Account No at a minimum
o The Outstanding
checkbox allows the user to search for supplements with outstanding documents. Only
supplements with outstanding document will display. If you need to view all
supplements, do not select this check box.
o Click the
PROCEED button and a list of supplements that match the search parameters will
display. If only one supplement results from the inquiry, the supplement
displays in the document collection screen.
o Select a
supplement and click the PROCEED button
·
To add a document:
o Select the
document from the drop down
o Click the ADD
button to the right of the document field
·
Update the documentation for the supplement by selecting the
status from the drop down list
·
Select PROCEED
·
Access the transaction through WIP to continue with the
transaction if required to complete the supplement
1.3.5
Supplement Functions
Every supplement transaction starts in the same way. To
begin a supplement transaction, follow these steps:
·
Select the supplement type from the SUPPLEMENT menu selection
·
Enter the Account No., Fleet No., and Fleet Expiration Year
·
Adjust supplement date, if necessary
·
A selection list will display if you only enter an account number
or an account number and fleet

Supplement Effective Dates:
·
Effective dates cannot be in the future except for the following:
o Renewals can be
done up to 90 days in advance of the fleet expiration date.
o Newly added
fleets can have an effective date of up to 90 days in the future
·
Effective dates can be backdated; however, the supplement
effective date must greater than the previous supplement for the given account,
fleet and registration year.
·
Supplement effective date of the renewal is the same as the fleet
effective date.
The IRP Renewal process involves the following steps:
·
The fleet information must be verified
·
The fleet distance must be entered
·
Vehicles must be processed including add, change and delete
·
Georgia and foreign jurisdiction fees must be computed
·
Payment is recorded
·
Credentials are issued
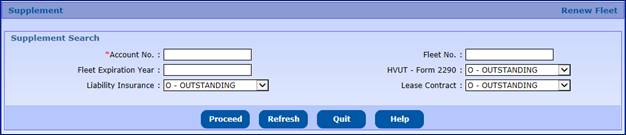
To begin the renewal, the user must perform the following
steps:
·
Select RENEW FLEET from the FLEET option in the PROCESS tab of
the IRP level menu
- Enter the Account No., Fleet
Number and Fleet Expiration Year being renewed. If fleet is not entered,
a selection list of the available fleets will be displayed if there is
more than one fleet.
- Select PROCEED to display the
Account screen
- Verify the
account information
o If the Account Name
or Address information has changed:
§ The user must click
the QUIT button from the Account screen and update the Customer from the Home
menu
§ After updating the Customer
information, the user will begin the renewal again. The updated information
from Customer will display.
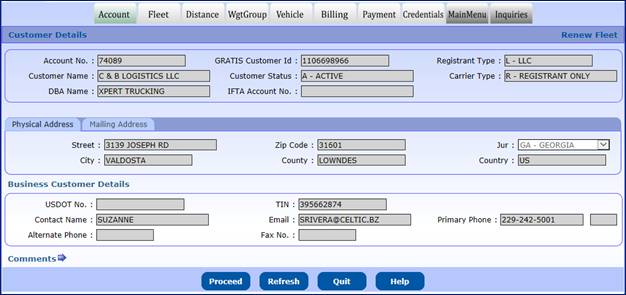
After reviewing the account information:
- Select PROCEED to display the Account Verification screen
- Select PROCEED at the verification screen to update the
account information and proceed to the Fleet Detail screen
The registrant can update certain fleet information during
renewals such as contact information, mailing address, fleet type/commodity
class, and insurance information as described below
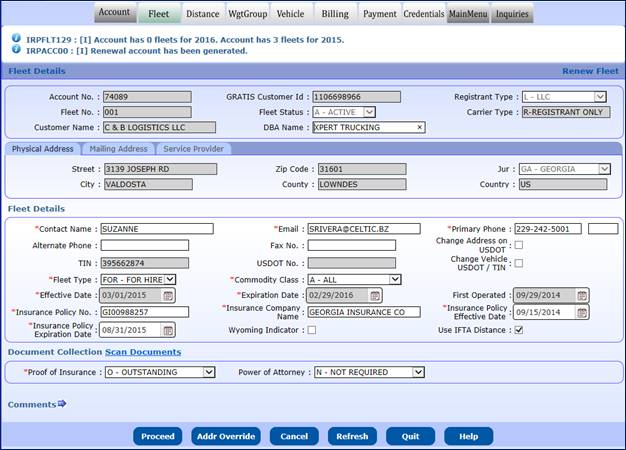
The
fleet information will populate with the information from the previous year.
Legal name and physical address will be populated with the most current
information from the customer record. Refer to Section 1.3.1.2 for IRP and
Section 1.3.2.2 for Restricted fleet screen field definitions.
·
The following information will default based on the renewal
period (12 months) and cannot be changed:
o Will default to
the effective date for the next year registration period
·
Fleet Expiration Date
o Will default to
the expiration date for the next year registration period
·
First Operated Date
o Will default
from the previous year
Updates for the Fleet Screen:
·
From the Fleet Detail screen:
o Review the
fleet information
o Update the
values, as necessary
o Click PROCEED
to display the Fleet Verification screen
o Click the PROCEED
button to update the fleet information in the database and proceed to the
Distance Detail screen
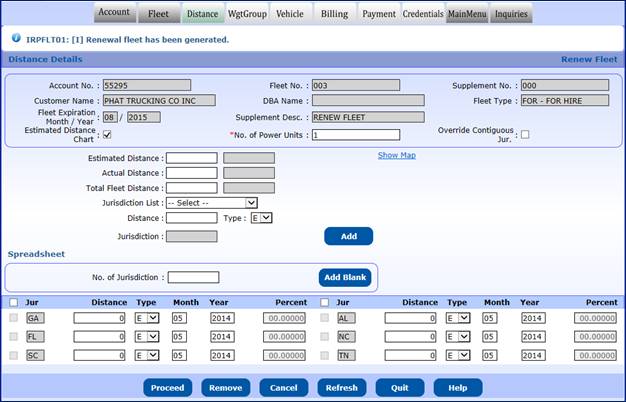
At fleet renewal time the jurisdiction distance can be
actual, estimated, or no-travel intended. The Georgia miles must be included. The
screen will pre-populate with the jurisdictions and distance types from the
previous year.
After reviewing the applicant’s Distance Schedule, the
user may data enter the distance for each jurisdiction, or elect to use the
estimated distance table or enter the distance for each jurisdiction.
The user can do the following to adjust the distance as
required:
To
use the estimated distance option the user must:
·
Check the estimated distance chart check box
·
Adjust the No. of Vehicles as required by the renewal
·
Set the jurisdiction distance type to “E” for estimated for every
jurisdiction with estimated miles
·
Click the PROCEED button and the distance for the estimated
jurisdictions will populate from the estimated distance table
The
user will be able to add jurisdictions of travel in one of three methods:
·
Selecting the jurisdiction of travel by selecting the
jurisdiction on the map (show map), entering the distance and the type (Actual,
Estimated) and selecting ADD, or
·
Selecting the jurisdiction of travel by selecting the
jurisdiction from the dropdown, entering the distance and type of distance and
selecting ADD
·
Select “Spreadsheet” from the dropdown. The User will enter all the
information manually, including the jurisdiction abbreviation, distance type,
month and year and distance, if not using the estimated distance chart
If
the carrier is no longer traveling to a jurisdiction, select “N” for no travel
intended.
There may be documents required for creating the
jurisdictions of travel and the appropriate distances
When the user has entered all the jurisdiction
information:
·
Enter the Control totals for Total Estimated Distance, Total
Actual Distance, and Total Distance, if required
·
Click the PROCEED button on the command line and the system will:
o Perform edits
including verifying contiguous jurisdictions
o Calculate
percentages, and populate estimated distance
o Display
verification screen
·
On the validation screen, any jurisdiction in RED, is calculating over 100% and requires review

·
If the distance is correct, select PROCEED to display the Weight
Group Selection screen
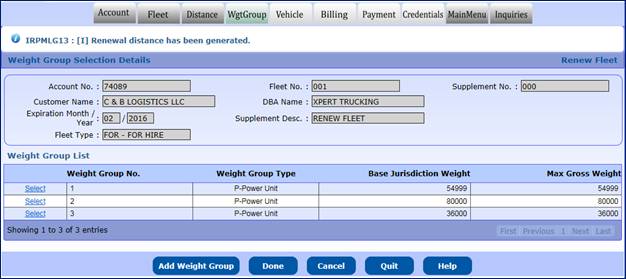
The user should perform the following to update a weight
group for the registration year:
From the Weight Group Selection screen:
·
View/Update the weight for any existing weight group
- Select the weight group to process, by selecting the
SELECT link next to the weight group number
- Update the weights required and select PROCEED for the
verification screen
- From the validation screen, select PROCEED to save the
change
- If no changes are required, select Go To Weight Group
Selection
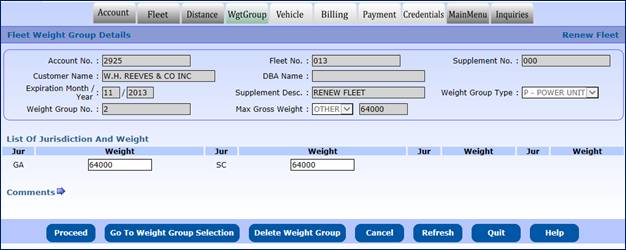
To enter a weight
group for the fleet, do the following:
·
Select the maximum gross weight for the weight group from the
drop down. If you select “Other”, you must enter the maximum gross weight
allowed for that weight group
·
If any of the jurisdictions have a different weight, enter the
weight for that jurisdiction
·
Click the PROCEED button on the command line to populate the
weight for the remaining jurisdictions and the verification screen will display.
If a weight is outside the 10% variance, a warning message will display in the
message area at the top of the verification screen. To explain the variance, a
comment must be entered
·
The system will check to ensure the weight for each jurisdiction
does not exceed the maximum weight allowed in the specific jurisdiction. If it
does, the system will automatically set the weight to the maximum allowed and
will display a warning message in the message area at the top of the
verification screen. Weights should be verified with the application
information and changes discussed with the Customer
·
If any of the weights need to be changed, click the BACK button
and the system will display the Jurisdiction weights for changes
Select DONE when you are finished with weight groups and the
Vehicle Processing screen will display
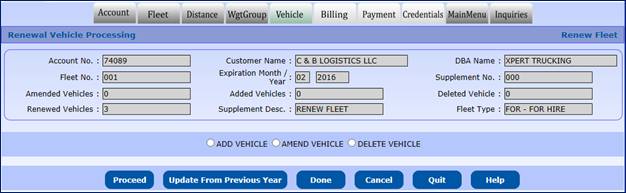
The vehicle processing on a renewal provides the ability
to perform the following vehicle functions:
- Update from the Previous Year
o After the
renewal is open and is not invoiced, supplement information can be
automatically updated in the renewed fleet by clicking the UPDATE FROM THE
PREVIOUS YEAR button on the command line and then either:
§
Delete Vehicle
§
Update Vehicle Information
o If the renewal
is invoiced (not paid), cancel the invoice first, and then click the UPDATE
FROM THE PREVIOUS YEAR button on the command line from the Vehicle Processing
screen
o If the renewal
is paid, the user must create the supplement in the renewal year.
·
Update vehicle information
·
Delete a vehicle from the fleet
The user can return to the account, fleet, distance, or
weight group process by selecting the tab at the top of the screen at any time
before invoicing.

·
The user must execute the UPDATE FROM PREVIOUS YEAR, if required,
prior to adjustments to existing vehicles
·
If no changes are required to any vehicle:
o
Click the DONE button
·
To update vehicle information vehicle:
o The user can
select UPDATE VEHICLE INFORMATION and then select PROCEED to display the
Vehicle Detail screen. Refer to Section 1.3.1.5 for IRP vehicles. Refer to Section
1.3.2.5 for Restricted Vehicles.
o The
user can select the vehicle to change by selecting either the Unit number, VIN,
or plate number.
o
After the user selects the vehicle, the existing vehicle
information will display
o
The user should update the information as necessary for renewal
o
Once the information is changed, click the PROCEED button to
perform edits. If the vehicle information passes the edits, the Vehicle Details
Verification screen will display.
o From
the Verification screen, review the vehicle information and click on the PROCEED
button to save the changes on the vehicle.
·
To delete a vehicle from the fleet:
o
The user can select DELETE VEHICLE and then select PROCEED to
display the Delete Vehicle screen. This is a list of all the active vehicles in
the fleet not updated during the renewal process.
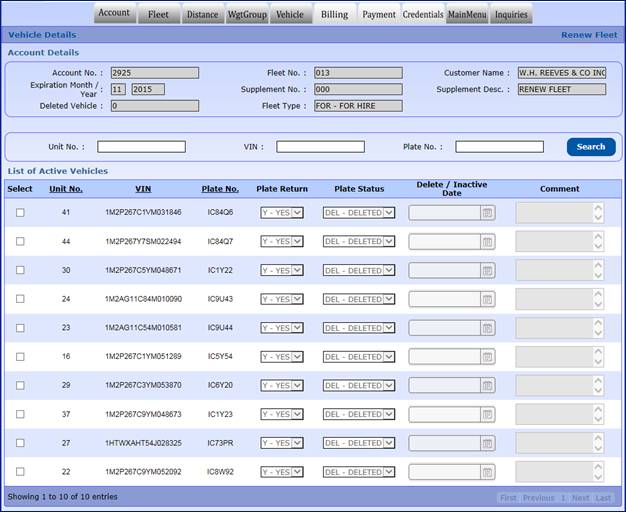
o To select a
vehicle to delete, check the box next to the unit number you want to delete
o For each delete
vehicle the following information must be provided:
§
If the user has returned the plate, indicate either
Y (Yes) or N (No)
§
PLATE STATUS defaults to Deleted
§
A comment can be added if necessary
o Once you have
selected all the vehicles you want to delete, select PROCEED to display the
verification screen. The verification screen will only display those vehicles
you have deleted.
o Click the PROCEED
button to save the information
o Click the DONE button
after completing all deletions
§ The Vehicle Processing
screen will redisplay.

·
To change/cancel information on vehicles that have already been
processed during the renewal:
o Select VEH LIST
to display a list of vehicles that have been changed, or deleted
The Vehicle List screen will display a list of the vehicle
that have been either added, changed, or deleted during the renewal.
The user can do the following:
·
Select BACK to return to the Vehicle Processing screen
·
Select a vehicle from the list by clicking the “Select” link to
the left of the UNIT No.
o This will
display a screen depending on the SERVICE TYPE for the vehicle (i.e. change or
delete)
o When a user
selects a vehicle, the vehicle information will display on the Vehicle Details
screen. The user can do one of the following actions:
§ If the user deletes the
vehicle from the renewal, the Vehicle Details screen will be protected and the
only action you can take is to CANCEL VEHICLE, which will undo the deletion and
will add the vehicle back on the renewal.
§ If the vehicle was
added or changed, from the vehicle screen the user can either make additional
changes or cancel the action
Ø To make changes,
update the information and select PROCEED and then select PROCEED from the
verification screen to save the changes.
Ø To cancel an added
vehicle from the renewal, select CANCEL VEHICLE to delete the vehicle from the
renewal
Ø To cancel a change
vehicle from the renewal, select CANCEL VEHICLE and the vehicle is processed on
the renewal as a no-change vehicle. The vehicle information for the renewal
will be the same as the previous year.
·
To update information on a previously deleted vehicle:
o The user should
select DELETE VEHICLE and then select PROCEED
o From the Delete
Vehicle screen, the user should select DELETE VEHICLE to display a list of
vehicles deleted during the renewal
o When the
changes are finished, select UPDATE to display the verification screen
o From the
verification screen, select PROCEED to save the changes to the deleted vehicles
·
To end the vehicle processing, the user selects DONE from the
Vehicle Processing screen. The system will display the Billing Details screen.
After this, the billing process starts. To get the details
of the billing process please refer to the Section 1.3.1.6 or for online users click
here.
1.3.5.1.7 Payment
Details
After this Payment details process starts. To get the
details of the payment process please refer to the Section 1.3.1.7 or for
online users click here.
1.3.5.2
Add Vehicle
Perform the following steps to process an ADD VEHICLE supplement:
·
From the IRP menu, select ADD VEHICLE from the SUPPLEMENT tab.
·
From the Fleet Search screen, enter the following:
o Enter the Account
No., fleet and fleet expiration year
o The supplement
date defaults to current date, adjust the date, if required. Refer to Section
1.3.4 for Georgia business rules on supplement dates.
o Select PROCEED
to display the vehicle detail screen
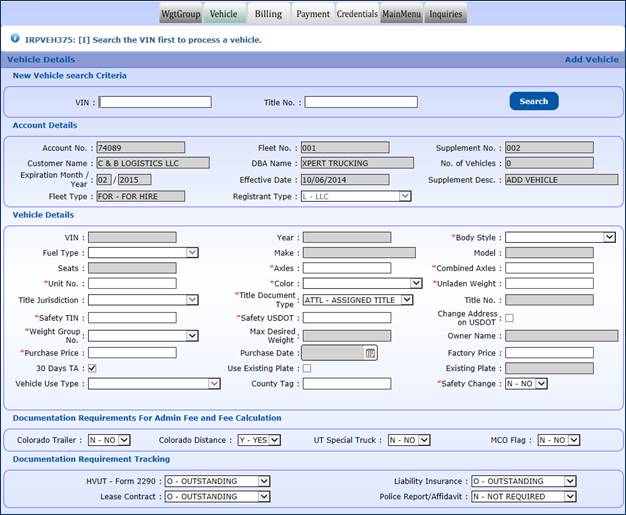
The
Vehicle Detail screen captures the information for each vehicle the user wants
to add to the fleet and register into the IRP system. Mandatory fields have a
red asterisk“*” beside them. At the top
of the Vehicle Detail screen there is a feature allowing the user to find an
existing vehicle in the IRP/Restricted database.
·
Enter the VIN and click the SEARCH button. The system will search for the information and will
populate the vehicle information fields on the Vehicle Detail screen.
·
Refer to Section 1.3.1.5 for the IRP vehicle
detail screen.
·
Refer to Section 1.3.2.5 for the Restricted
vehicle screen detail.
Click the PROCEED button on the command line to save the
vehicle information. The Vehicle Detail screen is displayed with empty fields
for the creation of another vehicle if required. Refer to the screen and
paragraphs referenced above for details.
If some of the vehicle information is wrong, needs to be
changed or vehicles need to be deleted after the vehicle has been stored in the
system, perform the following steps:
·
Click the VEHICLE LIST button on the command line and a selection
list of vehicles will be displayed
·
Click any “Select” link to the left of the unit number in the
selection list and the vehicle details will be displayed
·
Update the vehicle information as required and click the PROCEED
button on the command line
·
Delete the vehicle from the supplement by clicking the CANCEL
VEHICLE button
When all of the vehicle updates have been made click PROCEED
and the verification screen will be displayed. Click the PROCEED button and the
“VEHICLE DETAILS” screen will be displayed.
If you need to add a weight group for the IRP vehicles,
select the WTG GROUP tab.
·
Select ADD WTG GROUP, select the weight and then select PROCEED. After
selecting PROCEED from the verification screen, the system displays the Vehicle
Details screen so the user can add the vehicle.
When all of the vehicles have been entered correctly into
the system, click the DONE button and the “Billing Detail” screen will be
displayed. The navigation tabs at the top of the screen will indicate that the
user is now at the “Billing” step in the supplement process.
After this, the billing process starts. To get the details
of the billing process please refer to the Section 1.3.1.6 or for online users
click here.
1.3.5.2.2 Payment
Details
After this Payment details process starts. To get the
details of the payment process please refer to the Section 1.3.1.7 or for
online users click here.
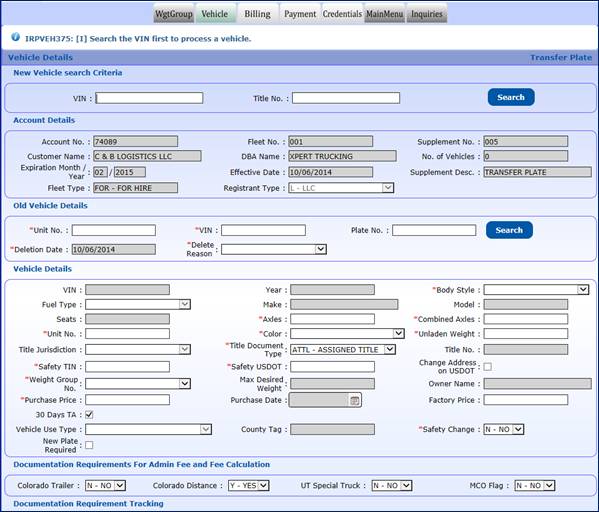
1.3.5.3
Transfer Plate
GAIRP
provides the ability to add a new vehicle and transfer an existing IRP plate
using the Transfer Plate supplement. The transfer vehicle must be in the same
account and fleet. Perform the following steps to process a TRANSFER PLATE
supplement:
·
From the IRP menu, select TRANSFER PLATE from the SUPPLEMENT tab
·
From the Fleet Search screen, enter the following:
o The Account
No., Fleet No., and Fleet Expiration Year
o The supplement
effective date is defaulted to the current date. The user can change the date
based on Georgia business rules. The credit will be calculated from the
supplement effective date. Refer to Section 1.3.4 for Georgia business rules on
supplement dates.
·
Select the PROCEED button from the command line on the screen and
the Vehicle Screen displays.
The Vehicle Details screen allows the following actions:
For IRP, to
review or add a new weight group
To review or add a weight group, select the WTG GROUP tab.
Only new weight groups can be added. Existing weight groups can be viewed but
cannot be changed.

·
Existing weight groups and their associated base jurisdiction and
maximum gross weight will be displayed
·
To view the detail per jurisdiction, click the “Select” link of
the weight group number to be viewed
o Select GO TO
WTG SELECTION to return to the list
·
To return to the Vehicle Details screen, select DONE
·
To add a weight group, select ADD WGTGROUP
o Enter the
information and select PROCEED to validate
o Select PROCEED
from the verification screen to save
To add a new vehicle
The Vehicle Details screen will display. The Vehicle
Detail screen is used to enter the information for each replacement vehicle the
user wants to add using an existing vehicle plate in the fleet.
At the top of the Vehicle Detail screen there is a feature
allowing the user to find the “NEW” vehicle in the database.
Enter the VIN and click on the SEARCH button. The system
will search for the information and, if found, will populate the vehicle
information fields on the Vehicle Detail screen.
·
The Vehicle Details screen captures all information about the new
vehicle and some required information about the old vehicle
To enter the “Old” vehicle information, perform the
following:
·
The Unit number, VIN, and Plate No. fields contain the
information for the vehicles currently registered to the account
·
The user can select from the list or type either the Unit No.,
VIN, or Plate - Only one of the values should be entered
·
Select the SEARCH button in this section to display the remaining
information about the old vehicle
·
DELETION DATE defaults to the supplement effective date
·
Select the DELETE REASON from the drop down
To enter the “NEW” vehicle information, perform the
following:
·
Refer to Section 1.3.1.5 for the IRP vehicle detail screen
·
Refer to Section 1.3.5.2 for the Restricted vehicle screen
detail
After you have entered the information, click the PROCEED
button on the command line and the system will perform edits to ensure that you
have entered all the mandatory fields and that they are correct to the extent
possible. The validation screen will display.
Click the PROCEED button on the command line to save the
vehicle information. The Vehicle Detail screen will be displayed with empty
fields for creation of another vehicle if required.
If some of the vehicle information is wrong and needs to
be changed or vehicles need to be deleted after the vehicle has been stored in
the system, the following steps are to be followed:
·
Click the VEHICLE LIST button on the command line and a selection
list of vehicles will be displayed
·
Click any SELECT link to the left of the unit number in the
selection list and the vehicle details will be displayed
·
Update the vehicle information as required and click the PROCEED
button on the command line
·
Delete the vehicle from the supplement by clicking the CANCEL
VEHICLE button on the command line
When all of the vehicle updates have been made, click the PROCEED
button on the command line and the verification screen will be displayed. At
the Verification screen click the PROCEED button and the “VEHICLE DETAILS”
screen will be displayed.
When all of the vehicles have been entered correctly into
the system click the DONE button on the command line and the “Billing Detail”
screen will be displayed. The navigation tabs at the top of the screen will
indicate that the user is now at the “Billing” step in the supplement process.
After this, the billing process starts. To get the details
of the billing process please refer to the Section 1.3.1.6 or for online users
click here.
After this Payment details process starts. To get the
details of the payment process please refer to the Section 1.3.1.7 or for
online users click here.
1.3.5.4
Delete Vehicle
Perform
the following steps to process a Delete Vehicle supplement:
·
From the IRP menu, select DELETE VEHICLE from the SUPPLEMENT tab
·
From the Fleet Search screen, enter the following:
o The Account No.,
Fleet No., and Fleet Expiration Year
·
The supplement effective date is defaulted to the current date. The
user can change the date based on Georgia business rules. Refer to Section
1.3.4 for Georgia business rules on supplement dates.

·
Select PROCEED to display the Delete Vehicle Selection Details screen.
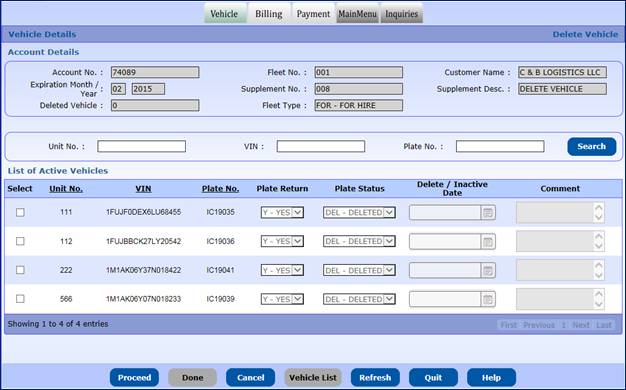
The Delete Vehicle Selection Details screen allows several
actions to be performed:
·
Select the vehicle to be deleted. To select the vehicle do one of
the following:
o Check
the SELECT checkbox next to the vehicle to be deleted from the list of active
vehicles
OR
o
For large fleets with multiple pages of vehicles, enter either a
unit number, VIN, or plate number and click the SEARCH button to display a
particular vehicle in the list.
o For
each delete vehicle the following information must be provided:
§ If the user has
returned the plate, indicate either Y (Yes) or N (No).
·
Plate Status – defaults to DEL – Deleted
§ Deletion date - must
be equal to or less than the current date
§ A comment can be
added if necessary.
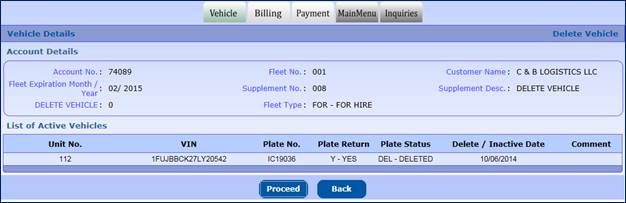
·
Selecting PROCEED will display the selected vehicle in a verification
screen and selecting PROCEED at the verification screen removes the vehicles
from the active vehicle list and allows the user to select another vehicle, if
required.
·
To undo the delete, select DEL VEH to display a list of vehicles
deleted during this supplement.
From this screen the user can either select the BACK
button to return to the previous screen with no updates or select PROCEED from
the validation screen to save the updates.
When all the vehicles to be deleted have been selected,
select DONE to proceed to the Billing Details screen.

After this, the billing process starts. To get the details
of the billing process please refer to the Section 1.3.1.6 or for online users
click here.
After this Payment details process starts. To get the
details of the payment process please refer to the Section 1.3.1.7 or for
online users click here.
1.3.5.5 IRP Change Weight Group
Perform the following steps to process an IRP Change Weight
Group Weight supplement:
·
From the IRP menu, select IRP CHANGE WEIGHT GROUP from the
SUPPLEMENT tab

·
From the Fleet Search screen, enter the following:
o Enter
the Account No., Fleet No., and Fleet Expiration Year
o
The supplement effective date is defaulted to the current date. The
user can change the date based on Georgia business rules.
o Select
the PROCEED button from the command line on the screen to display the Weight
Group Selection Details screen
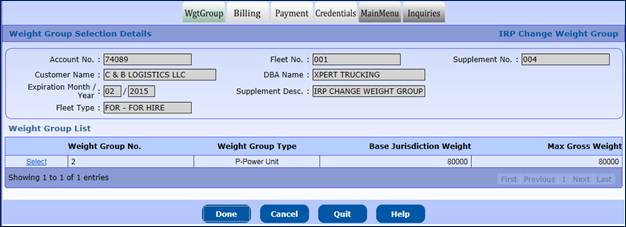
·
Weight Group Selection Details screen allows the following
actions:
o The
user can select only one weight group per supplement to change. Select the
weight group number you wish to change by clicking the “SELECT” link next to
the weight group number.
o The
current weight group information will display on the Fleet Weight Group Details
screen.
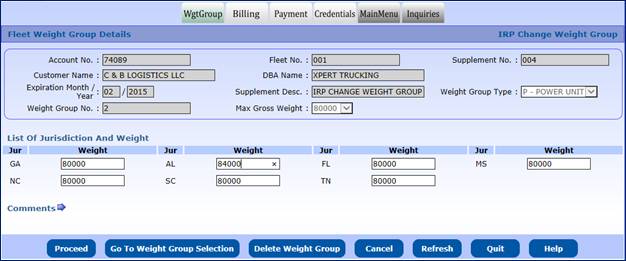
o Change the
weights for the jurisdictions
§ The system will run a
check to ensure the maximum combined gross weight does not exceed the maximum
weight allowed in a specific jurisdiction
§ The system will
verify if the declared weight for each jurisdiction is within or less than 10% variance
of the Base jurisdiction’s weight. However, the system will provide a comment
field for weights that exceed the 10% variance if a registrant provides
sufficient information. If the registrant does not provide the necessary information,
the supplement cannot proceed.
o Select
PROCEED when you are finished to display the verification screen
o
If you do not want to change any weight, click the GO TO WEIGHT GROUP
SELECTION button
o
When you are finished, select DONE to go to the Fleet Vehicle
Detail screen
After this, the billing process starts. To get the details
of the billing process please refer to the Section 1.3.1.6 or for online users
click here.
After this Payment details process starts. To get the
details of the payment process please refer to the Section 1.3.1.7 or for
online users click here.
Perform the
following steps to process an IRP Add Jurisdiction supplement:
·
From the IRP menu, select IRP ADD JURISDICTION from the
SUPPLEMENT tab.
·
From the Fleet Search screen, enter the following:
o The
Account No., Fleet No., and Fleet Expiration Year
o
The supplement effective date is defaulted to the current date. The
user can change the date based on Georgia business rules. Refer to Section
1.3.4 for Georgia business rules on supplement dates.
o Select
PROCEED to display the Distance Details Screen.

The Distance Details screen allows the following actions:
·
Change an existing jurisdiction that has a distance type of “N” –
no travel intended.
o Update distance
o Update distance
type
o Enter distance
– if distance type is actual
·
To add a new jurisdiction:
o Select the
jurisdiction from the jurisdiction list or from the map
o Enter the
distance and distance type
o Click the ADD button
to add the selected jurisdiction to the grid
·
Override if jurisdictions are not contiguous and add a comment. The
system will determine if a carrier has included all the jurisdictions necessary
to create a path to the base jurisdiction. If a path is not found using the
listed jurisdictions, an error message will be displayed. The user can
override the contiguous validation and provide a comment or add the “missing”
jurisdictions to create a valid path. The error will indicate which
jurisdiction(s) are in error.
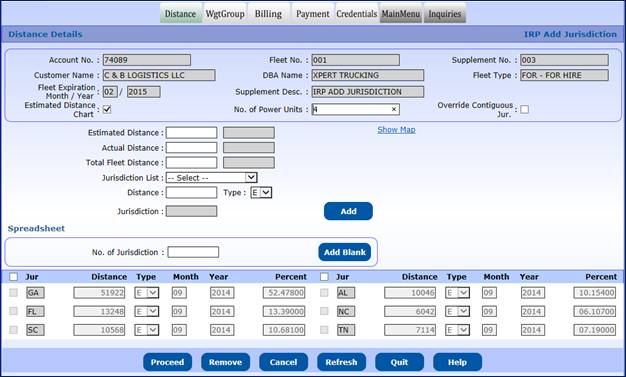
·
The user must enter the total Estimated, total Actual, and
overall total Distance
·
If the new jurisdiction has a distance type of Estimated and the
carrier provides the estimated distance instead of using the Estimated Distance
Chart, a comment must be included.
·
Select PROCEED when finished to display the verification screen
The verification screen will display with the percentages
and jurisdiction information provided. Jurisdictions highlighted in RED are being
penalized and total over 100%. The system will display “over 100%” information
on the screen. The “over 100%” field will contain the total percentage
calculated in excess of a 100%.
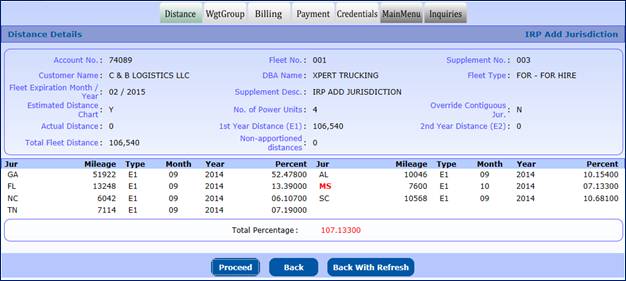
·
Select PROCEED when you are finished to continue to the Weight
Group Selection screen
·
Select BACK to go back and change information
·
Select BACK with REFRESH to go back to the previous screen and
perform a REFRESH of the screen at the same time.
From the Weight Group Selection screen, the user can do
the following:
·
For add jurisdictions, the system has automatically set the maximum
gross weight for each weight group for each jurisdiction added. The user can
select any weight group to change the weight for the newly added jurisdictions.
The weight for the new jurisdiction will be displayed in the weight screen.
Refer to Section 1.3.1.4 Add Weight Group.
·
To adjust a weight, select the weight group number by clicking the
SELECT link associated with the weight group and the Weight Group Details
screen will display.
·
For any added jurisdiction, the weight can be updated
·
Click the DONE button from the command line on the Weight Group
Selection Details screen to display the Billing Details screen.
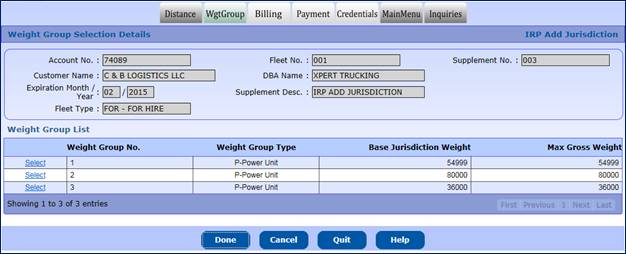
After this, the billing process starts. To get the details
of the billing process please refer to the Section 1.3.1.6 or for online users
click here.
After this Payment details process starts. To get the
details of the payment process please refer to the Section 1.3.1.7 or for
online users click here.
1.3.5.7
Replace Cab Card
Perform
the following steps to process a Replace Cab Card supplement:
·
From the IRP menu, select REPLACE CAB CARD from the SUPPLEMENT
tab
·
From the Fleet Search screen, enter the following:
o The Account No.,
Fleet No., and Fleet Expiration Year.
o The supplement
effective date is defaulted to the current date. The user can change the date
based on Georgia business rules. Refer to Section 1.3.4 for Georgia business
rules on supplement dates.
o Select PROCEED
to display the Replace Cab Card Selection screen.

The Replace Cab Card Vehicle Details screen allows the
following actions:
·
Indicate the vehicle(s) for the replace cab card by doing one of
the following:
o Check the check
box next to the unit number for the vehicle
o The Next and
Previous buttons are for paging through a vehicle list if the fleet has a large
number of vehicles, or
o Enter the Unit number,
VIN or Plate number and click the SEARCH button – once the vehicle information
is found it will display in the selection list
- Select PROCEED when you are
finished to display a screen with the selected vehicles
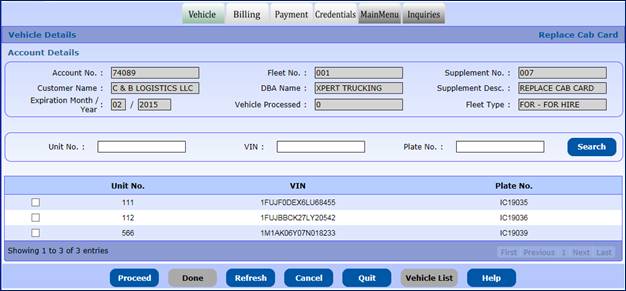
On the Replace Cab Card screen
·
When applicable, the user can select a Decal and/or TA by clicking
the DECAL or TA checkbox
·
Select PROCEED to display the validation screen.
·
Select PROCEED from the validation screen to save the vehicles. You
will return to the active list of vehicle in case you want to replace cab cards
on additional vehicles
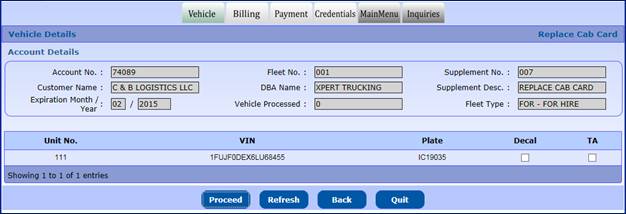
GAIRP will display the list of active vehicles that have
not been selected for replacement cab cards. From this screen the user can do
the following:
·
Click the VEHICLE LIST button to display a list of vehicles
processed in this supplement. You can change the information on any vehicle or
cancel the vehicle from the supplement.
·
Select additional vehicles for replacement cab cards by clicking
the check box next to the vehicle and then selecting PROCEED.
·
Click the DONE button when you are finished to display the
Billing Details screen
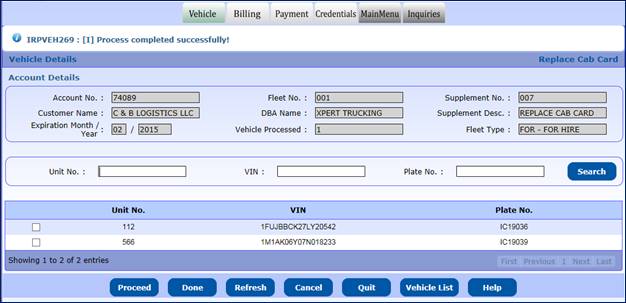
Select VEHICLE LIST to update or cancel a vehicle from the
supplement and the list of vehicles processed in the supplement will be
displayed.
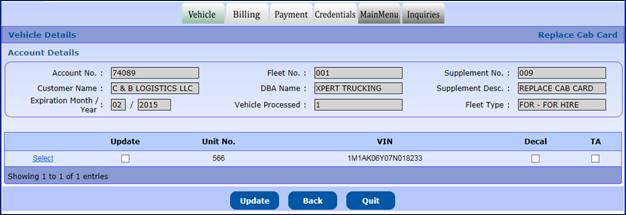
You can do the following from this screen:
·
Click the BACK button to go back to the previous screen
·
Update a vehicle(s)
o Update the
vehicle information
o Check the
Update check box
o Click UPDATE
·
Cancel a vehicle from the supplement
o Click the “Select”
link to the left of the vehicle
o GAIRP will
display the vehicle detail screen
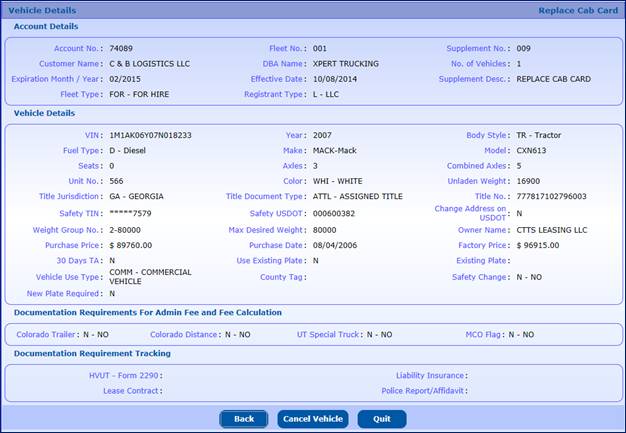
o Click the CANCEL
VEHICLE button at the bottom of the screen to remove it from the supplement or click
the BACK button to go back to the previous screen
After you have
completed all the updates, the Replace Cab Card screen will once again display.
·
Select DONE when you are finished to display the Billing Details
screen
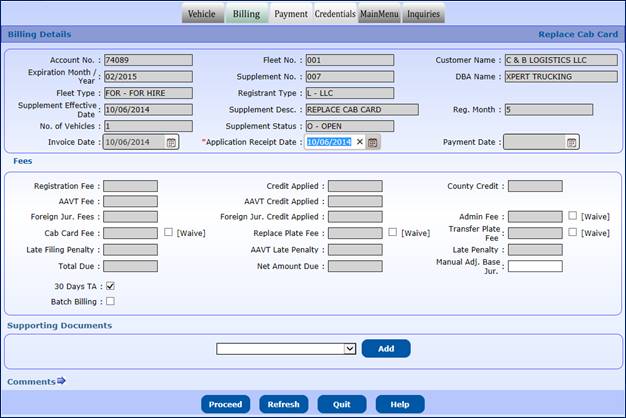
After this, the billing process starts. To get the details
of the billing process please refer to the Section 1.3.1.6 or for online users
click here.
After this Payment details process starts. To get the
details of the payment process please refer to the Section 1.3.1.7 or for
online users click here.
1.3.5.8
IRP Fleet To Fleet
Transfer
Fleet to Fleet transfer moves a vehicle in one fleet to
another fleet within the same account. The fees are charged similar to a
transfer. Some jurisdictions fees differ from a transfer when transferring
between fleets.
Perform the
following steps to process a Fleet to Fleet supplement:
·
From the IRP menu, select IRP FLEET TO FLEET TRANSFER from the SUPPLEMENT
tab.
·
From the Fleet Search screen, enter the following:
o Enter the Account
No., Fleet No., and Fleet Expiration Year of the fleet the vehicle is being
transferred to.
o The supplement
effective date is defaulted to the current date. The user can change the date
based on Georgia business rules.
o Select PROCEED
to display the From Fleet Vehicle Selection Detail screen

·
At the From Fleet Vehicle Selection Detail screen the user will
perform the following actions:
o Enter the fleet
number the vehicles are being transferred “From”
o Select PROCEED
to receive a list of vehicles in the “From” fleet
o Select a
vehicle to transfer by clicking the “Select” link for the vehicle
o The Vehicle
Detail screen will display for the selected vehicle
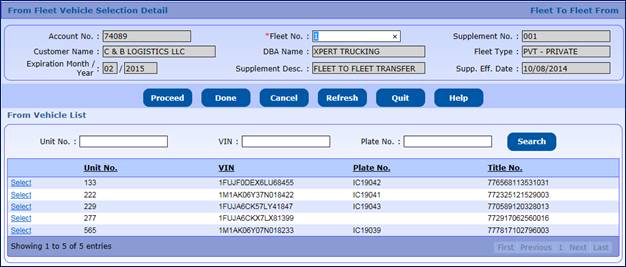
From the Vehicle Detail screen, the user can do the
following:
·
Enter the Unit No.
·
Select the correct weight group
o If you need to
add a weight group, select the WTGROUP tab and proceed to add the weight group.
o After
completing the new weight group, the user will be transferred back to the Fleet
to Fleet Transfer Vehicle Detail screen.
·
Update the vehicle information as allowed
·
Select PROCEED to continue to the verification screen
·
Select PROCEED from the verification screen to save the vehicle
and proceed back to the From Fleet Vehicle Selection Detail screen
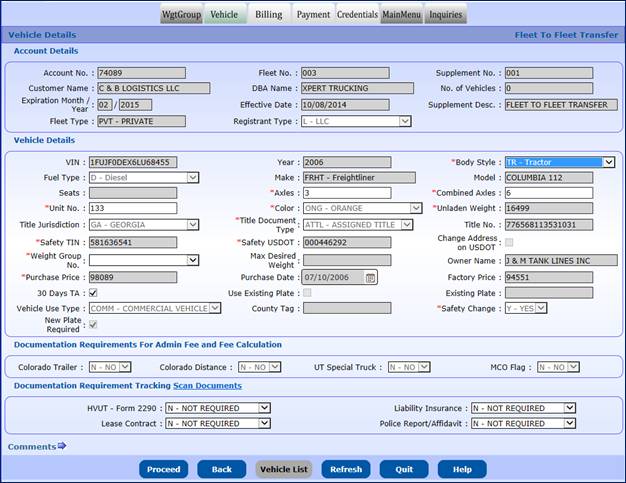
From the Fleet to Fleet Transfer screen, you can do the
following:
·
Select another vehicle to transfer
·
Select VEHICLE LIST to view, update or delete a vehicle in the
supplement.
·
Select DONE to proceed to the Billing screen
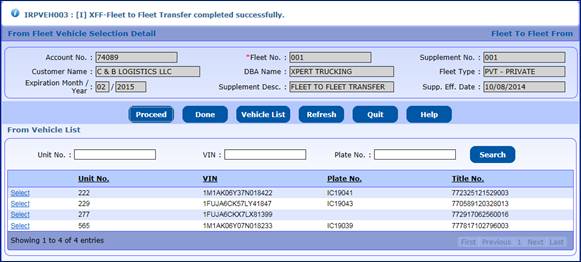
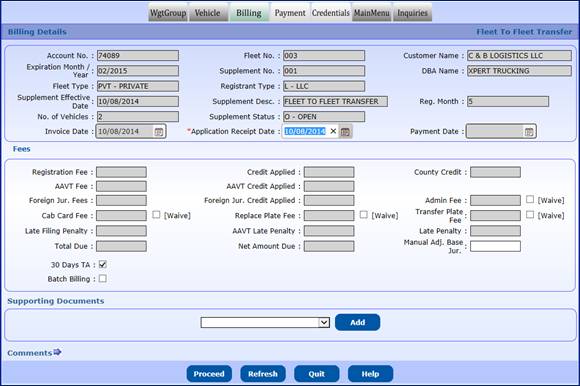
After this, the billing process starts. To get the details
of the billing process please refer to the Section 1.3.1.6 or for online users
click here.
1.3.5.8.2
Payment Details
After this Payment details process starts. To get the
details of the payment process please refer to the Section 1.3.1.7 or for
online users click here.
1.3.5.9 Replace Plate
Perform
the following steps to process a Replace Plate supplement:
·
From the IRP menu, select REPLACE PLATE from the SUPPLEMENT tab
·
From the Fleet Search screen, enter the following:
o The Account No.,
Fleet No., and Fleet Expiration Year
o The supplement
effective date is defaulted to the current date. The user can change the date
based on Georgia business rules. Refer to Section 1.3.4 for Georgia business
rules on supplement dates.
o Click PROCEED
to display the Replace Plate Vehicle Selection Details screen
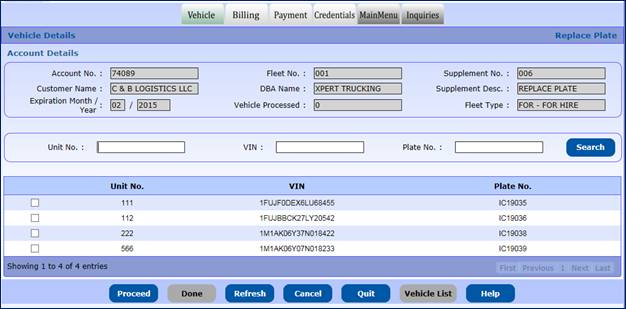
Replace Plate Vehicle Details screen allows the following
actions:
·
Indicate the vehicle(s) to receive a replacement plate by doing
one of the following:
o Click the check
box next to the unit number for the vehicle
o For large
fleets, the user may enter the Unit No., VIN or Plate number and click the
SEARCH button – once the vehicle information is found it will display in the
selection list
- Click
PROCEED when you are finished to display a screen with the selected
vehicles
On the Replace Plate screen:
·
Select an option for the POLICE REPORT / AFFIDAVIT field using
the available dropdown list. The options include the following:
o
O – Outstanding (Screen defaults to this option)
o
C – Collected
o
N – Not Required
o
S – System Collected
NOTE: To issue a new plate, a copy
of the Police Report/Affidavit is required.
·
Select a REASON from the available dropdown list, which include:
o
OTHR – Other
o
CORR – Correction
o
DMGD – Damaged
o
LOST – Lost
o
STLN – Stolen
·
Document Requirement Tracking – A user can scan documents using
the “Scan Documents” link to collect documents such as a police report
·
Waive the Plate Fee by clicking the “Fee Override” checkbox
·
The Plate checkbox will default to checked and cannot be changed
·
A TA can be issued by clicking the TA checkbox, if required
·
Select PROCEED to display the validation screen
·
Select PROCEED from the validation screen to save the vehicles. You
will return to the active list of vehicle in case you want to replace plates on
additional vehicles.
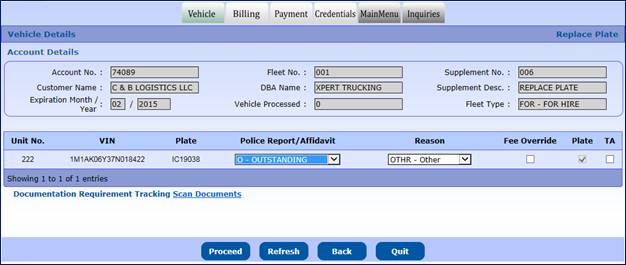
GAIRP will display the list of active vehicles that have
not been selected for replacement plates. From this screen the user can do the
following:
·
Click the VEHICLE LIST button to display a list of vehicles
processed in this supplement. You can change the information on any vehicle or
cancel the vehicle from the supplement.
·
Select additional vehicles for replacement plates by clicking the
check box next to the vehicle and then click PROCEED
·
Click the DONE button when you are finished to display the
Billing Details screen
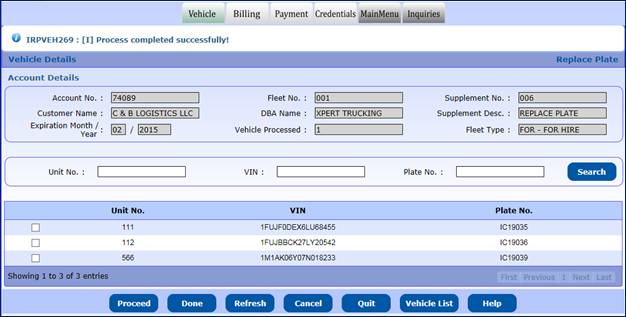
Select VEHICLE LIST to update or cancel a vehicle from the
supplement and the list of vehicles processed in the supplement will be
displayed.
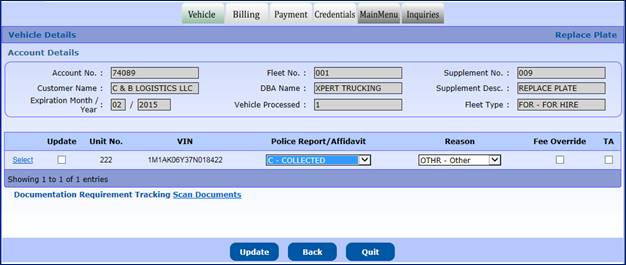
You can do the following from this screen:
- Click the BACK button to go back
to the previous screen
- Update a
vehicle(s)
o Update the
vehicle information
o Check the
Update check box
o Click UPDATE
- Cancel a
vehicle from the supplement
o Click the “SELECT”
link to the left of the vehicle
o GAIRP will
display the vehicle detail screen
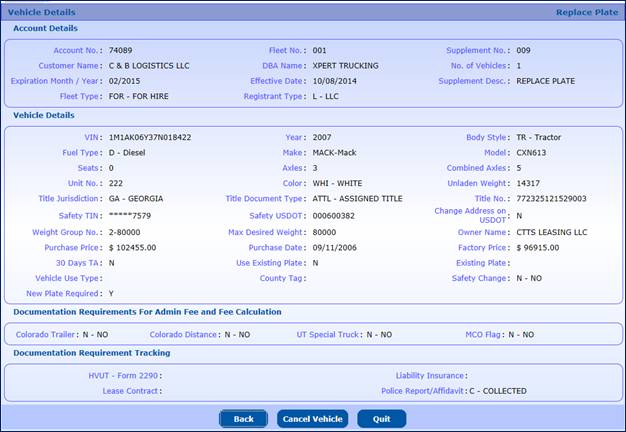
o Select CANCEL
VEHICLE at the bottom of the screen to remove the vehicle from the supplement
or select BACK to go back to the previous screen
After you have completed the updates, the replace plate screen
will once again display.
·
Click DONE when you are finished to display the Billing Details
screen.
After this, the billing process starts. To get the details
of the billing process please refer to the Section 1.3.1.6 or for online users
click here.
1.3.5.9.2
Payment Details
After this Payment details process starts. To get the
details of the payment process please refer to the Section 1.3.1.7 or for
online users click here.
1.3.5.10 IRP Change
Carrier Type
Use this supplement when a carrier
is changing either their fleet type or commodity class during the registration
year. Normally, this is done during renewal.
Perform the following steps to process an IRP Change
Carrier Type supplement:
·
From the IRP menu, select IRP CHANGE CARRIER TYPE from the
SUPPLEMENT tab.
·
From the Fleet Search screen, enter the following:
o The Account
No., Fleet No., and Fleet Expiration Year
o The supplement
effective date is defaulted to the current date. The user can change the date
based on Georgia business rules. Refer to Section 1.3.4 for Georgia business
rules on supplement dates.
o Select PROCEED
to display the Fleet Details screen

·
The Fleet Details screen allows the following actions:
o The screen
indicates the current values of the Fleet type and Commodity Class
o The user will
update as required by selecting the new type and commodity class from the drop
down
·
The following is the list of acceptable Commodity Classes for
each Fleet Type:
|
PVT
|
ALL
|
|
FOR
|
ALL, Household Goods, Bus
|
|
RES
|
No Commodity class
|
o Select
PROCEED and verify the changes
o When you are
finished, select PROCEED to go to the Fleet Vehicle Detail Verification screen

o After verifying
the information, click the PROCEED button to move to the Billing screen where a
success message will display at the top of the screen to indicate the IRP
Change Carrier Type update was applied.
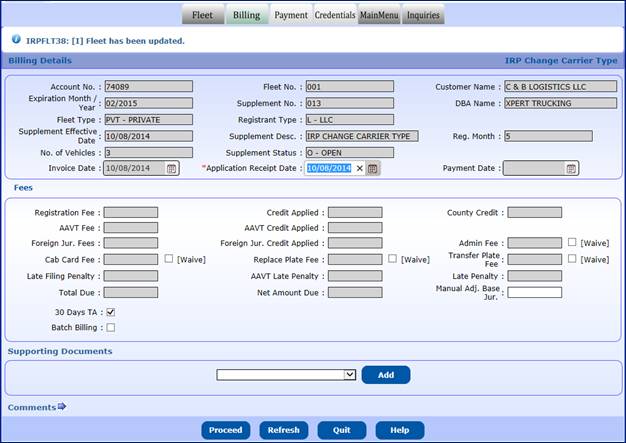
After this, the billing process starts. To get the details
of the billing process please refer to the Section 1.3.1.6 or for online users
click here.
1.3.5.10.2 Payment Details
After this Payment details process starts. To get the
details of the payment process please refer to the Section 1.3.1.7 or for
online users click here.
1.3.5.11 Amend
Vehicle With Fee
This supplement is performed when a vehicle needs to be
amended and IRP fees are due based on the changes. Perform the following steps
to process an Amend Vehicle with Fee supplement:
·
From the IRP menu, select AMEND VEHICLE WITH FEE from the
SUPPLEMENT tab.
·
From the Fleet Search screen, enter the following:
o The Account
No., Fleet No., and Fleet Expiration Year
o The supplement
effective date is defaulted to the current date. The user can change the date
based on Georgia business rules. Refer to Section 1.3.4 for Georgia business
rules on supplement dates.
o Select PROCEED
to display the Amend Vehicle Details Screen (see below)
The Amend Vehicle Details screen allows the following
actions:
·
Select the WGT Group tab, then review existing weight groups or
add a new weight group
o To review
select the weight group number from the list
§ Existing weight
groups and their associated base jurisdiction and declared gross weight will be
displayed
§ Select GO TO WGT
SELECTION to return to the list
o To add a weight
group, select ADD WGT GRP
§ Enter the information
and select PROCEED to validate
§ Click the PROCEED button
from the validation screen to save
o Select DONE to
return to the Vehicle Details screen
- Select a vehicle to amend
o Enter
either the UNIT No., VIN or Title No. in the CHANGE VEHICLE DETAILS section
o Click
the SEARCH button to populate the vehicle information in the VEHICLE DETAILS
area
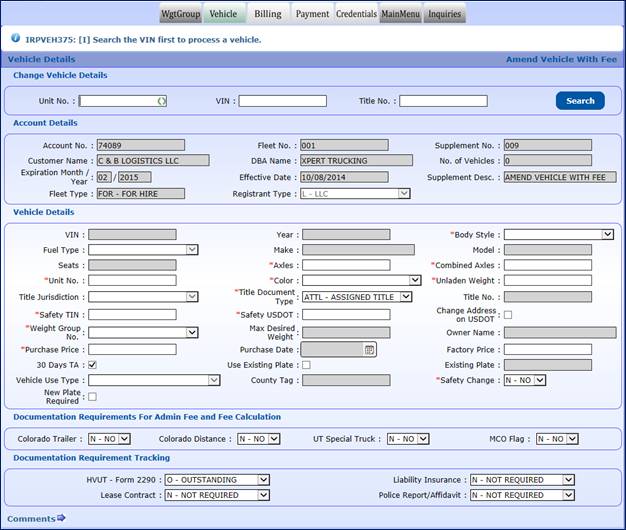
GAIRP will populate the screen with the vehicle
information from GAIRP. Once the vehicle information is populated on the
screen, update the editable fields as required.
Refer to Section 1.3.1.5 IRP Add Vehicle for detailed
field information on IRP vehicles. If the fleet type is of the added vehicle is
different than the existing vehicle in the fleet, a new plate will be issued.
Refer to Section 1.3.2.5 Restricted Add Vehicle for
detailed field information on Restricted vehicles.
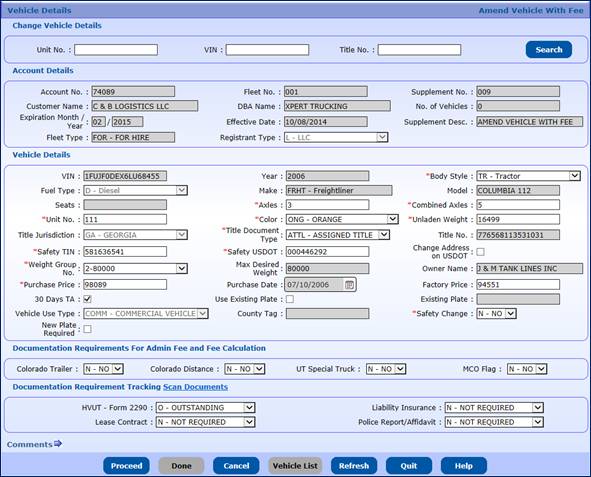
VIN correction must be done using the VIN Correction
supplement. Refer to Section 1.3.5.14 VIN Correction supplement.
To amend the vehicle:
·
Update the information on the screen as required
·
Select PROCEED to execute edits and display the validation screen
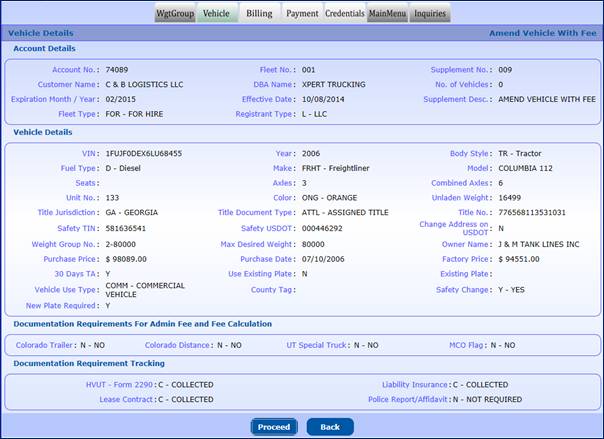
·
Select PROCEED from the verification screen to save the vehicle
information
Follow the
same procedure for the vehicles requiring changes.
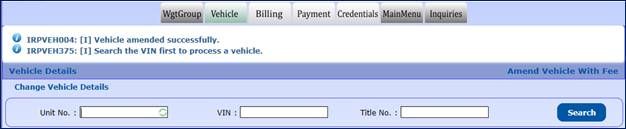
If you need to update a previously
updated vehicle, click the VEHICLE LIST button on the command line to display a vehicle selection list.
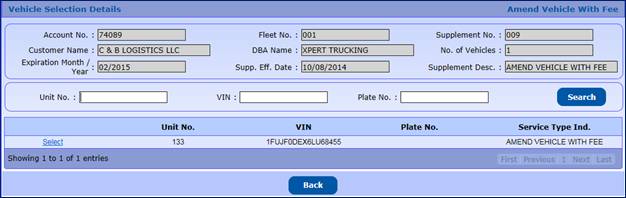
Select the vehicle you need to update or review by
clicking the “Select” link and proceed as before.
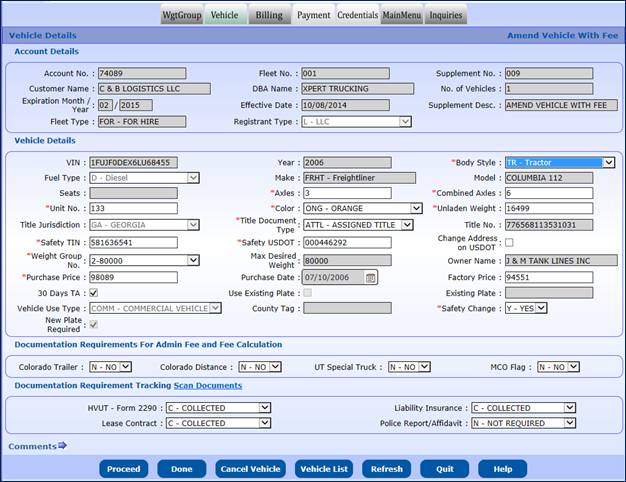
If you need to delete a
vehicle from the supplement, select VEHICLE LIST to display a vehicle selection
list. Select the vehicle you need to cancel. Once the vehicle is displayed, you
may select CANCEL VEHICLE on the command line to delete the vehicle from the
supplement.
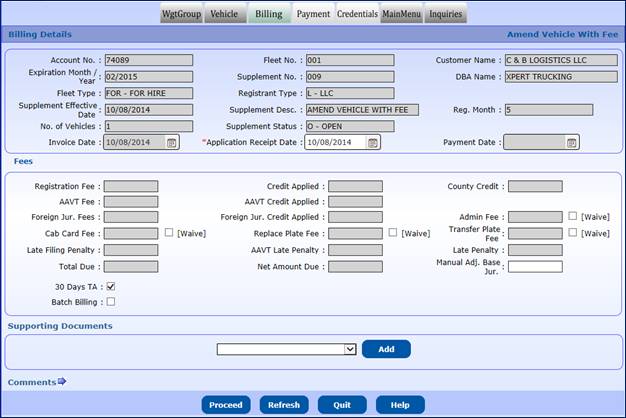
At the Amend Vehicle with Fee Billing Detail screen, a
user can reference any supporting documents provided with the supplement using
the ADD button in the “Supporting Documents” section.
When all the required changes are processed, click DONE to
proceed to the Billing Details screen.
After this, the billing process starts. To get the details
of the billing process please refer to the Section 1.3.1.6 or for online users
click here.
1.3.5.11.2 Payment Details
After this Payment details process starts. To get the
details of the payment process please refer to the Section 1.3.1.7 or for
online users click here.
1.3.5.12 Amend
Vehicle Without Fee
This transaction will only charge Georgia administrative
fees. IRP fee related changes are not made with the Amend Vehicle without Fee
supplement. Changes allowed include unit number, color and Safety TIN/USDOT
Perform the following steps to process an Amend Vehicle
without Fee supplement:
·
From the IRP menu, select AMEND VEHICLE WITHOUT FEE from the
SUPPLEMENT tab.
·
From the Fleet Search screen, enter the following:
o The Account
No., Fleet No., and Fleet Expiration Year
o The supplement
effective date is defaulted to the current date. The user can change the date
based on Georgia business rules. Refer to Section 1.3.4 for Georgia business
rules on supplement dates.
o Select PROCEED
to display the Amend Vehicle without Fee Details screen

·
Select a vehicle to be amended
o Select either
the UNIT No., VIN or Title No. , from the CHANGE VEHICLE DETAIL section
o Click the
SEARCH button to populate the vehicle information to the VEHICLE DETAILS area

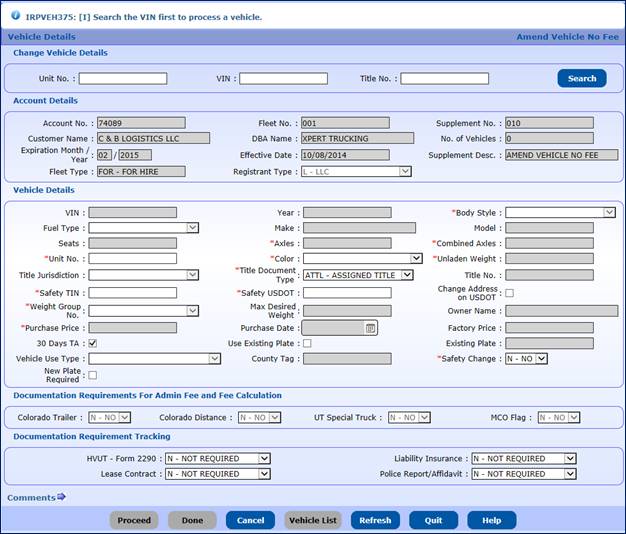
GAIRP will display the Vehicle Details populated from the vehicle
information in GAIRP. Once the vehicle information is populated on the screen,
update the fields as required.
Refer to Section 1.3.1.5 IRP Add Vehicle for detailed
field information on IRP vehicles. Only information that does not affect IRP
fees can be changed.
Refer to Section 1.3.2.5 Restricted Add Vehicle for
detailed field information on Restricted vehicles.
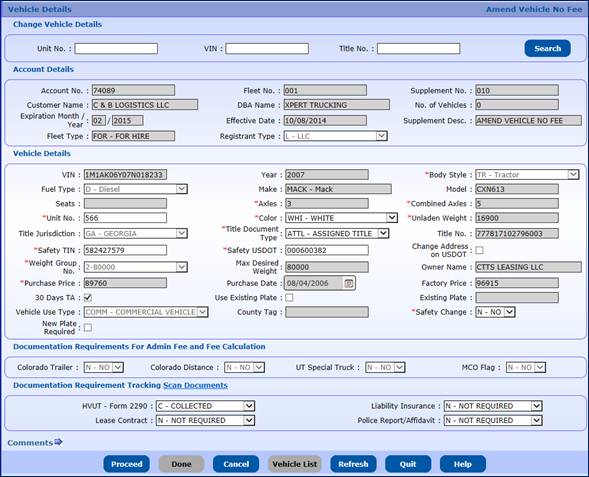
Any information that effects fees must be updated prior to
doing the amend vehicle supplement. VIN correction is done using the VIN
Correction supplement. Refer to Section 1.3.5.14 VIN Correction.
To amend the vehicle:
·
Update the information on the screen as permitted/required
·
Select PROCEED to execute edits and display the validation screen
·
Select PROCEED from the verification screen to save the vehicle
information
Follow the same procedure for any other vehicles requiring
changes.
If you need to update a previously updated vehicle, then
click the VEHICLE LIST button on the command line to display a vehicle
selection list.

Select the vehicle you need to update or review. Proceed
as before.
If you need to delete a vehicle from the supplement,
select VEHICLE LIST to display a vehicle selection list. Select the vehicle you
need to cancel. Once the vehicle is displayed, you may select CANCEL VEHICLE on
the command line to delete the vehicle from the supplement.
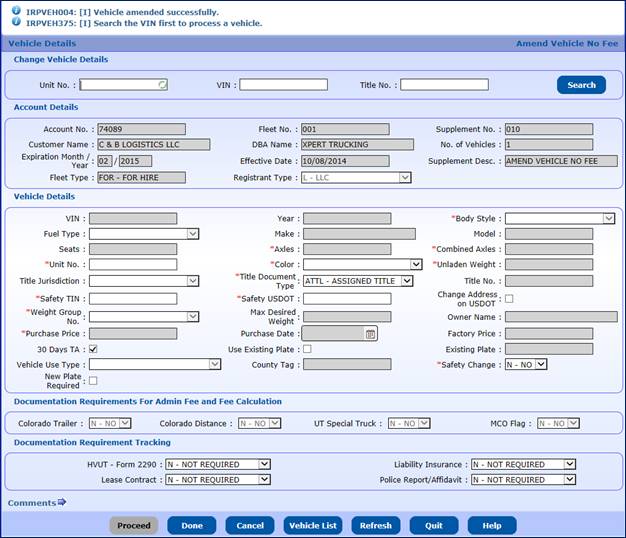
When all the vehicles requiring change are processed, click
the DONE button to proceed to the Billing Details screen.
After this, the billing process starts. To get the details
of the billing process please refer to the Section 1.3.1.6 or for online users
click here.
1.3.5.12.2
Payment Details
After this Payment details process starts. To get the
details of the payment process please refer to the Section 1.3.1.7 or for
online users click here.
1.3.5.13 Change Fleet Name
Use this supplement for DBA Name
and mailing address changes.
Perform
the following steps to process a Change Fleet Name supplement:
·
From the IRP menu, select CHANGE FLEET NAME from the SUPPLEMENT
tab
·
From the Fleet Search screen, enter the following:
o The Account
No., Fleet No., and Fleet Expiration Year
o The supplement
effective date is defaulted to the current date. The user can change the date
based on Georgia business rules. Refer to Section 1.3.4 for Georgia business
rules on supplement dates.
o Select PROCEED
to display the Fleet Details screen.

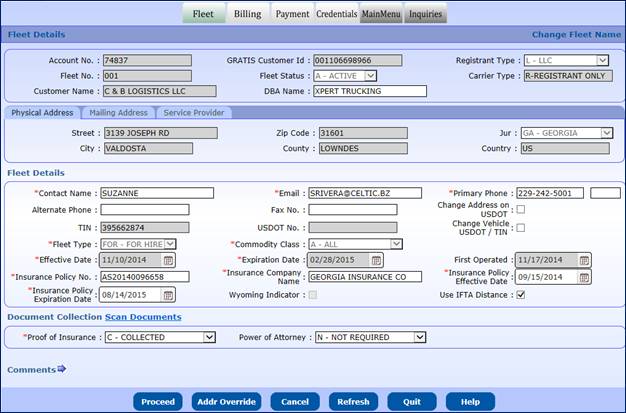
- The Fleet Detail screen allows
the following actions:
o The screen
indicates the current values of the Fleet information.
o The following
is a list of the fleet information that may be modified with this supplement:
§ DBA Name
§ Contact name, email, primary
phone, alternate phone and fax number
§ Insurance information
– policy number, company name, policy dates
§ Service Provider
§ Mailing addresses
§ Comments
o Select PROCEED
and validate the changes
o When you are
finished, select PROCEED to go to the Fleet Vehicle Detail screen
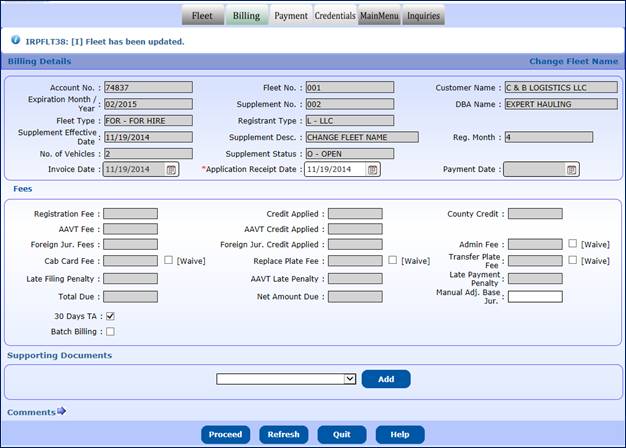
After this, the billing process starts. To get the details
of the billing process please refer to the Section 1.3.1.6 or for online users
click here.
1.3.5.13.2 Payment Details
After this Payment details process starts. To get the
details of the payment process please refer to the Section 1.3.1.7 or for
online users click here.
Perform the following steps
to process a VIN Correction supplement:
·
From the IRP menu, select VIN CORRECTION from the SUPPLEMENT tab.
·
From the Supplement Search screen, enter the following:
o Enter the Account
No., Fleet No., Fleet Expiration Year and/or Supplement No.
o Select PROCEED
to display the VEHICLE SEARCH screen

·
From the Vehicle Search screen, enter the following:
o VIN, Unit No.
or Plate No. of the vehicle to be changed
o Click the
Proceed button to display the vehicle which can then be selected to make the
VIN changes
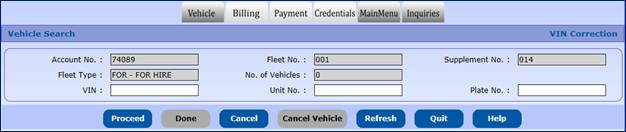
·
Once the vehicle is displayed on the Vehicle Search screen, perform
the following:
o Click the “SELECT” link to the left of the UNIT No.
to display the Vehicle Details screen

·
From the Vehicle Details screen, enter the new VIN and click the
UPDATE button
o
The updated information from the GAIRP is displayed
o
Select PROCEED to display the Vehicle verification screen
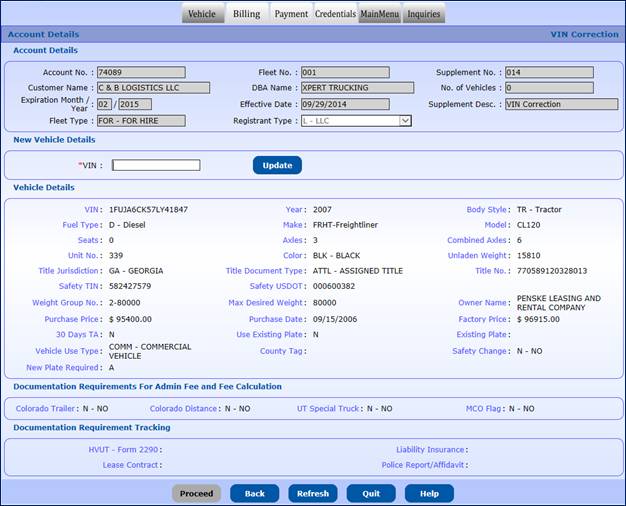
o
Select PROCEED to return to the Vehicle Search screen
·
To correct additional VINs – repeat the steps above starting with
the Vehicle Search screen
·
To review or cancel the VIN correction, select “Cancel Vehicle”.
Select “OK” at the confirmation prompt to confirm you want to cancel a vehicle
where the VIN was corrected.
o A list of
vehicles that are being corrected will display
§ The new and old VIN
numbers will be displayed
§ Click the “SELECT”
link associated with the vehicle that is to be cancelled
§ The Vehicle Details
screen will display, select “CANCEL VEHICLE”
·
To complete the transaction select DONE to display the Billing
Details screen
After this, the billing process starts. To get the details
of the billing process please refer to the Section 1.3.1.6 or for online users
click here.
1.3.5.14.2
Payment Details
After this Payment details process starts. To get the
details of the payment process please refer to the Section 1.3.1.7 or for
online users click here.
1.3.5.15 IRP Fleet
Reinstatement
This supplement is used when a carrier
has not been operating in Georgia and IRP fees are not due for the full renewal
period. A Reinstatement supplement is done for every year the carrier was not
in service in Georgia. Perform the following steps to process a Fleet Reinstatement
supplement:
·
Select PROCESS/Fleet/REINSTATEMENT from the IRP menu
·
Enter the Account No., Fleet number, and the last registration
year for the account.
·
Select PROCEED to display the distance information

·
The Distance Type will be updated to “N” – No Travel Intended and
the distance to zero for all jurisdictions.
·
Select PROCEED to save the changes and proceed to the Billing
Details screen.
·
From the Billing Detail screen:
o
No fees are charged
o
Select PROCEED to finish the reinstatement process for the account
No., fleet and registration year
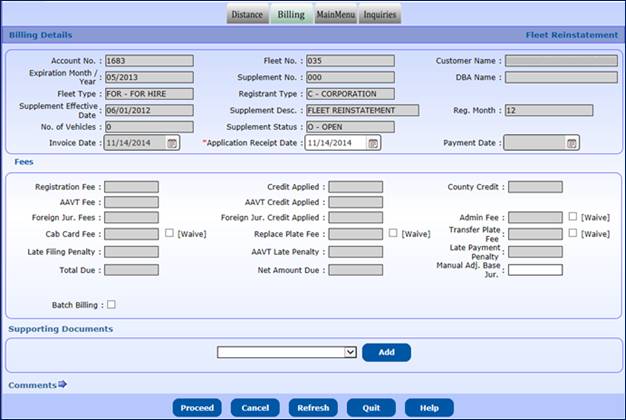
The reinstatement supplement is closed after billing.

Repeat this process for every year except the year you are
performing the renewal for the carrier.
Once the registration year reinstatements have been
completed, a renewal supplement should be performed for the current year
registration. According to the IRP plan, if the carrier has been out of
business for a period of 18 months, they are eligible for first year estimated distance.
NOT ALL CARRIERS WILL QUALIFY FOR THIS. The following procedures outline how to
adjust the distance for the first year estimates.
·
The Distance screen will display all previously selected
jurisdictions with a Distance Type of “N” and a Distance of zero.
o Update the
distance and jurisdictions as required.
o Update the
Total Estimated Distance, Total Actual and Total Fleet Distance.
o Update the
Distance Type to either A – Actuals, E – Estimated, or N- No Travel
o Adjust the
jurisdiction year to the current fleet effective year, if the carrier is
eligible for first year estimates (E1) to the effective month and year of the
fleet. If the carrier is not eligible for first year estimates, and is using
estimates, do not change the month and year of the distance.
o Select PROCEED
to display the Distance verification screen.
§ Note that the
Distance Type is now an “E1” and the percentage is 100%.
- Select PROCEED to display the
Weight Group Selection Details screen.
o Select DONE if
all weight groups are present or follow the steps in a normal renewal to Add
additional weight groups or change an existing weight group.
- Vehicles are not brought forward
from previous registration years. User must perform a renewal with zero
(0) vehicles then perform an Add Vehicle supplement. .
- Complete the renewal as you would
a normal renewal. Refer to Section 1.3.4.1 Renewal.
This supplement is used when multiple vehicle transactions
need to be processed during the same supplement. The Combined Vehicle
supplement allows the user to Add Vehicles, Delete Vehicles, and Amend Vehicles
with Fees within the same supplement.
- From the IRP menu, select COMBINED
from the SUPPLEMENT tab.
- From the Supplement Search
screen, enter the following:
o Enter the
Account No., Fleet No., and Fleet Expiration Year
o The supplement
date defaults to current date, adjust the date if required
o Select PROCEED
to display the Vehicle Processing screen
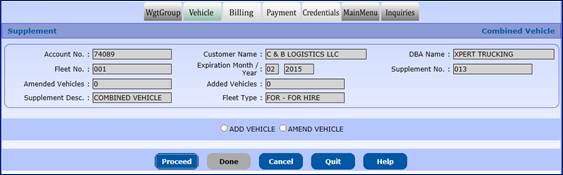
·
At the Vehicle Processing screen there are two radio buttons
which can be selected one at a time to do the following:
o Add a new
vehicle
o Amend or update
vehicle information
To add a vehicle:
o The user can click
the ADD VEHICLE radio button and then select PROCEED to display the Vehicle
Detail screen
o The user should
enter all the vehicle information as required and then select PROCEED. For
details on the add vehicle information refer to the New Account/Add Vehicle
section for either IRP (1.3.1.5) or Restricted Accounts (1.3.2.5).
o Once the
vehicle is added, the user will return to the Vehicle Processing screen
displayed above
·
To amend vehicle information:
o The user can click
the AMEND VEHICLE radio button and then select PROCEED to display the Vehicle
Detail screen
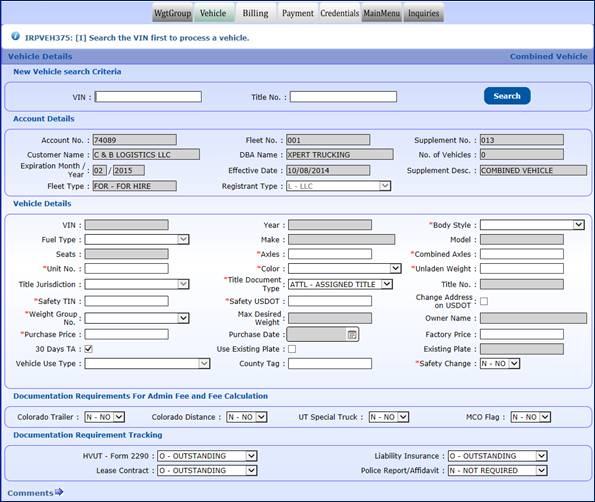
o The user can
select the vehicle to change by selecting either the Unit number, VIN, or plate
number
o Once the
vehicle is selected, the existing vehicle information will display
o The user is
then able to update the information as necessary
o Once the
information is changed, select PROCEED to perform edits. If the vehicle
information passes the edits, the Vehicle Details Verification screen will
display.
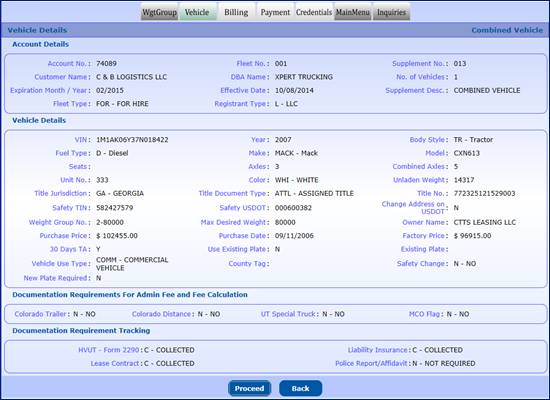
o From the
Verification screen, review the vehicle information and select PROCEED to save
the changes made to the vehicle
·
The user will again be returned to the Vehicle Processing screen
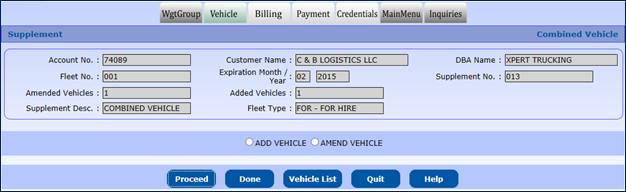
To change/cancel
information on vehicles already having been processed during the renewal; OR to
change/cancel a previously “modified” vehicle (including added, deleted or
updated vehicles), a user can do the following:
·
Click the VEHICLE LIST button to display a list of vehicles that
have been changed, added or deleted with this supplement
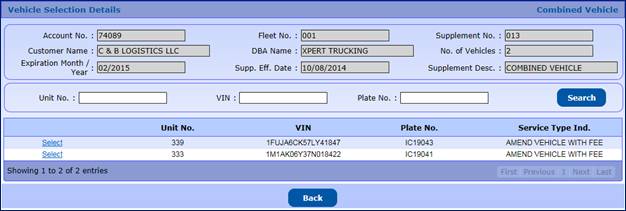
At the Vehicle Selection Details screen for a COMBINED
VEHICLE supplement, the user can do the following:
·
Select BACK to return to the Vehicle Processing screen
·
Select a vehicle from the list by clicking the “Select” link to
the left of the UNIT No.
o When a vehicle
is selected, the vehicle information will display on the Vehicle Details screen.
The user can do one of the following actions:
§ If the vehicle was
deleted, the Vehicle Details screen will be protected and the only action you
can take is to CANCEL VEHICLE, which will undo the delete adding the vehicle back
to the fleet.
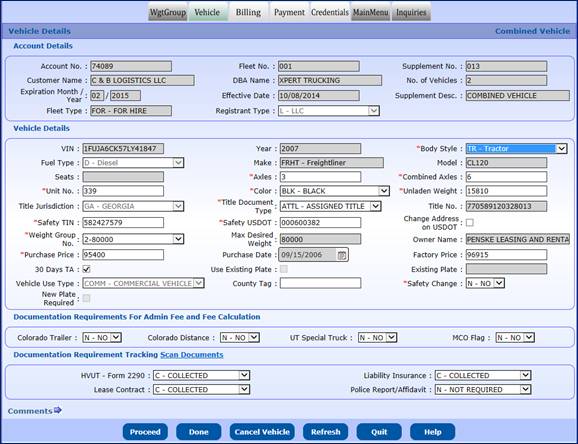
§ If the vehicle was
added or changed, from the vehicle screen the user can either make additional
changes or cancel the vehicle from this supplement.
§ To make changes,
update the information and select PROCEED and then select PROCEED from the
verification screen to save the changes.
§ To cancel an added
vehicle, select CANCEL VEHICLE to delete the vehicle from the fleet.
§ To cancel a change
vehicle, select CANCEL VEHICLE and the vehicle will be cancelled from this supplement.
After this, the billing process starts. To get the details
of the billing process please refer to the Section 1.3.1.6 or for online users
click here.
1.3.5.16.2 Payment Details
After this Payment details process starts. To get the
details of the payment process please refer to the Section 1.3.1.7 or for
online users click here.
1.3.5.17
IRP Do Distance
To correct a supplement that that has been remitted, the
user must process a Correction supplement. Distance related corrections will be
processed through the IRP Do Distance Correction supplement. This supplement
will adjust fees for every vehicle and supplement for the registration year. Do
Distance Corrections can be done on New Account, New Fleet, Add Jurisdiction
and Renewal supplements.
To access the correction process function,
·
Select the ADMIN/IRP Error CORRECTION/ Do-Distance tab from the
IRP menu
·
Enter the appropriate Account No., Fleet No., Fleet Expiration Year
and select PROCEED
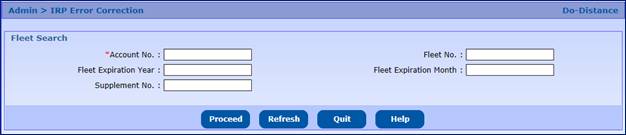
·
Select the appropriate supplement to display the correction
screen. If more than one supplement exists, GAIRP will display a selection
list.
Once the supplement is selected, the Distance screen will
display. There are two parts to the screen: an area for edits (above the
command line) and an area for reference (below the command line).
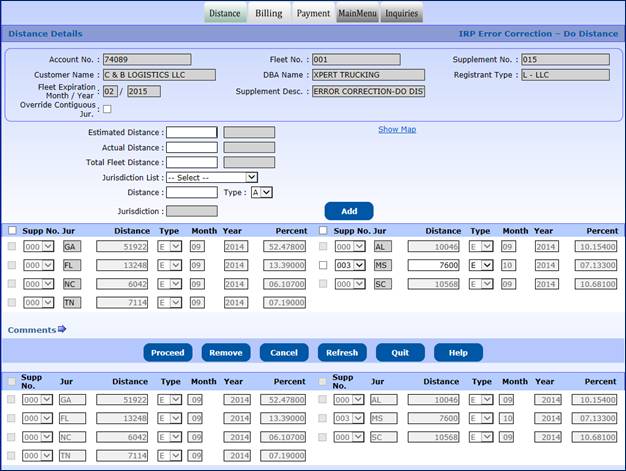
The following can be done:
·
Update the distance or the distance type
o User may change
either the DISTANCE or the distance TYPE on any jurisdiction that is part of
the supplement being corrected
·
Add additional jurisdictions
o Select the
jurisdiction from the JURISDICTION LIST drop down or from the map
o Enter the
DISTANCE
o Enter the
DISTANCE TYPE
o Select ADD to
add the jurisdiction to the grid
·
Update the supplement number
o If the carrier
has Add Jurisdiction supplements in the registration year, the jurisdiction can
be moved to another supplement number by selecting the supplement number from
the drop down.
·
Enter the Estimated Distance, Actual Distance and Total Fleet Distance
control totals
·
Select PROCEED to recalculate the percentages based on the
updated information
·
From the validation screen, select PROCEED to accept the changes.
Select BACK to make additonal changes.
·
Complete the supplement through payment.
1.3.5.18 IRP Do Vehicle
To correct a supplement that has been remitted, the user
must process a Correction supplement.
Vehicle related corrections will be processed through the UNDO
Vehicle and Do Vehicle corrections. For example, if an incorrect vehicle was
included in an ADD Vehicle supplement, the incorrect vehicle must be deleted
through the UNDO Vehicle correction supplement. The UNDO supplements will
provide a full refund for each jurisdiction, which is different than a Delete
vehicle supplement, which does not provide a full refund. A DO Vehicle
correction supplement will be processed to add the correct vehicle.
The Do Vehicle correction will add the appropriate vehicle
if required.
To access the correction process,
·
Select the ADMIN/CORRECTION/DO VEHICLE tab from the IRP menu.
·
Enter the appropriate Account No., Fleet No., Fleet Expiration
Year and select PROCEED
·
Select the appropriate supplement to display the correction
screen. Supplement available for the DO VEHICLE correction will display in the
grid.
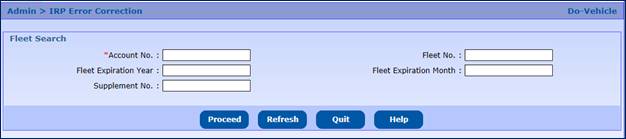
·
GAIRP will display the DO VEHICLE error correction screen.
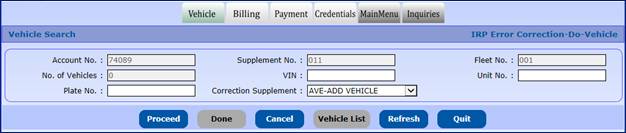
·
Correcting an ADD-VEHICLE supplement
o Select PROCEED
o Vehicle Detail
screen will display
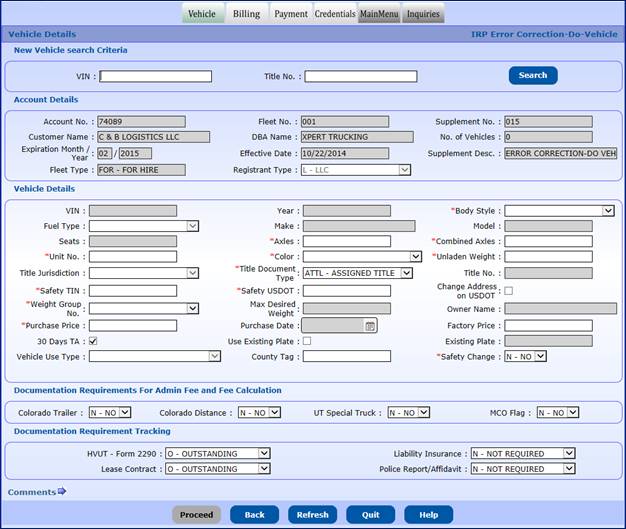
o Follow the same
process as an Add Vehicle supplement. Reference Section 1.3.1.5 IRP Add Vehicle.
·
Correcting a Transfer Plate supplement
o Select PROCEED
to display a list of vehicle to identify the “Old” Vehicle
o Once the old
vehicle is identified, Vehicle Detail screen will display
o Follow the same
process as a Transfer Plate supplement. Refer to Section 1.3.5.3 for Transfer
Plate
·
Select DONE to proceed to the Billing Details screen
·
Complete the Do Vehicle correction supplement through payment
To correct a supplement that has been remitted, the user
must process a Correction supplement.
Vehicle related corrections will be processed through the UNDO
Vehicle and Do Vehicle corrections. For example, if an incorrect vehicle was
included in an ADD Vehicle supplement, the incorrect vehicle must be deleted
through the UNDO Vehicle correction supplement. The UNDO supplements will
provide a full refund for each jurisdiction, which is different than a Delete
vehicle supplement, which does not provide a full refund. A DO Vehicle
correction supplement will be processed to add the correct vehicle.
NOTE: The UNDO Vehicle supplement does not apply to
vehicles in Restricted Fleets.
To access the correction process:
·
Select the ADMIN/CORRECTION/UNDO VEHICLE tab from the IRP menu
·
Enter the appropriate Account No., Fleet No., Fleet Expiration Year
and select PROCEED
·
Select the appropriate supplement to display the correction
screen. Supplement available for the DO VEHICLE correction will display in the
grid.
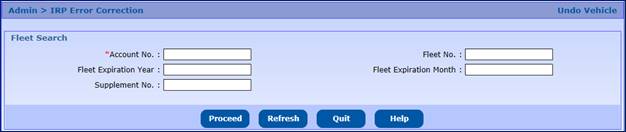
·
GAIRP will display the UNDO VEHICLE screen.
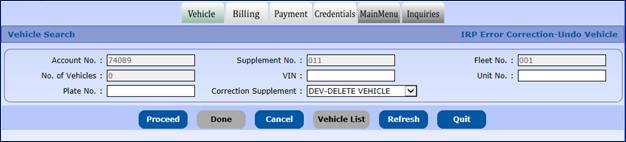
·
Select PROCEED to display a list of vehicle available on the
supplement for the UNDO action.

·
Select a vehicle by selecting the link beside the UNIT NO. and
select PROCEED to display the vehicle information
If the correct vehicle is displayed:
Select PROCEED to confirm the UNDO action and return to
the selection screen.
·
Select DONE to proceed to the Billing Details screen from the
selection screen
·
Complete the UNDO Vehicle correction supplement through payment
This supplement is used when a carrier has been
reinstated, but the reinstatement needs to be removed.
·
Select SUPPLEMENT/ CANCEL REINSTATEMENT from the IRP menu
·
Enter the Account No., Fleet No. and the last registration year
for the account
·
Select PROCEED to display the distance information

·
The selected Reinstatement will be listed and can be cancelled by
clicking the CANCEL button.
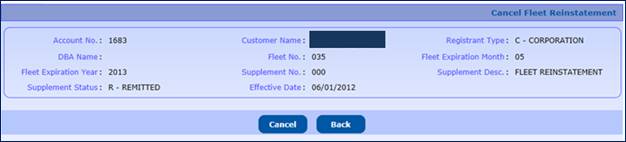
1.3.6
Inquiry Function
The system will provide the user with the capability to perform
inquiries on all of the IRP related information using the tree structure. All
of the inquiries are available on the Inquiry Tab at the IRP Main Menu.
Perform the following steps to
generate an inquiry related to a specific account or fleet:
·
From the IRP menu, select one of the following from the INQUIRY tab
o Account
o Fleet
o Distance
o WGT Group
o WGT Group
Supplement Base
o Vehicle
Transaction
o Vehicle
o Supplement
o Fees Schedule
o Jurisdiction
Fee
o Factory Price
o Audit / Error
Correction
o USDOT Vehicle
o Failed OOS
Cabcard Inquiry
o TA
·
At a minimum one search criteria must be entered and it is
usually the Account No. prior to selecting PROCEED
·
The grid displays the search results based on the search criteria
entered
·
Paging is available on the screen. If more than one page of
results are found, the buttons at the bottom right of the list will be enabled
and allow the user to navigate by clicking the First, Previous, (Page Number), Next
or Last links.
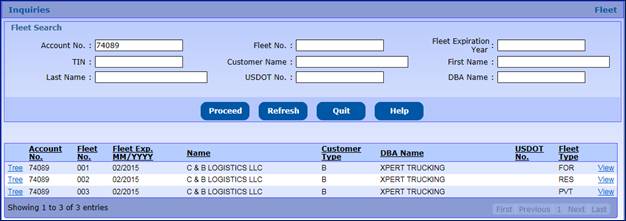
·
Select the VIEW link on the right to review the details of a
specific inquiry/supplement
o For the example,
the Fleet Level details are displayed
o Click the CLOSE
button to return to the search result screen
o Click the QUIT
button on the search result screen to close the Inquiry screen and return to
the IRP Level menu

To view the structure of the entire account, click the TREE
link to the left of the Account No. in the grid.
·
The account structure will appear on the left side of the result
screen including all registration years as well as fleets and supplements
within the registration year.
·
If multiple fleets exist within a registration year, they will
appear as a separate line under the Fleet List.

·
Each level with a “+” can be expanded or if a “-“ is displayed
can be collapsed.
·
The expansion of the Supplement will display all supplements that
have taken place for the associated fleet within a given registration year.
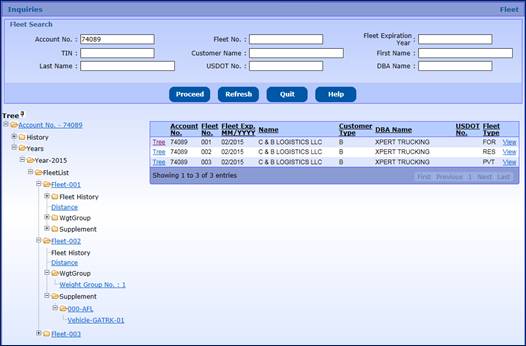
·
The expansion of the supplement will reveal the vehicles
associated with the supplement.
·
To view details at any level select the link and a detail screen
will display, for this example the Fleet link was accessed which displays
detailed Fleet information. Use the scroll bar to the right of the screen to
view additional details for this supplement.

USDOT Vehicle Inquiry

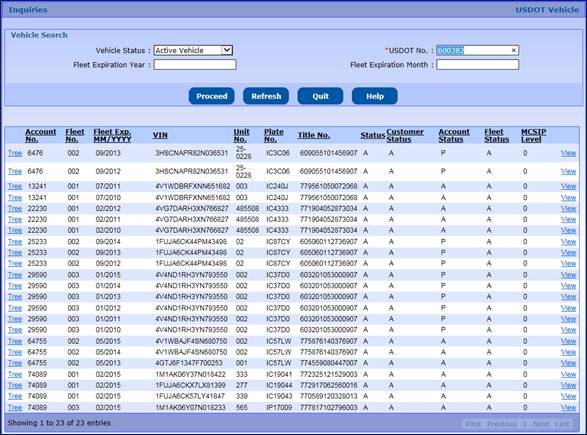
TA Inquiry
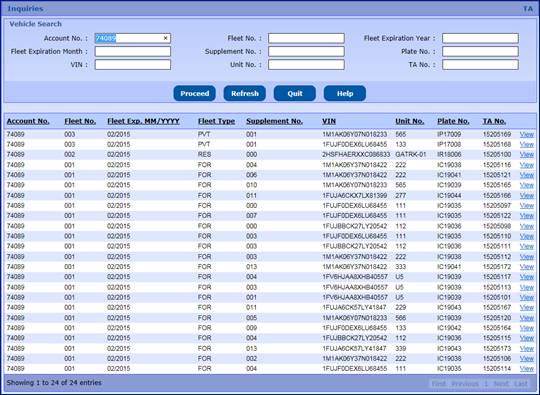
The system will provide the facility to maintain the
account information outside of the supplement processing.
Perform the following steps to update account information
without generating a supplement. Cab cards are not generated as part of account
maintenance.
·
From the IRP menu, select UPDATE ACCOUNT from the PROCESS/ACCOUNT
tab
·
From the Customer Search screen, enter the following:
o The Account No.
(there are other search fields available including, Customer Name, TIN and
USDOT No.)
o Select PROCEED
to display the Update Account screen
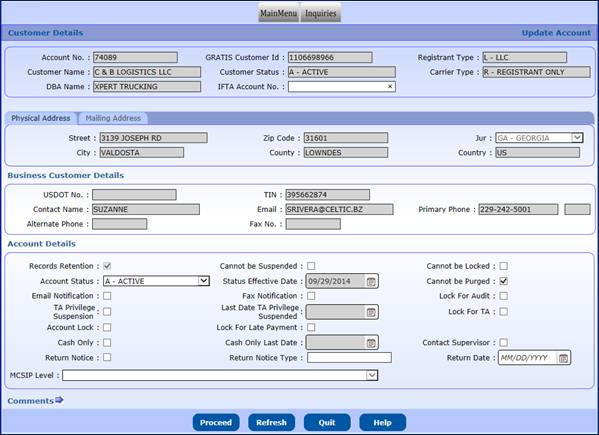
Changes to Business Customer information must first be made
to the Common Customer at the Enterprise Level. The user will be able to update
the account status and various processing flags. The following items are
changeable:
·
Account Status
o Active
o Inactive – Supplements
cannot be processed
o Suspended
Payment – Safer (Code 961) – TA Suspensions
o Suspended Other
– Safer (Code 950) – PRISM OOS
·
“Cannot be Suspended” indicator – the account cannot go into
suspension for any reason – batch jobs will not create correspondence or update
the status to suspended
·
“Cannot be Locked” indicator – the account cannot be locked if
there is a suspension process
·
“Cannot be Purge” indicator – indicator to the purge process that
information associated with the account (i.e. fleets etc.) cannot be purged.
Default value will be “unchecked” for account to be purged
·
Email Notification – Carrier will receive renewal notice by email
·
FAX Notification – Carrier will receive renewal notice by FAX
·
Lock for Audit – If checked, the lock stops all processing WIP,
creation, and allows payment of supplements. Not reported to Safer.
·
“TA Privilege” suspension – If checked, the “Last Date TA
Privilege Suspended” field will be enabled and the user must enter the last
date the account cannot received TAs
·
Lock for Late Payment – If checked, the lock stops all processing
WIP, creation, and allows payment of supplements
·
MCSIP Level – used to indicate the reason for the PRISM OOS
suspension – select from the drop down
·
Comments can be added as required. Select PROCEED to save the
updated information.
1.3.7.2 Fleet Maintenance
The system will provide the facility to maintain the fleet
information outside of the supplement processing. Perform the following steps
to update Fleet information without generating a supplement. Cab cards are not
generated as part of Fleet Update.
- From the IRP menu, select UPDATE FLEET
from the PROCESS/FLEET tab.
- From the Fleet Search screen,
enter the following:
o Enter appropriate
data in any of the available search fields, those primarily used include, Account
No., Fleet No., Fleet Expiration Year
o Select PROCEED
to display the Fleet Details screen
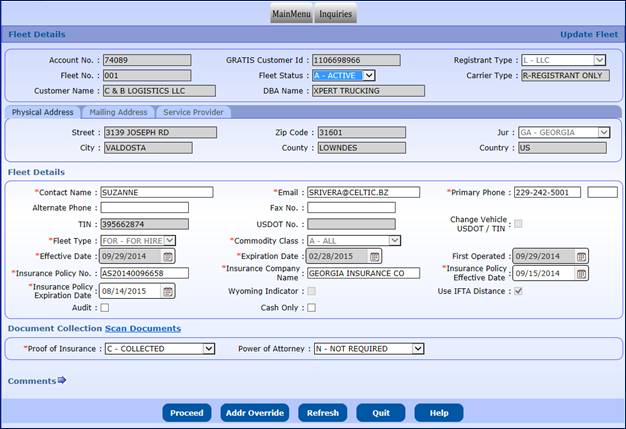
In addition to the status, additional fleet information can
be changed such as contact information insurance information and Service
Provider. Fleet information that requires the reprint of a cab card is done
through supplement processing such as Change Carrier Type.
·
AUDIT indicator – indicating the fleet is recommended for an IRP
audit
·
CASH ONLY indicator – If set, only Cash, Credit Card, Certified
Check or Money order payment types will be allowed.
1.3.7.3 Vehicle Maintenance
The user will use Vehicle Maintenance to place a PRISM Suspension
on a vehicle. Do the following:
·
From the IRP menu, select VEHICLE MAINTENANCE from PROCESS/FLEET
tab.
·
Enter appropriate data in any of the available search fields,
those primarily used include, Account No., Fleet No., Fleet Expiration Year
·
Select the type of vehicle listing you wish to view from the
Vehicle Status dropdown list. Options include Active, Deleted and Suspended.
·
Select PROCCED to display a list of vehicles matching the
criteria
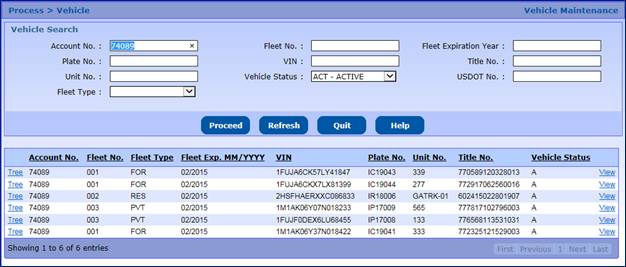
·
Select a vehicle from the list by clicking the “VIEW” link on the
left side of the vehicle row
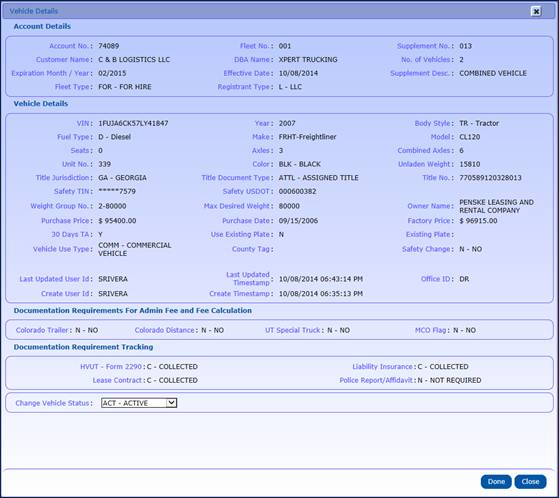
·
Select SUSPEND from the CHANGE VEHICLE STATUS drop down
o
The SUS – Suspended vehicle status will populate the MCSIP LEVEL
field to select, if applicable/required
·
Select DONE to apply the vehicle status change. You can also
click the CLOSE button if you wish not to make any changes and return to the
vehicle selection screen.
The vehicle will be included in
the batch suspension process for updates to FMCSA in the nightly run.
1.3.8
Reprint Functionality
The system provides the ability to reprint the following:
·
Renewal Notices
·
Invoices
·
Cab Cards
·
Shipping Documents
·
TA
To reprint, select one of the items listed above from the
Reprint tab at the IRP menu.
To reprint a renewal notice do the following:
·
Select RENEWAL from the REPRINT tab at the IRP Main Menu
·
Enter at a minimum the Account No. and Fleet Expiration Year,
which are required fields

·
Select PROCEED to display a list of fleets that match the search
parameters entered
·
Select the ELECTRONIC DELIVERY TYPE from the drop down. Available
options include:
o PDF will
display in a PDF file
o FAX will
display the fax number of the fleet and allow the user to change the fax number
o EMAIL will
display the email address on the fleet and allow user to change the email
address
·
Select a fleet by clicking the “SELECT” link to the left of the Account
No.
·
Select PROCEED to generate the Renewal Notice
1.3.8.2
Reprint Invoice
To reprint an invoice do the following:
·
Select INVOICE from the REPRINT tab at the IRP Main Menu
·
Enter at a minimum the Account No., Fleet No. and Fleet Expiration
Year, which are required fields
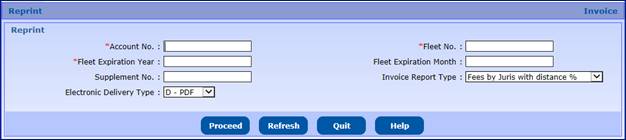
·
Select PROCEED to display a list of invoiced supplements for the
entered search parameters.
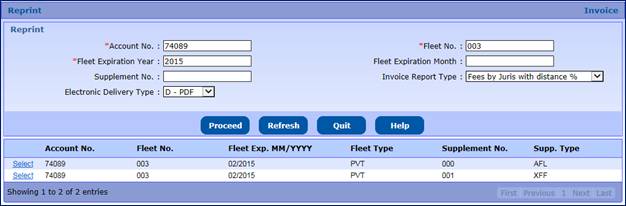
·
Select the INVOICE REPORT TYPE from the drop down list which
include the following:
o Summary Invoice
o Fees by Unit
o Fees by
Jurisdiction with distance percentage (default)
o Supporting
Document for Vehicle
o Fees by Unit by
Jurisdiction
·
Select the ELECTRONIC DELIVERY TYPE from the drop down listing
including:
o PDF option will
display in a PDF file
o FAX option will
display the fax number on the fleet account and allow the user to change the
fax number
o EMAIL option will
display the email address on the fleet account and allow the user to change the
email address
·
Select an invoiced supplement by clicking the “SELECT” link to
the left of the Account No.
·
Select PROCEED to generate the invoice
Use this function to reprint a cab card due to a paper jam
or other printing error. To charge a fee for a duplicate cab card perform a
Replace Cab Card supplement.
To reprint cab cards do the following:
·
Select CABCARD from the REPRINT tab at the IRP Main Menu
·
Enter at a minimum the Account No., Fleet No. and Fleet Expiration
Year, which are required fields
·
Select PROCEED to display a list of vehicles by supplement based
on the entered search parameters
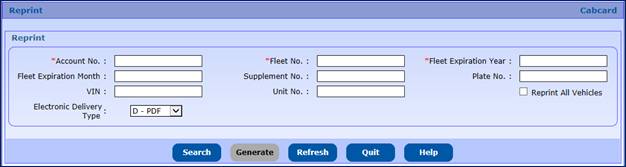
·
Select the ELECTRONIC DELIVERY TYPE from the drop down
·
Check the Reprint all Vehicles check box to reprint all the
vehicles, OR
·
Select the vehicle(s) by:
o Individually
clicking the check box to the left of the vehicle Unit No listed or,
o Click the check
box to the left of “UNIT No.” column heading to select and deselect all the
vehicles in the list
·
Click the GENERATE button to generate the selected cab cards
To reprint a shipping document, do the following:
·
Select SHIPPING DOCUMENT from the REPRINT tab at the IRP Main
Menu
·
Enter at a minimum the Account No., Fleet No. and Fleet Expiration
Year, which are required fields
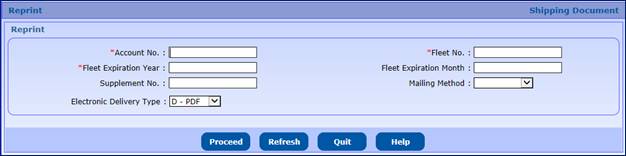
·
Select the ELECTRONIC DELIVERY TYPE from the drop down
o PDF option will
display in a PDF file
o FAX option will
display the fax number from the fleet account and allow the user to change the
fax number
o EMAIL option will
display the email address from the fleet account and allow the user to change
the email address
·
Select a supplement by clicking the “SELECT” link to the left of
the Unit No.
·
Select PROCEED to generate the shipping document
1.3.8.5
Reprint TA
To reprint a shipping document, do the following:
·
Select TA from the REPRINT tab at the IRP Main Menu
·
Enter at a minimum the Account No., Fleet No., Fleet Expiration
Year, Fleet Expiration Month and Supplement No., which are required fields
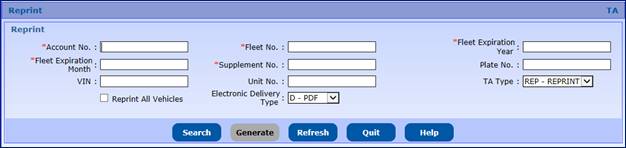
·
Select SEARCH to display a list of TAs which match the entered
search parameters
·
Select the TA TYPE:
o
Extend will allow the user to perform a one-time 30 day extension
of the TA and generate a new TA expiration date
o
Reprint will reproduce the TA already printed (default)
o
Reissue
·
Select the ELECTRONIC DELIVERY TYPE from the drop down
o PDF option will
display in a PDF file
o FAX option will
display the fax number from the fleet account and allow the user to change the
fax number
·
EMAIL option will display the email address from the fleet
account and allow the user to change the email addressCheck the Reprint all
Vehicles check box if you want to reprint the TA for all the vehicles, OR
·
Select the vehicle(s) by:
o Individually
clicking the check box to the left of the vehicle Unit No., OR
o Clicking the
check box to the left of “UNIT No.” column heading to select and deselect all
the vehicles in the list
·
Select GENERATE to generate the TA(s)
1.3.9 Next Day Cancellation –
Payment Cancellation
When a deposit has already occurred and a payment must be
cancelled, an internal user with the role of Administrator can use the Next Day
Cancellation option to have the full amount of the payment refunded.
To perform a Next Day Payment Cancellation, perform the
following steps:
- Select NEXT DAY CANCELLATION from the PAYMENT tab of the
IRP menu
- Enter the Account No., Fleet No. and Fleet Expiration Year
to display a list of supplements in a grid

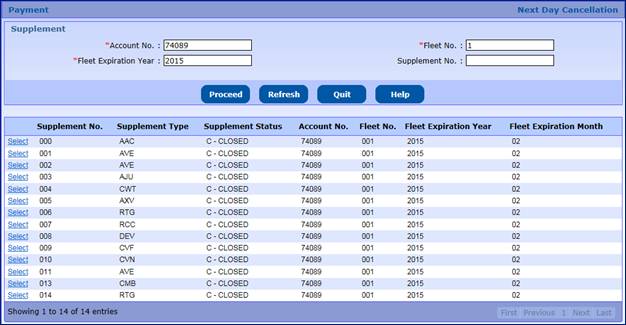
- Click the “Select” link to the left of the supplement
where the payment is to be cancelled
- The Payment Details page of the supplement selected will be
displayed with a Cancel Payment button in the command line
- Click the CANCEL PAYMENT button, and then click OK when
the cancellation confirmation box appears
- After the cancellation is confirmed, the GAIRP system will
return the user to the IRP level main menu displaying a confirmation
message that the cancellation was successfully completed
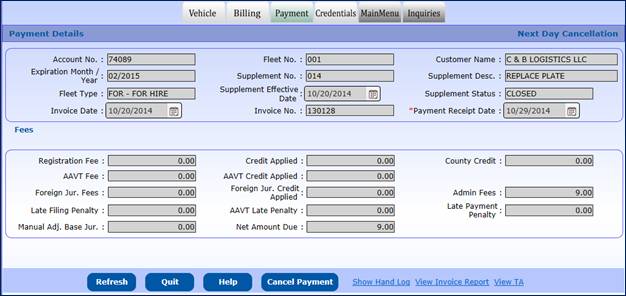

- After the cancellation is confirmed, the GAIRP system will
return the user to the IRP level main menu displaying a confirmation
message that the cancellation was successfully completed
- Now, from the IRP level menu, select IN PROCESS to
continue with cancellation of the transaction, if required
- Enter the Account No., Fleet No. and Fleet Expiration Year
of the cancelled payment supplement
- If more than one transaction exists IN PROCESS for the
account then a list of records will display in a grid. If not, the
Payment Details page of the supplement with the cancelled payment will
display. The supplement status will appear as “Invoiced” and the
calculated fees will display.
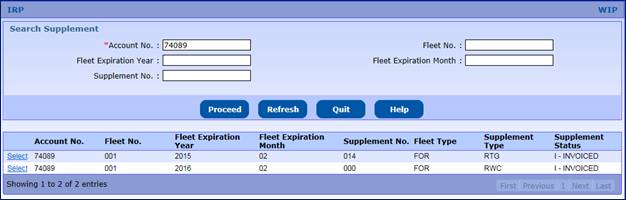
- If the bill needs to be cancelled then select the BILLING
tab and select OK at the confirmation message pop-up
- The Billing screen displays with a CANCEL BILL button. If
the CANCEL BILL button is selected, a cancellation confirmation will be
displayed. Upon selecting OK the fees will be removed, the supplement
status will display as “Open” and a message will display at the top of the
screen confirming the cancellation was completed successfully.
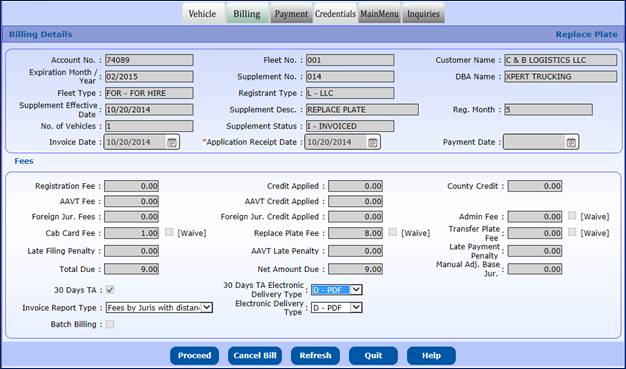
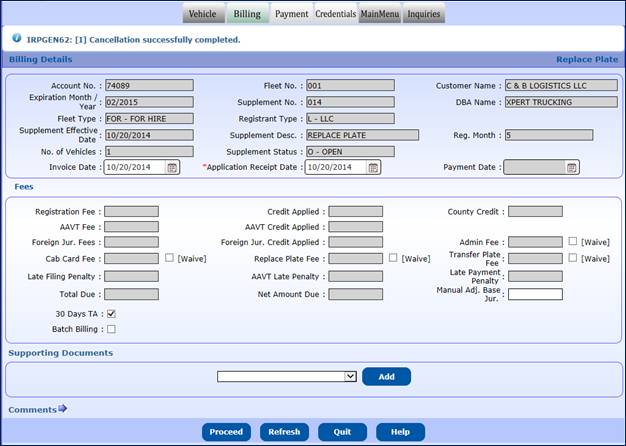
Multiple reports are accessible through the GAIRP
application.
To access the reports listed below, select the
ADMIN/REPORT tab from the IRP menu. The following reports are available:
·
IRP Annual Report
·
Jurisdiction Fee Summary
·
Account List Report
·
Non-Renewed Account Report
·
View Transmittal Report
·
TA Report
·
Incomplete Temporary Report
·
Year End Vehicle
·
Equipment by USDOT
·
Vehicle GVW Fees
·
Vehicle Status
·
Originals Not Paid
·
AAVT Vehicle Registration Report
·
PRISM Suspension/Denial
·
Supplement Keyed in by User
·
Large Accounts
·
GVW Greater than 54,999
·
Account Paid
·
Supplement Report
·
Supplement Tracking
1.3.10.1.1
IRP Annual Report

Enter the expiration year for the desired report.
Currently PDF Is the only delivery type available so select the PROCEED button
to generate the report.
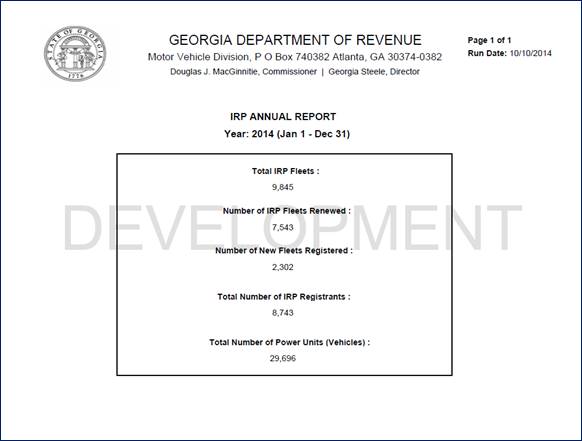
To generate the Jurisdiction Fee Summary report, enter the
FROM and TO dates in appropriate fields, select the FLEET TYPE from the Drop
Down list and click the PROCEED button.

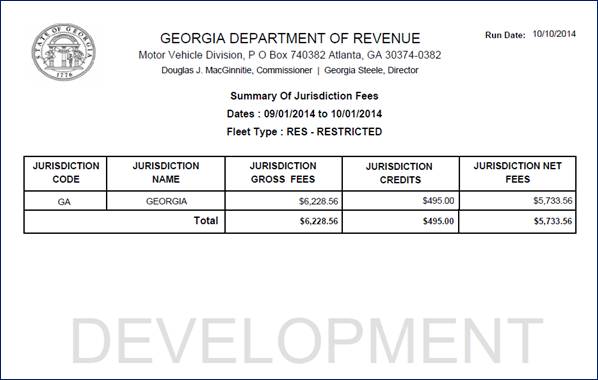
To generate the Account
List report, enter the FLEET EXPIRATION YEAR and FLEET EXPIRATION MONTH and
click PROCEED.

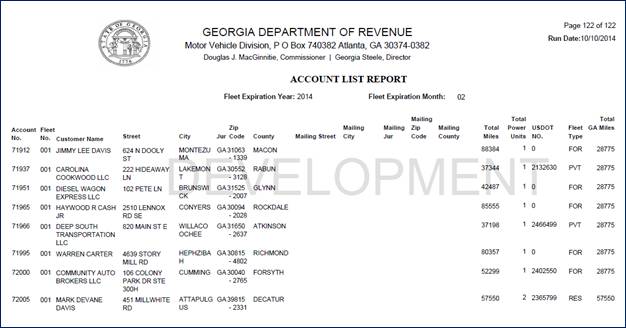
To generate the Non-Renewed Account Report:
- Enter the Fleet Expiration Year and Fleet Expiration Month
·
PDF is the only delivery type available

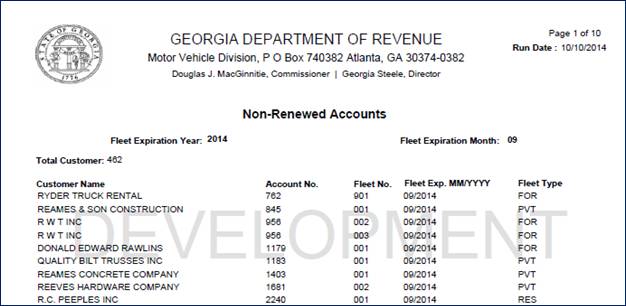

To view the transmittal reports select the report type and
month from the dropdown lists available, then click the PROCEED button.
Transmittal reports include the following:
·
ClearingHouse
·
EC Transmittal Recap
·
IRP Transmittal
·
Records To Be Remitted
·
Summary Report
·
Transmittal Recap
·
Uniform Transmittal Report
·
Audit Uniform Transmittal Notice
·
IRP Notice
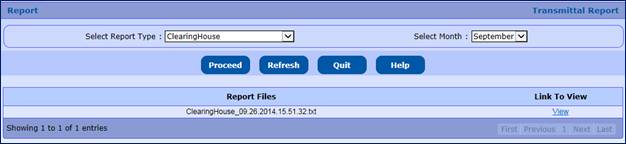
To generate the TA Report from the Admin/Report tab do the
following:
·
Select TA Report
·
Enter the FROM and TO dates
·
Select the REPORT TYPE from the drop down (Paid, Not Paid or
Both)
·
Click PROCEED to generate the report

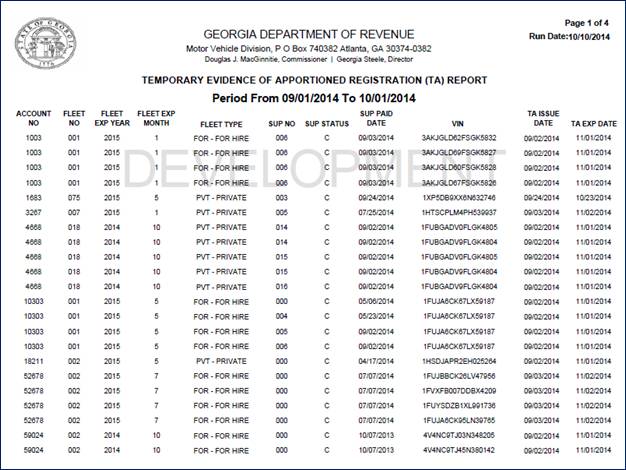
·
From the ADMIN/REPORT tab, select INCOMPLETE TEMPORARY REPORT
·
Enter FROM and TO dates
·
Select PROCEED to generate the report

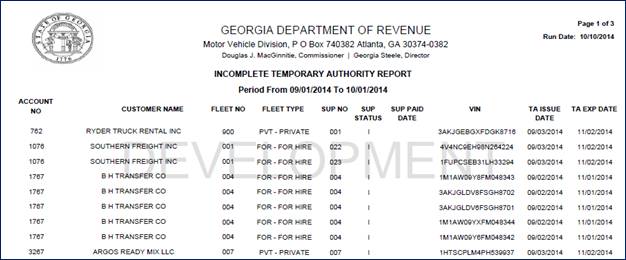
·
From the IRP main menu, select YEAR END VEHICLE from the
ADMIN/REPORT tab
·
Enter the REPORT YEAR
·
Select PROCEED to create the report

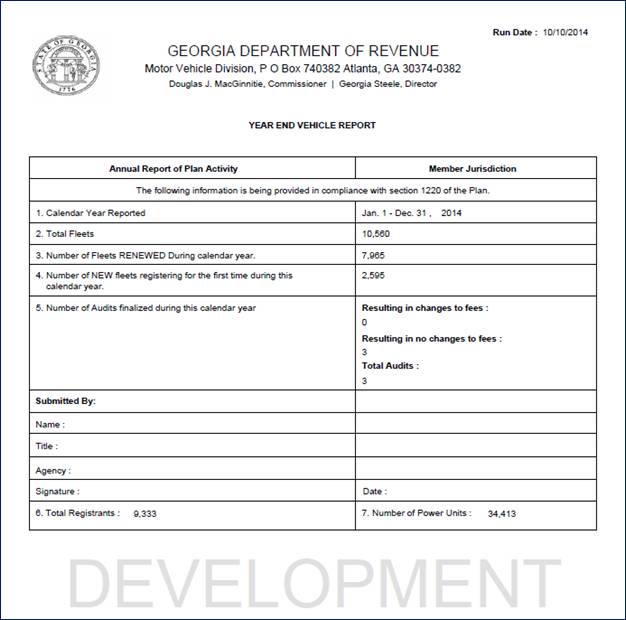
·
From the ADMIN/REPORT tab, select EQUIPMENT BY USDOT
·
Enter the USDOT No. and Fleet Expiration Year
·
Select PROCEED to generate the report

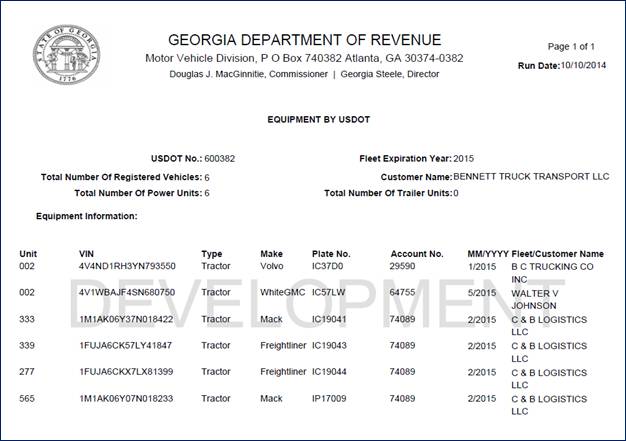
·
From the ADMIN/REPORT menu, select VEHICLE GVW FEES
·
Select the FLEET TYPE from the drop down
·
Enter FROM DATE and TO DATE
·
Select PROCEED to create the report

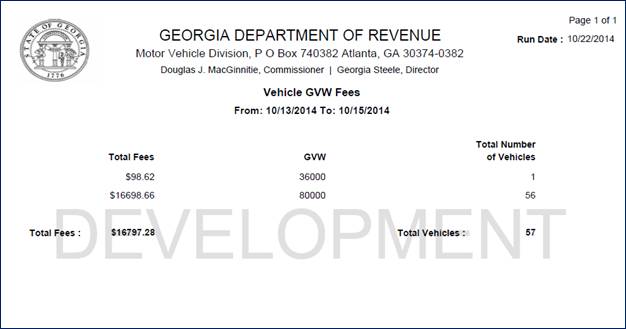
·
From the ADMIN/REPORT tab, select VEHICLE STATUS
·
Enter the Account No., Fleet No. and Fleet Expiration Year
·
Enter the Supplement Number (optional)
·
The user can check the All Vehicles checkbox which will generate
the report without displaying a list of supplements to select
·
Select PROCEED to create the report
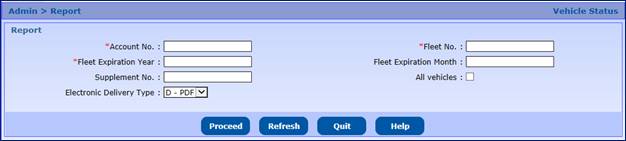
·
If supplement number was not provided, select the supplement by
clicking the “Select” link to the left of the Account No. to generate the
report
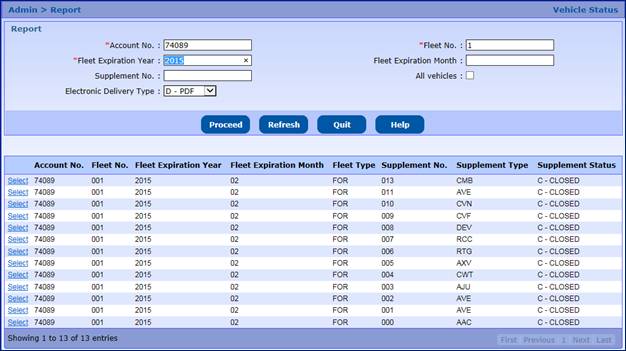
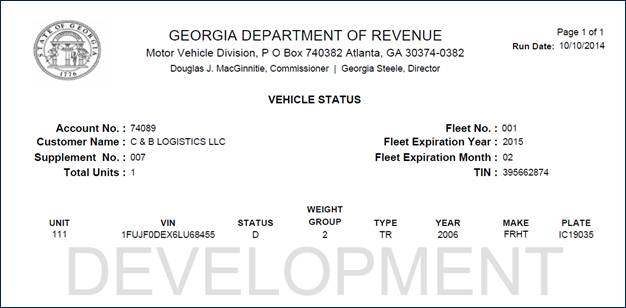
1.3.10.1.12
Originals Not Paid Report
From the
ADMIN/REPORT tab, select ORIGINALS NOT PAID
- Enter the Fleet Expiration Year and Fleet Expiration Month
- Select PROCEED to create the report


From the ADMIN/REPORT tab, select PRISM SUSPENSION/DENIAL
·
Select the REPORT TYPE from the drop down (Denial Report,
Suspension Report, Quarterly Report or All)
·
Enter a FROM DATE and TO DATE
- Select PROCEED to generate the report
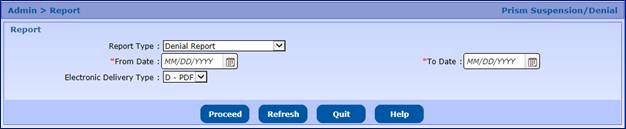
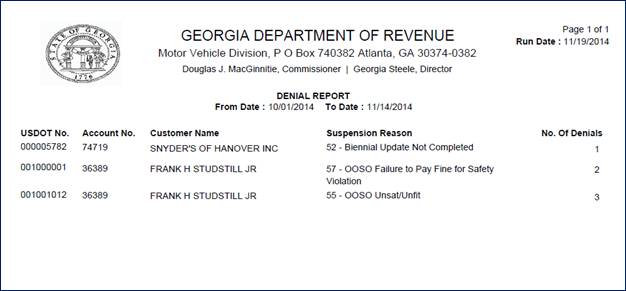
From the
ADMIN/REPORT tab , select AAVT VEHICLE REGISTRATION REPORT
- Enter the REPORT YEAR
- Select PROCEED to create the report

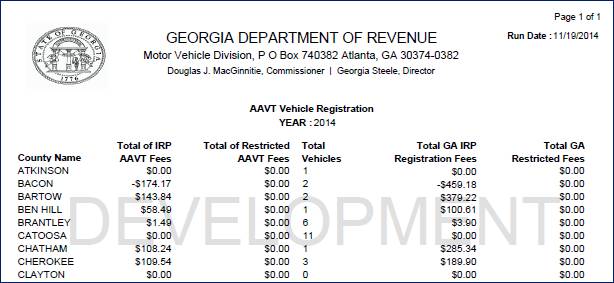
·
From the ADMIN/REPORT tab, select SUPPLEMENT KEYED IN BY USER
·
Enter a START DATE and END DATE
·
Select PROCEED to generate the report

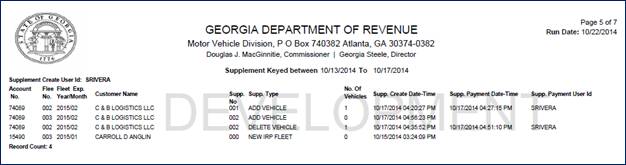
·
From the ADMIN/REPORT tab, select LARGE ACCOUNTS
·
Enter the Registration Year and Number of Vehicles (defaults to
100)
·
Select an Electronic Delivery Type from the drop down (PDF or
Excel)
·
Select PROCEED to generate the report

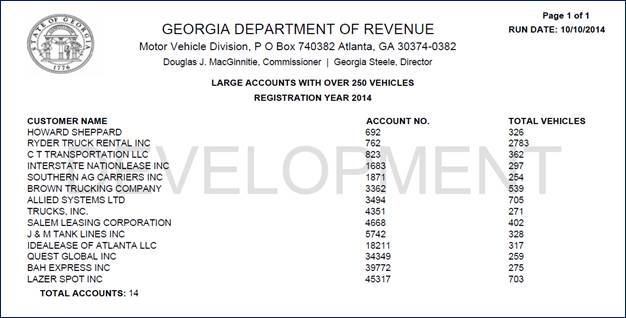
·
From the ADMIN/REPORT tab, select GVW GREATER THAN 54,999
·
Enter the Registration Year From and To Dates
·
Select the Electronic Delivery Type from the drop down
·
Select PROCEED to generate the report

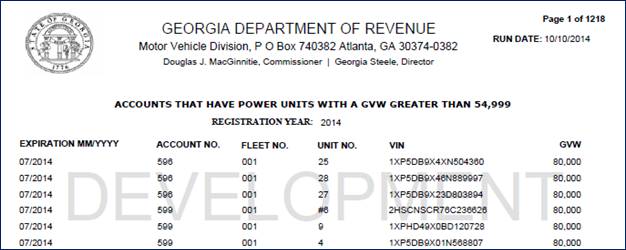
·
From the ADMIN/REPORT tab, select ACCOUNT PAID
·
Enter a Start Date and End Date
·
Select the Service Location from the drop down (each office is
listed individually or the user can select the ALL OFFICE option)
- Select PROCEED to generate the report

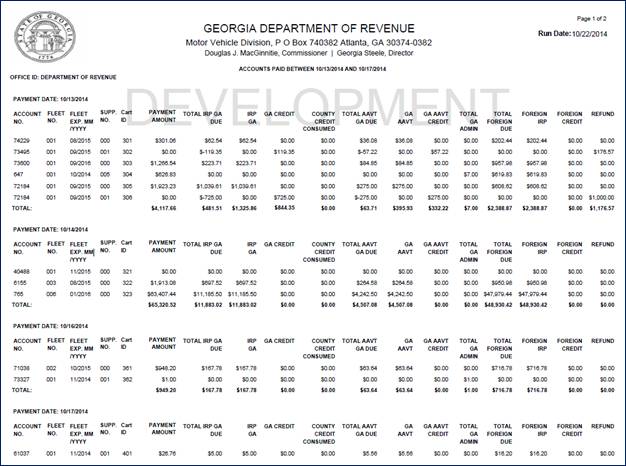
·
From the ADMIN/REPORT tab, select SUPPLEMENT REPORT
·
Enter the Fleet Expiration Year and Fleet Expiration Month
·
Select the Report Type from the drop down
- Select PROCEED to create the report

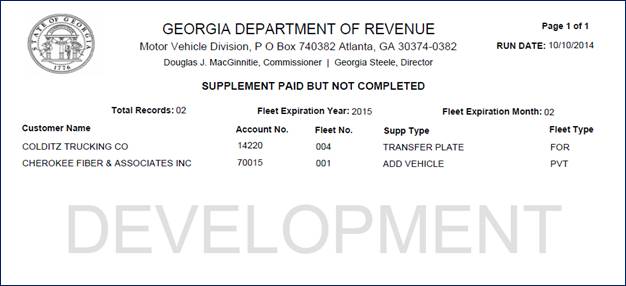
·
From the ADMIN/REPORT tab, select SUPPLEMENT TRACKING
·
Enter From and To Dates
·
Select the Fleet Type from the drop down
·
Select PROCEED to create the report

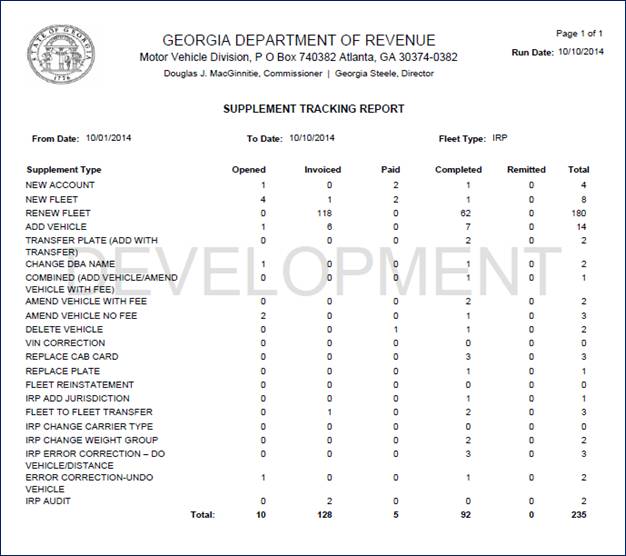
Ledger reports will provide transaction information on a
daily basis or range of dates for a given user, office and overall summary.
The reports will be used to verify GAIRP transactions on the Office Deposit as
well as providing additional financial breakdowns to GADOR and County Offices.
They will also be used to balance the monthly IRP transmittals to the clearinghouse.
To access the daily ledger reports for IRP, select LEDGER
REPORTS from the ADMIN tab at the IRP menu. The reports include:
·
Daily Detail Ledger
o Provides
detailed information by user within an office by payment date
o Transactions
that resulted in a negative net due are recorded separately
·
Summary Daily Receipt
o
Provides a summary of daily fees collected
o
Allows the user to select a range of dates
·
Daily Summary Ledger
o Summary of all
the daily fees collected including out of state fees paid and recorded through
the AAVT Management screen
·
Credit Card Summary
o Summary
of credit card payments for each account by office.
o
There are three credit card reports:
§ Credit Card Paid
Report
§ Credit Card Unpaid
Report
§ Credit Card Remaining
Report

The steps below will vary depending on the Ledger Report
type selected.
·
Select the Report Type from the drop down
·
Enter the From and To Dates (if present)
·
Enter a Payment Date (if present)
·
Select the SERVICE LOCATION from the drop down
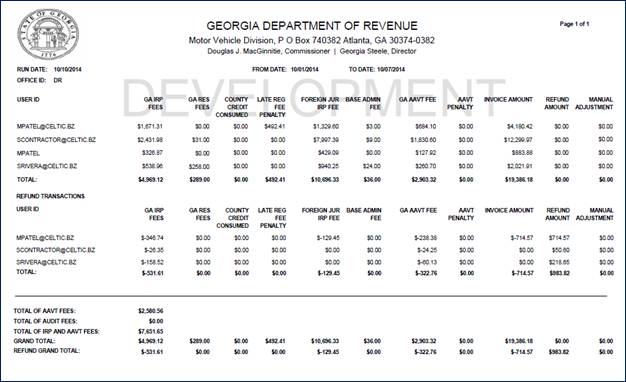
From the ADMIN tab, select CSR Ledger Report
·
Enter a Payment Date
·
Service Location is the service location of the user logged in
·
Click PROCEED to generate the report

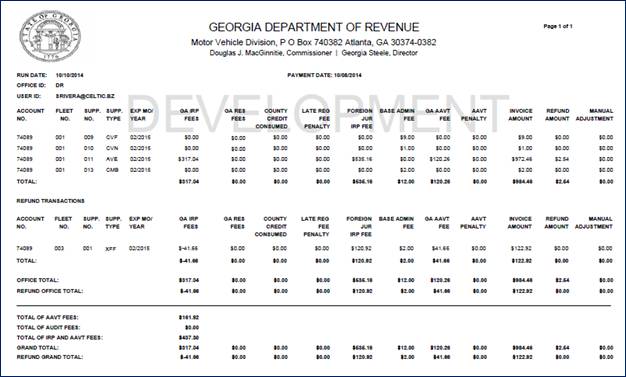
1.3.10.2 Batch
Processes
The user interface for all batch processes consists of the
following processes:
·
Submit batch process to execute
·
Perform inquiries about the status of the execution
·
View logs
View
Report/Results
The IRP Transmittal batch process will be used as an
example.
Do the following to submit the job for execution:
·
From the IRP main menu, select the ADMIN/BATCH PROCESS from the tab
·
Select IRP Transmittal from the SELECT BATCH PROCESS field
·
Enter data in the required fields:
o Select a FROM DATE
and TO DATE
o Select the
Operation Code from the drop down (defaults to the first step in the process –
“1 – Initialize Data”)
·
Select PROCEED to submit the job for execution
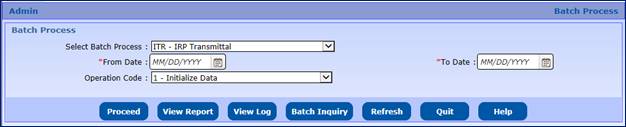
·
Click the BATCH INQUIRY button to see the status of the job
To see job status do the following:
- Select a job from the SELECT BATCH PROCESS drop down
- Click the BATCH INQUIRY button to display the resulst (mandatory
fields do not have to be entered)
- Select the VIEW link to the right of the batch job to display
the log information
Return back to the main batch processing screen.
To review the logs for completed jobs do the following:
·
Select the BATCH PROCESS from the drop down
·
Click the VIEW LOG button (mandatory parameters do not have to be
entered)
·
Select the VIEW link to the right of each log to display
·
Delete old logs by selecting the checkbox in the “Check to
Delete” column and then clicking the DELETE REPORTS button

To review the reports/results for sucessfully completed
jobs do the following:
·
Select the BATCH PROCESS
·
Click the VIEW REPORTS button (mandatory parameters do not have
to be entered
·
Select the VIEW link to the right of each report to display
·
Delete old reports by selecting the checkbox in the “Check to
Delete” column and clicking the DELETE REPORTS button
To execute the CVIEW Baseline batch process:
·
Select CVIEW Baseline from the drop down list available
·
Select the applicable Operation Code from the drop down selection
which includes:
o
T20
o
T21
o
T22
- Click the PROCEED BUTTON to execute the batch process

Perform the following steps to execute the CDL – CVIEW
Daily batch process:
·
Select CDL CVIEW Daily from the drop down
·
Select a FROM and TO date
·
Select an OPERATION CODE from the drop down list (T20, T21, T22)
·
Click the PROCEED button to execute the Batch Process

To run the Clearinghouse Data Return batch process, select
Clearinghouse Data Return from the drop down and then click the PROCEED button
from the command line.

Use Estimated Distance to calculate the estimated distance
chart as required by the IRP plan. The process provides a report of the chart
and makes the chart available for use by GAIRP.
The required data to execute the batch process are:
·
Fleet Expiration Year
·
Number of Years
Estimated Year is the distance year to start with and the
Number of Years is the number of years to use in the calculation. According to
the IRP plan, you calculate the estimated distance chart once every three
years; however, you can calculate it once a year.

Perform the following steps to execute the GRATIS Batch
Update:
·
Select GRATIS BATCH UPDATE from the drop down
·
Select a RUN date
·
Select an OPERATION CODE from the drop down list which include:
o
Compare Data with MCS
o
Upload Data from GRATIS
·
Click the PROCEED button to execute the batch process

To execute the IFTA Mileage batch process, select IFTA
Mileage from the drop down and then click BROWSE button to upload an IFTA
mileage file.
Select the PROCEED button from the command line.

To generate IRP Transmittal Reports, perform the following
steps from the IRP level menu.
·
Select ADMIN/BATCH PROCESS to display the Batch Process screen
·
Select IRP Transmittal from the Batch Process dropdown list
·
Enter a FROM and TO date in the appropriate fields
·
Select the appropriate Operation Code listed below
o All – Users
will run this to generate the transmittal for the given period. User will enter
the time period for the transmittal.
o The remaining
options are used to assist with balancing concerns and are normally used by
support staff
§ Initialize Data
Ø Creates detail
information
§ Summary Report
Ø Generates information
for the summary reports
§ Clearing House and
Records to be Remitted
Ø Once the reports are
balanced, the clearinghouse files are created
§ Reports &
Clearinghouse & Remittal File
Ø Inserts a record in
the Recap table and generates the following reports:
Ø Audit Uniform
Transmittal Notice
Ø Error Correction
Transmittal Recap
Ø IRP Transmittal
Ø Summary Report
Ø Transmittal Recap
Ø Uniform Transmittal
Notice
Ø Refund Transmittal

Perform the following steps to execute the PRISM
Suspension batch process:
·
Select PRISM Suspension from the drop down
·
Enter a RUN DATE
·
Click the PROCEED button to execute the Batch Process

The renewal notices generate monthly for IRP and are
normally generated 90 days prior to the fleet expiration date.
To begin the process, do the following:
·
Select Renewal Notice from the batch process drown down list
·
Select the Operation Code (available options include Renewal
Notice and Reminder Letter)
·
Select the Account (use the “All Account“ option for the primary
renewal activity – there is also the ability to execute a renewal batch process
for “Selected Accounts”)
·
Enter the Renewal Year
·
Enter the Fleet Expiration Month
·
Click the PROCEED button to execute the batch process
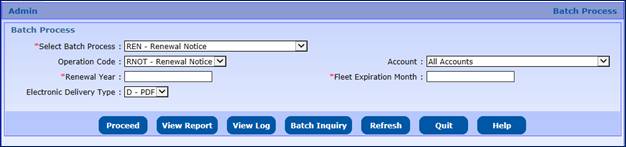
Once the Transmittal files have been sent to the
Clearinghouse and verified for accuracy, the IRP supplements included in the
transmittal are updated with a remitted date. Usually this function is
performed by support personnel.
Perform the following steps:
·
Select Remittal Process from the drop down and a listing of
Remitted Batch jobs will display, if available, then select the “View” link to
view the log files
·
A user can also select a REMITTED DATE and then click the PROCEED button to run this batch process
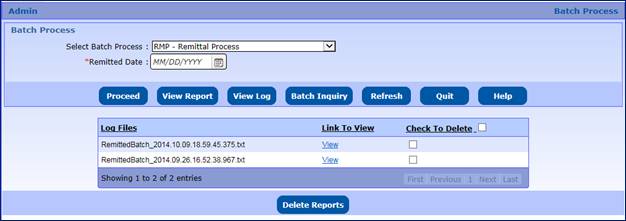
The Locking Process batch process is performed daily and
will determine if a motor carrier account needs to be locked and if so, which
type of correspondence will be created.
To perform this function, do the following:
·
Select Locking Process from the drop down
·
Select a Process Mode (either Report or Update)
·
Enter a Run Date
·
Select a Suspension Batch Process Type, which includes:
o
Audit Locking
o
Supplement Process Locking 1 (Warning Email when a supplement is
unpaid 23 days after the invoice date and the account lock checkbox is checked)
o
Supplement Process Locking 2 (Notification Email that the account
is locked when a supplement is unpaid 30 days after the invoice date and the
account lock checkbox is checked)
·
Click the PROCEED button to execute the batch process

The Vehicle Safety batch process creates a vehicle safety
report listing those vehicles to be suspended or should be reinstated. To
perform this function, select Vehicle Safety from the drop down list and click
the PROCEED button from the command line.

The Vehicle Safety for Volpe batch process sends an email
notification to VOLPE for targeted vehicles registering to a different USDOT. To
perform this function, do the following:
·
Select the Vehicle Safety For Volpe option from the drop down
list available
·
Enter a FROM and TO date in the appropriate fields execution
·
Select the “Email to PRISM Technical Support” checkbox if
applicable
·
Click the PROCEED button to execute this batch process

The Batch Billing process is used for fleets having more
than 200 vehicles for which the fees need to be calculated and TAs need to be
generated in batch mode. If the batch billing check box was selected, the
supplement is submitted to the “Batch Queue” where the batch billing queue
administrator will run the process in off peak hours to calculate the bill and
produce the TAs in batch.
To view the batch billing status and/or print the TA,
perform the following steps:
·
Select BATCH BILLING from the ADMIN tab at the IRP main menu
·
Enter the Account No., Fleet No. and Fleet Expiration Year

·
Select the Billing Queue Status from the dropdown – available
options are:
o
Cancel Bill – Displays a list of supplements where the Batch
Billing checkbox was checked but the bill was cancelled
o
Completed – Displays a list of records where the fee calculation
and TA generation was successfully completed
o
Failed – Displays a list of records where the batch job failed
and no TAs were generated (the user can review the failure reason by selecting
the “View Log” option for that batch
o
Pending – Displays a list of records where the batch billing was
submitted to the Queue
o
Running – Displays a list of records where the fee calculation
and TA generation is still in process
o
Deleted – Displays a list of records where the batch billing
process was deleted
o
All – Displays all records in the Batch Billing queue with their
respective status
·
Click SEARCH to generate a list of records matching the search
parameters entered
·
If TAs are available for viewing and printing then a “View List”
link will display to the far right of the record. Click the link to generate a
PDF copy of the TA – each PDF file will contain 75 TAs.
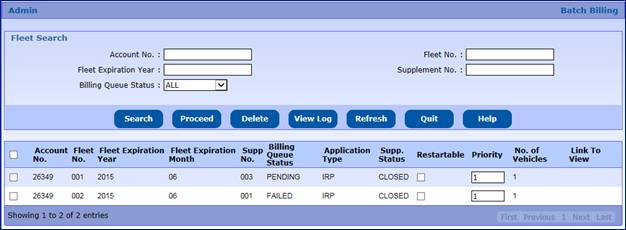
The Batch Credential process is used for fleets having
more than 200 vehicles for which cabcards need to be generated. If the batch credential
check box was selected, the supplement is submitted to the “Batch Queue”.
The cabcards are generated in PDF files and available in
batches of 75 in each PDF file. To print the credentials, perform the following
steps:
·
Select BATCH CREDENTIAL from the ADMIN tab at the IRP main menu
·
Enter the Account No., Fleet No. and Fleet Expiration Year
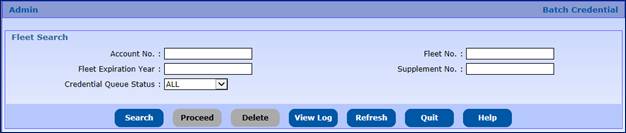
·
Select the Credential Queue Status from the dropdown – available
options are:
o
Cancel Bill – Displays a list of supplements where the Batch Credential
checkbox was checked but the bill was cancelled
o
Completed – Displays a list of records where the fee calculation
and TA generation was successfully completed
o
Failed – Displays a list of records where the batch job failed
and no TAs were generated (the user can review the failure reason by selecting
the “View Log” option for that batch
o
Pending – Displays a list of records where the batch billing was
submitted to the Queue
o
Running – Displays a list of records where the fee calculation
and TA generation is still in process
o
Deleted – Displays a list of records where the batch billing
process was deleted
o
All – Displays all records in the Batch Credential queue with
their respective status
·
Click SEARCH to generate a list of records matching the search
parameters entered
·
If credentials are available for printing then a “View List” link
will display next to the record. Click the link to generate a PDF copy of the cabcards
– each PDF file will contain 75 cabcards.
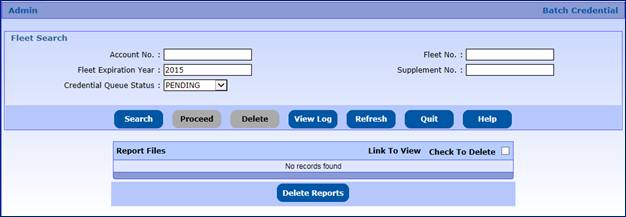
Generate address labels either generates address labels
for one carrier or a group of carriers (active or all).
To generate address labels for SELECTED CARRIERS:
·
From the IRP main menu, select the ADMIN/GENERATE ADDRESS LABEL
tab
·
Select “Selected Carriers” as the Report Type from the drop down
list available
·
A user can use any of the search parameters to display a list of
accounts to choose from or enter a combination that would produce the intended
account such as Account No., Fleet Expiration Year and Fleet
·
Select PROCEED to generate the labels
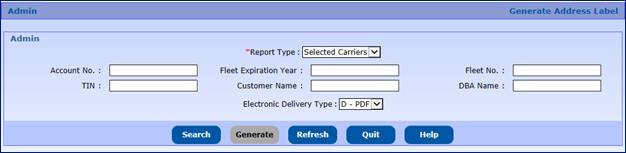
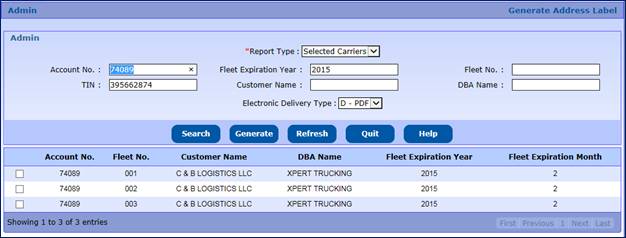
To generate address labels for ALL/ACTIVE CARRIERS:
·
Select either “All Carriers” or “Active Carriers” from the drop
down
·
Enter the Fleet Expiration Year, if required
·
Enter the Fleet Expiration Month, if required
·
Select PROCEED to generate the labels
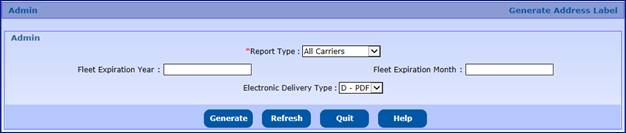
The system will provide the facility to update a
supplement effective date. This is used if the supplement effective date was
entered incorrectly at the beginning of a supplement. NOTE: Since the
supplement effective date is used for the calculation of fees and changing the
date could affect other supplements on the account/fleet, it is important the
user perform a Fleet Level Supplement inquiry and pay particular attention to
the effective dates of other supplements such as Change Weight Group, Add
Jurisdiction, Change Carrier Type, etc.
The Update Supplement Effective Date requires that the supplement
be in open status to change the date. NOTE: This function cannot be performed
on converted supplements. Changing the supplement effective date on supplement
zero will not change the expiration date of the fleet.
Do the following to change the supplement effective date:
·
From the IRP main menu, select the ADMIN/UPDATE SUPPLEMENT
EFFECTIVE DATE tab
·
Enter the Account Number
·
Select PROCEED to display a list of open supplements
·
Select the supplement you want to change by clicking the “Select”
link

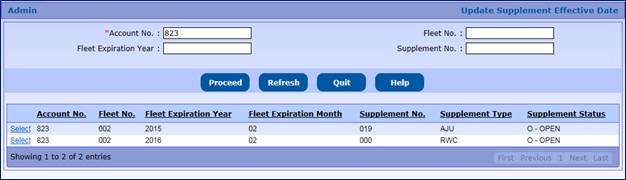
·
The update screen will display the old effective date. From here
set the new effective date.
·
Select the PROCEED button

·
A Validation screen will display
·
The supplement will calculate the fees for the number of
registration months. Verify this is correct.

·
Either select UPDATE to save the changed date or BACK to change
the date again
·
Advise the IRP processor to go to IN PROGRESS to recalculate the
invoice if the Supplement Effective Date is in fact changed.
The system will provide a work queue that is used to
inform IRP staff about GRATIS changes that affect IRP vehicles. Examples of
these include:
·
An Inactivated registration (due to title change) – Notification
to customer
·
VIN Correction (new cab card needed) – Notification to customer
·
Change in purchase price or purchase date
To view the vehicles listed in the GRATIS WORK QUEUE and
to modify the status; perform the following steps:
·
From the IRP main menu, select the GRATIS WORK QUEUE from the
ADMIN tab

·
Enter either the Report Date, VIN and/or Account Number to search
for the record
·
Select a status from the dropdown list:
o
Close – lists all vehicles which have been resolved/closed
o
Ignore – lists all vehicles with a status of Ignore
o
Notify – lists all vehicles which have been sent a notification
o
Pending – lists all vehicles which are pending and no action
taken
NOTE: If the Status is left
blank but an account number is provided for the search, then all vehicles
assigned to that account will be displayed, regardless of status.
·
Select SEARCH to display a list of vehicles which matches the
search criteria
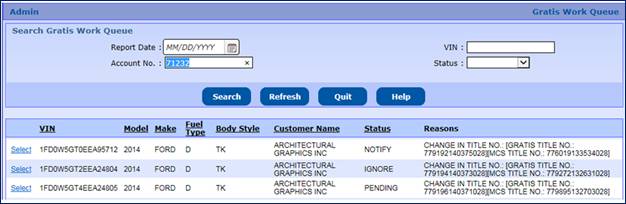
·
Select the desired record by clicking the “Select” link to the
left of the VIN
·
The GRATIS Work Queue Details screen for that vehicle will
display
o
Enter the required comment to denote the change or action needed
o
Update the Status of the vehicle, as required
o
If Notify status is selected, GAIRP will send the appropriate
email notification to the carrier’s email address listed at the Customer level.
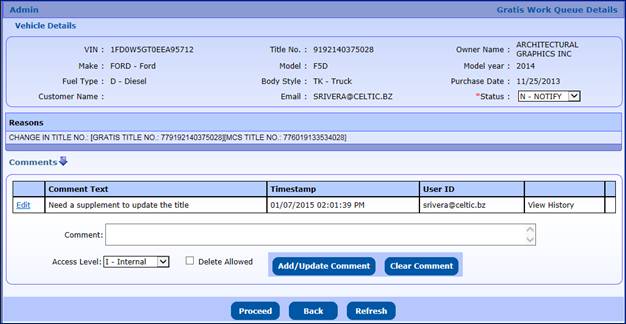
·
The system will return a message indicating the update was
successful, confirm the notification email was sent and list the email address.
The GAIRP system provides External users the ability to
perform a number of supplements for submission to an internal review queue at
any point of time during the transaction. Internal users at GADOR will then
access these transactions for review, processing and approval.
The limitations for Web Processing by External users include:
- Access to only their assigned account – When processing a
transaction, the account number will be auto-populated and protected on
all GAIRP screens
- The Account/Fleet status must be Active
- If the Account/Fleet status is Suspended, an External
User has the ability only to make payments
- Only one supplement can be open at a time – A supplement
must be in invoiced status before an external user can open another
supplement
When an External user is ready to submit the transaction to
the internal review queue, the External user must perform the following steps:
·
Select SUBMIT from the WEB PROCESSING tab at
the IRP level menu

- Enter data in the required fields including:
- Fleet No.
- Fleet Expiration Year
- Fleet Expiration Month
- Supplement No.
- Status will auto-populate as Pending – leave the default
status as is
- Select SUBMIT to have all the document submitted for
internal review
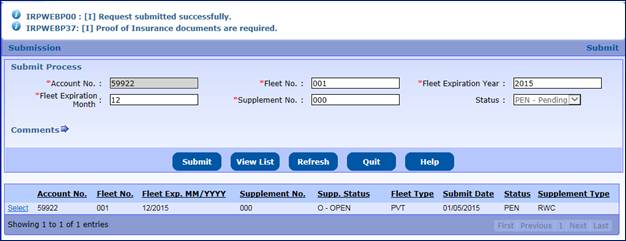
- Click the “Select” link for the appropriate supplement to
upload the necessary documents to support the transaction submitted.

- Use the Browse option to select a file to be uploaded,
then click the Upload button ensure the file is attached to the
transaction.
- External users must:
- Upload one file at a time
- Ensure the file size is less than 4 MB
- Enter appropriate comments to assist the internal users in
the review and processing of the transaction
External users should ensure a valid email address exists on
the fleet record to receive email notifications advising that the supplement is
ready to be paid online; or to receive alerts if additional action is required.
NOTE: External Web users can only open supplements with a
status of “Pending”, “Action required” or “Approved”. They will not be able to
open any supplement with a status of “In Process”
Internal users have the ability to select a transaction
submitted by an external user once the external user has submitted a
transaction to the internal review queue in GAIRP. The transaction can be
retrieved for further processing, review and/or approval.
Once the status of a web transaction is updated to
“Approved” or “Action required”, and an email address exists on the fleet
record, the GAIRP system will send an email to the carrier using the fleet
email address. The email serves as notification to the carrier advising that
the supplement is ready to be paid online or action is required.
To retrieve a transaction submitted by an external user, the
Internal user must perform the following steps:
- Select PENDING from the SUBMISSION tab at the IRP level
menu
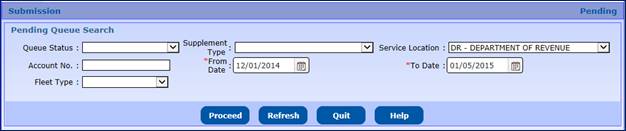
- Select the Queue Status from the drop down or leave blank
to retrieve all – Action Required, Approved, Closed, In Process or Pending
- Select the Supplement Type from the drop down or leave
blank to retrieve all – the available options include:
- New Account
- New Fleet
- IRP Add Jurisdiction
- Add Vehicle
- Transfer Plate
- Amend Vehicle with Fee
- Replace Cab Card
- Replace Plate
- Renew Fleet
- Fleet to Fleet Transfer
- The Service Location will default to the location of the
Internal User logged on; use the drop down to leave the field blank if
location unknown.
- Enter a date range in which the transaction was submitted
- Click PROCEED to display a list of records matching the
search parameters
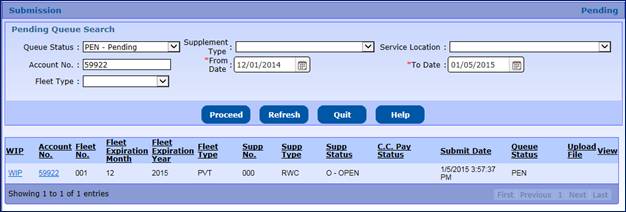
- Click the link in the WIP column for the appropriate
record to start the “ In Progress” for the selected transaction. The
status will be updated to “In Process”
- Once the transaction is completed, the status will be
updated to “Approved”, as long as no additional action is required.
- If the transaction only requires review, the internal user
will:
- Select the Account No. Link
- Review the appropriate information/documentation
·
Change the status of the selected transaction
to the appropriate status, usually “Approved” unless additional action is
needed
1.3.12
IRP Audit
Audit select assists the auditors in selecting accounts for
audit. To create an audit selection sample do the following:
·
Select AUDIT SELECTION from the ADMIN/IRP Audit tab
·
The IRP Audit Sampling screen will display. Enter data in all the
required fields which include:
o
Audit Year
o
Analysis Duration – the number of years to analyze for the sample
o
County Code - select from the drop down list
o
Application – IRP
o
Sample Name – this is used for searching only
o
Auditor Name – this is used for searching only
o
Sampling Type – Stratification, Random or Nth Record
o
Sample Percentage – should be 100 so the screen defaults to this
amount
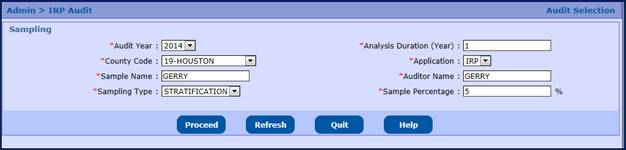
·
Select PROCEED and the system will display the accounts/fleets
that match the selection criteria
From the selection screen, the authorized user can do the
following:
·
Adjust the LARGE and SMALL threshold amounts – based on number of
units
·
Add an Account – enter an account number not in the list and
select ADD
·
Delete an account – select the DELETE checkbox next to the
account and select DELETE
·
Select PROCEED to finalize the list of accounts/fleets for the
sample
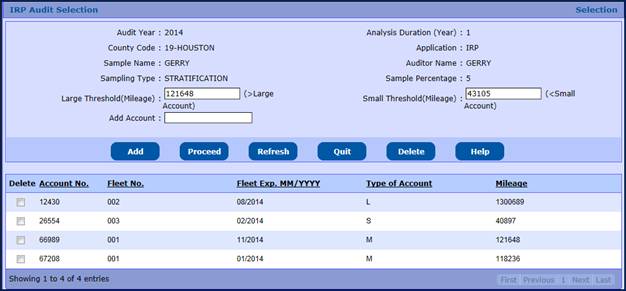
·
Select PROCEED from the verification screen – system will gather
all the information required for the accounts/fleets specified and display the
criteria screen
From the criteria screen, the authorized user can select
SIMPLE or ADVANCED. The simple screen sets the criteria based on levels. The
levels coincide with the number of selection criteria on the ADVANCED screen.
Level 1 will select the first criteria at 100%; Level 2 will select the first
two criteria each at 50%, etc.
The criteria is used to assign a point value for ranking the
accounts/fleets.
On the advanced screen, the user can select the criteria and
a high/low designation to adjust the weighted points assigned.
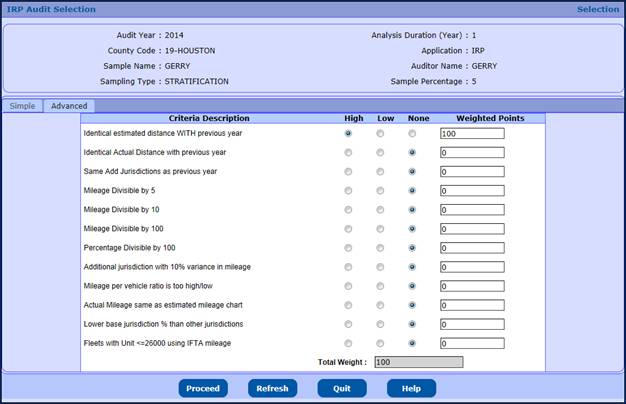
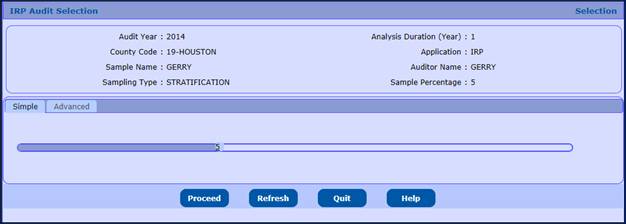
Select PROCEED after the criteria are provided. The system
will calculate the point values for each account/fleet and display the REPORT
screen.
From the Report screen, the authorized user can do the
following:
·
Indicate the percentage of large, medium and small accounts to
include in the reports
·
Select reports – some of the reports are provided below
o Account by
weight
o Summary
o Detail
o Sample Vehicle
o Stratification
·
Export to Excel – exports the report to excel
·
Save the selection for later retrieval
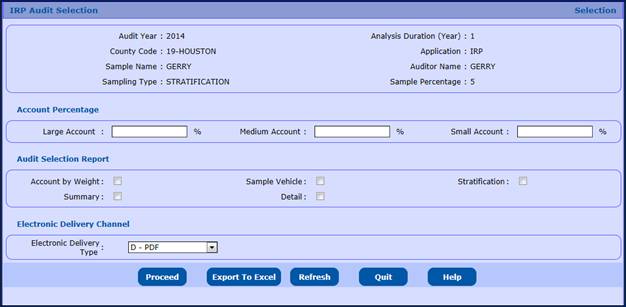
Summary
Report
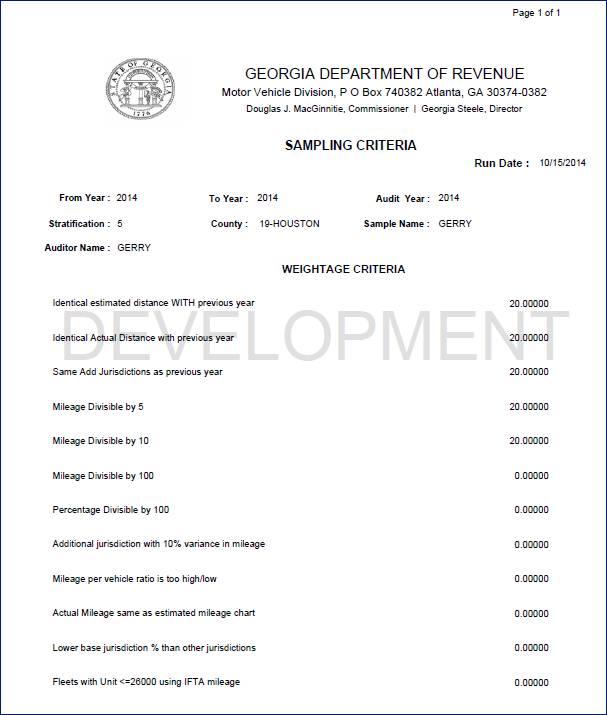
Account by Weight report
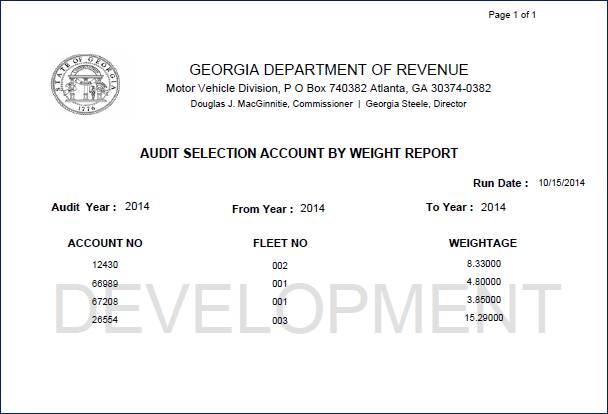
Account Detail Report
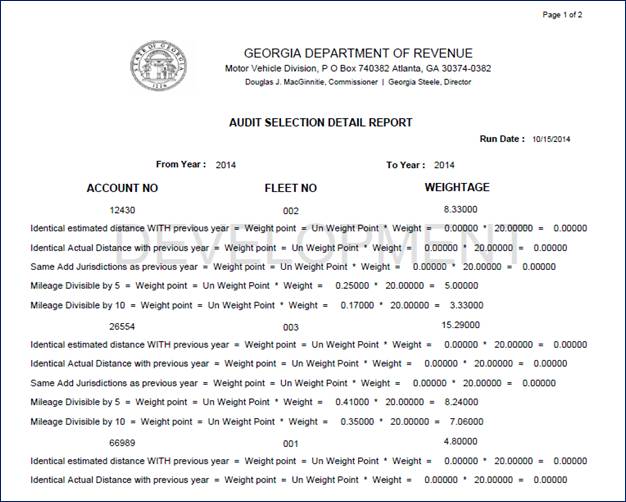
Do the following to upload audit results from a predefined
XML file:
·
Select AUDIT UPLOAD from the ADMIN/IRP Audit tab

·
On the Audit Upload screen, use the BROWSE to find the flat file
on the local computer drive.
·
Select PROCEED – If edits are passed, the audit results will be
uploaded.
1.3.12.3 Audit Download
The audit download function allows the download of fleet
information for use by the auditor. The output file is a predefined XML file
provided by Georgia.
To download information, the authorized user does the
following:
·
Select AUDIT DOWNLOAD from the Audit tab
·
Enter the ACCOUNT NO.
·
Enter the FLEET NO.
·
Enter the FLEET EXPIRATION YEAR

·
Select PROCEED to generate the file
·
A success message will appear at the top of the screen, select
the “Click Here” link to download the XML file to a local directory
·
Sample XML Download file
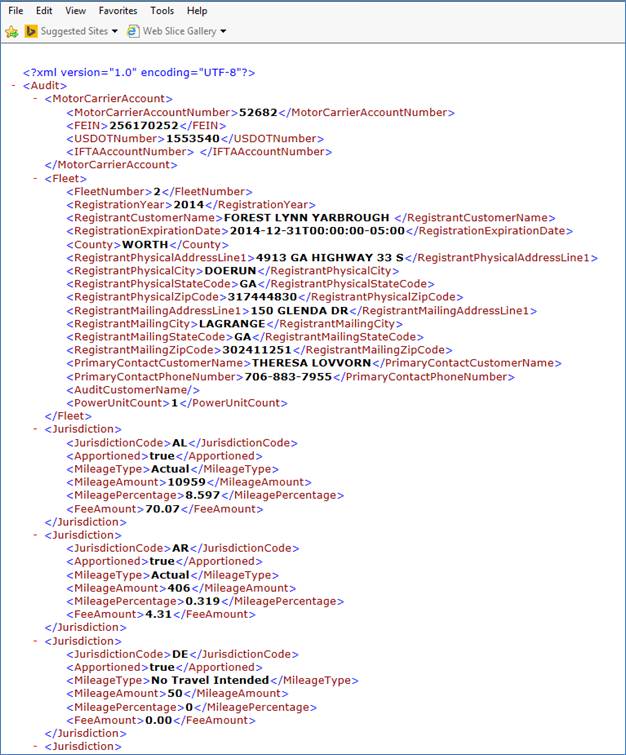
1.3.12.4 Audit
Select WIP
To do Work-in-Progress for Audit Selection, the authorized
user can do the following:
·
Select AUDIT SELECTION WIP from the AUDIT tab

·
Enter one of the following to identify the audit sample:
o Audit Year
o Sample ID
o Sample Name
o Auditor Name
·
Select PROCEED to display a list of samples that match the
criteria
·
Select the SAMPLE NAME to continue with the audit sample

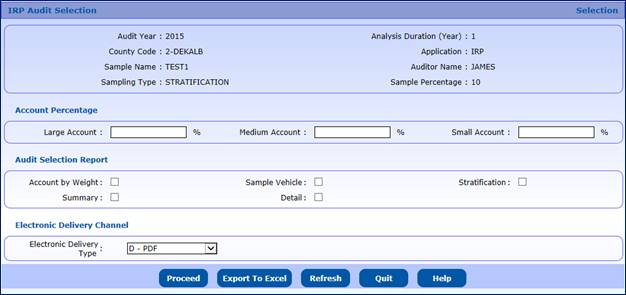
·
Audit Percentage section can be used to produce only a percentage
of accounts from the sampling – these are not mandatory fields and can be left
blank
·
Select at least one Audit Selection Report available:
o Audit by Weight
o Sample Vehicle
o Stratification
o Summary
o Detail
·
Select PROCEED to display a list of samples that match the
criteria
To do perform an Audit by Fleet or Distance, the authorized
user can do the following:
- Select PROCESS AUDIT FLEET/DISTANCE from the AUDIT tab
- Enter all the required data fields including:
- Account No.
- Fleet No.
- Fleet Expiration Year
- Fleet Expiration Month
- Distance Period FROM and TO dates
- Audit Assigned Date
- Click the PROCEED button to process create the report
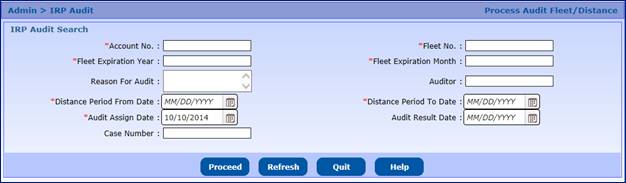
To create the Apportioned Vehicle list do the following:
·
Select Carrier Report Vehicle List from the ADMIN -> IRP Audit
tab

·
Enter FLEET EXPIRATION YEAR
·
select PROCEED to
create the report
·
An Excel Spreadsheet is provided with the list of carriers and
applicable information
|
Supplement
Abbreviation
|
Supplement
Description
|
Vehicle
Service Abbreviation
|
Vehicle
Description Abbreviation
|
|
AAC
|
New Account
|
AAC
|
New Customer Account
|
|
AFF
|
Fleet to Fleet Transfer
|
AFF
|
Fleet to Fleet – From
|
|
XFF
|
Fleet to Fleet Transfer
|
AFT
|
Fleet to Fleet – To
|
|
AFL
|
New Fleet
|
AFL
|
Add Fleet
|
|
AJU
|
Add Jurisdiction
|
AJU
|
Add Jurisdiction
|
|
AVE
|
Add Vehicle
|
AVE
|
Add Vehicle
|
|
AXV
|
Transfer Plate
|
AXF
|
Add with Transfer – From Vehicle
|
|
AXV
|
Transfer Plate
|
AXT
|
Add with Transfer – To Vehicle
|
|
CFF
|
Change Carrier Type
|
CFF
|
Change Carrier Type
|
|
CFN
|
Change Name
|
CFN
|
Change Fleet Name
|
|
CMB
|
Combined
|
AVE
|
Combined – Add Vehicle
|
|
CMB
|
Combined
|
CVF
|
Combined – Change/
Amend Vehicle Fee
|
|
CMB
|
Combined
|
DEV
|
Combined – Delete Vehicle
|
|
CVF
|
Amend Vehicle with Fee
|
CVF
|
Change/ Amend Vehicle with Fee
|
|
CVN
|
Amend Vehicle No. Fee
|
CVN
|
Change/ Amend Vehicle No. fee
|
|
CWT
|
Update Weight Group Weight
|
CWT
|
Change Weight
|
|
DEV
|
Delete Vehicle
|
DEV
|
Delete Vehicle
|
|
EOD
|
Error Correction – DO Vehicle
|
AVE
|
Error Correction – Add Vehicle
|
|
EOU
|
Error Correction – UNDO Vehicle
|
|
|
|
RCC
|
Replace Cab Card
|
RCC
|
Replace Cab Card
|
|
REI
|
Reinstatement
|
|
Reinstatement
|
|
RTG
|
Replace Plate
|
RTG
|
Replace Plate
|
|
RWC
|
Renewal
|
AVE
|
Renewal – Add Vehicle
|
|
RWC
|
Renewal
|
CVF
|
Renewal – Amend Vehicle
|
|
RWC
|
Renewal
|
DEV
|
Renewal – Delete Vehicle
|
|
RST
|
Replace Validation Sticker
|
RST
|
Replace Validation Sticker
|
|
VCV
|
VIN Correction
|
VCV
|
VIN Correction
|
|
EOD
|
Do Distance
|
|
Error Correction – Do Distance
|