
Georgia Trip Permit User Guide
Volume 1
HOME Level
Prepared for
Department of Revenue
State of Georgia
April 14, 2017
Celtic Systems
8961 E. Bell Road
Suite 101
Scottsdale, AZ 85260
Revision History
|
Version |
Date |
Name |
Description |
|
.01 |
|
|
First Draft |
|
|
|
|
|
GA Trip Permit Guide, Version 1.00
Document release date:
This manual and the software described in it are furnished under license and may be used or copied only in accordance with the terms of the license. The content of this manual is for informational use only, is subject to change without notice, and should not be construed as a commitment by Celtic Systems. Celtic Systems assumes no responsibility or liability for any errors or inaccuracies that may appear in this manual.
Celtic Systems
8961 E. Bell Road, Suite 101
Scottsdale, AZ 85260
Table of Contents
4.1.Cart Management Transaction Search page
8.WIP(Work in Progress) Trip Permit
12.Trip Permit Customer Inquiry
1. Request Trip Permit User
The Request Trip Permit User page allows users to request a User ID and Password credentials. Once the user receives their credentials, they will be able to log into the Trip Permits application, enter the motor carrier information for the trip permit and pay the required fee online. After successful collection of fees, a trip permit will be emailed to the user.
1.1.User Detail Screen

Fields description:
1) Email Address/User ID: A valid email address should be entered. Future Trip Permits will be sent to this email address. Click on “Check If Exists” button to ensure that the User ID is not present in the Trip Permit system
2) Password: Password should be between 8 – 12 characters long with one lowercase letter, one uppercase letter, one number and one special character
3) Confirm Password: Reenter Password
4) Customer Name: Enter Customer Name
5) TIN: User should enter their valid Tax Identification Number (TIN)
6) Phone No: Enter valid Phone Number
7) Address section: Enter valid address in the Address section. All fields are mandatory.
8) Verify: Check “I’m not a robot” checkbox before selecting PROCEED
9) PROCEED: After entering all the required information, select the PROCEED button. The verification page will be displayed. After verifying all the information, the user should select PROCEED to create the Trip Permit User ID.
2. Generate Trip Permit
Trip Permits allow a carrier to travel in Georgia on a temporary basis. There are three types of permits: Motor Fuel Use Tax Permit, IRP Trip Permit and IRP Hunter’s Permit.
1) Motor Fuel Use Tax Permit - If you need to travel out-of-state before you receive your IFTA credentials, you must purchase fuel trip permits to travel in IFTA jurisdictions and for your reentry into Georgia. Your Georgia Motor Fuel Use Tax Permit must be purchased and validated before you reenter the state. The Motor Fuel User Permit is valid for 10 days.
2) IRP Trip Permit - A 72-hour IRP Trip Permit is required for out-of-state based vehicles with non-apportioned license plates and those with IRP apportioned licensed plates which are not apportioned for Georgia. Permits must be secured prior to entry and must remain with the vehicle while in the state. Trip permits allow interstate and intrastate operation in Georgia.
3) IRP Hunter’s Permit - This permit is valid for seven (7) days. Georgia based owner-operator who was previously leased to a motor carrier and whose current year tag was in the carrier’s name but is no longer leased to them, and as a result has no IRP registration. This permit allows an operator to move his empty vehicle from place to place, as needed, in looking for employment. Other states will recognize a valid Georgia Unlade Vehicle Registration- Hunter Permit.
Search Screen

Key Field Description: “Generate Trip Permit” Search page
a) PROCEED: PROCEED displays a list of active Trip Permits for the user. User can select a trip permit from the list and the trip permit information will be populated to the Trip Permit Data Entry screen. This will save the user time when creating a new trip permit
b) CREATE PERMIT: Creates a new Permit without defaulting information from an existing trip permit
3. Permit Data Entry Screen

Field Description: “Generate Trip Permit” Permit Data Entry page
If an existing permit was entered, the screen will be pre-populated with the information from the selected permit. User will have to validate some of the information on the screen by re-entering the information.
a) Permit Details section:
a. Permit Type dropdown: Select the type of Permit from the dropdown
b. Permit Eff. Date: Enter Permit’s Effective date
b) Safety USDOT: “Safety USDOT” is a required field and a valid Carrier USDOT #should be entered in this field. This should be the USDOT of the carrier responsible for safety of the vehicle
c) Vehicle Details section:
a. VIN: Enter valid VIN information. This field may be pre-populated, if the user selected an existing permit to create the new permit
b. Confirmed VIN: User has to reenter VIN information. System doesn’t allow user to copy and paste a VIN in this field.
c. Year: Enter year of the vehicle
d. Make: Select a make from the drop down for the vehicle
e. State of Registration: Select the state of registration for the VIN from the drop down
f. Unlade Weight: Enter Unlade Weight of the VIN
d) Insurance Details Section: Enter valid Insurance Details in this section. All fields are mandatory.
e) Operator Details Section:
a. Operator USDOT/TIN: If Operator is leased on to another carrier, either valid Operator USDOT or valid Operator TIN should be entered along with other required information
i. If Operator USDOT is selected, then only a valid Operator USDOT field should be provided
ii. If Operator TIN is selected, then a valid TIN along with Company Name, Address, City, State, Zip and Phone # should be provided
f) PROCEED: Select PROCEED after all the required information is entered on the screen to proceed to the verification page
g) QUIT: System will not save any information on the screen when QUIT is selected
Permit Data Verification Screen

Field Description:
a) PROCEED: Select PROCEED to proceed to the payment process
b) ADD to CART: “Add to Cart” adds a Trip Permit request in the cart. This is useful when a single payment has to be made for multiple trip permits
c) BACK: BACK displays the Trip Permit Data Entry page where user can update the Trip Permit data
4. Cart Payment
Permit transactions are added to a cart for the payment

If Trip Permit transactions are added in the cart, it will be listed on the screen. Otherwise, the user can select “Search” button to search Trip Permit transaction(s) present in the cart
After a cart is selected:
a. To remove a transaction from the cart:
1. Select the check box next to the transaction
2. Click the REMOVE button
b. To continue to add additional transactions to the cart, click the SAVE & QUIT button
c. Click PAY to perform the edits and display the validation screen
4.1.Cart Management Transaction Search page
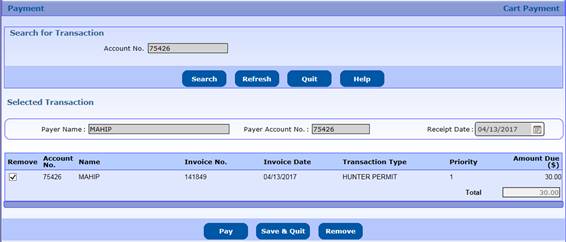
Field Description:
a) PAY: Continue with the Payment process
b) SAVE and QUIT: Saves the Trip Permit transaction(s) in the cart and quits from the Cart Payment screen
c) REMOVE: Remove Trip Permit transaction(s) from the cart
Cart Management Verification page

Field Description:
a) PROCEED button: Proceed to the Payment process
b) BACK: Goes back to Cart Management Transaction Search page
5. Cart Payment screen

Users can only make Trip Permit payment using Credit Card. A popup window will open after user selects Credit Card. After payment is made, amount will be reflected on Cart Payment screen.
a) PROCEED: Proceed to generate Trip Permit(s)
6. Trip Permit Reprint

This functionality is used to reprint a Trip Permit. Enter search criteria and select PROCEED. System will populate list of active Trip Permits in the grid. Select a Trip Permit to generate PDF version of the Permit.
7. Update Trip Permit Customer

This functionality is used to update Trip Permit Customer information. Following fields can be updated:
a) Phone No.
b) Fax No.
c) Address Details (Street, Zip Code, Jur, City, County)
8. WIP(Work in Progress) Trip Permit

Permits that were “Quit” from the Verification page can be picked up using this functionality to complete the Trip Permit payment process.
After entering required search criteria, select PROCEED button to fetch unfinished Permit records.
Select appropriate Permit No. to continue with the Trip Permit Generation. See section “Generate Trip Permit” for more details on how to generate Trip Permit.
9. Permit Inquiry

This functionality is used to perform Trip Permit Inquiry. Enter search criteria and select PROCEED. System will populate list of active Trip Permits in the grid. Select Permit’s VIEW link to open a popup with the Trip Permit details.

10. Trip Permit Issued Report

This functionality is used by internal user to generate Trip Permit Issued Report. Enter search criteria and select PROCEED. System will open an excel sheet with the Issued Trip Permit details.
11. Trip Permit Ledger Report

This functionality is used by internal user to generate Trip Permit Ledger Report. Enter FROM DATE and TO DATE, and select PROCEED. System will open Trip Permit Ledger PDF Report. This report contains Trip Permit transaction information along with credit card details.
12. Trip Permit Customer Inquiry

This functionality is used to perform Trip Permit Customer Inquiry. Enter search criteria and select PROCEED. System will populate Customer record in the grid. Select VIEW to open a popup with the Customer details.

13. Cancel Permit Payment

This functionality is by internal user to perform next day Trip Permit Payment Cancellation. Enter search criteria and select PROCEED. System will populate Permit records in the grid. Select PERMIT NO. to open a popup and click OK to continue with the cancellation.
![]()
14. Forget Trip Permit User ID

This functionality is used to obtain information if the Trip Permit User ID is forgotten, Enter TIN # and select PROCEED. User ID’s hint will be displayed on top of the entry page screen.
